These days pretty much everyone needs to know how to blur images; especially those who actively share content on social media. Say, you want to create a tutorial to post on your social media account, but it’s impossible to crop out all the personal information from some of the screenshots. The simple solution would be to hide this information by blurring it.
Many countries have laws and restrictions, the main goal of which is to protect the privacy of people online. They exist for a reason – we live in the world where AI face recognition exists, which can be used to get private information on anyone. And some people can use this kind of information for malicious purposes. So, be careful when sharing any kind of visual content online. Always make sure that all the info that can reveal where you work or live is hidden.
Also, you might need to blur a part of an image for aesthetic reasons. Maybe you took a photo with your smartphone and now too many details are in focus. You want to get rid of some distracting elements and bring all the attention to the main subject. Well, you can blur the background to achieve both of these things.
By blurring a part of an image, you can protect people’s privacy as well as avoid accidentally leaking sensitive information. And it’s super easy to do. Even a total beginner can tackle this task! You can blur a part of an image in Canva in three different ways. They will give you drastically different results, but all three will require little time and effort. Blurring objects in Canva is definitely less complicated than in Photoshop. In addition, the step-by-step instructions provided in this article will make things even easier for you by showing you exactly what needs to be done.
It’s worth noting right away that batch-processing is not available in Canva for free. Fortunately, here you will also learn about another browser-based app that can be used to easily blur objects in multiple images in one go.
If you are interested, keep reading.
How to Blur Part of an Image in Canva with a Blur Element
Before we begin, please note that you’ll need a couple of things to do any kind of editing in Canva. First, Canva is an online app, so you’ll need a browser and internet connection to use it. Second, Canva is a cloud-based editor, which means you will need to create an account or sign in, if you already have one. Canva has a free and a paid version, so it is possible to sign up for free.
Alright, let’s take a look at the first method to blur a part of an image in Canva. It’s surprisingly quick and easy. It will take you only a couple of steps:
- Once you signed in your account on Canva, click on the “Create a design” button in the upper left corner of the dashboard.
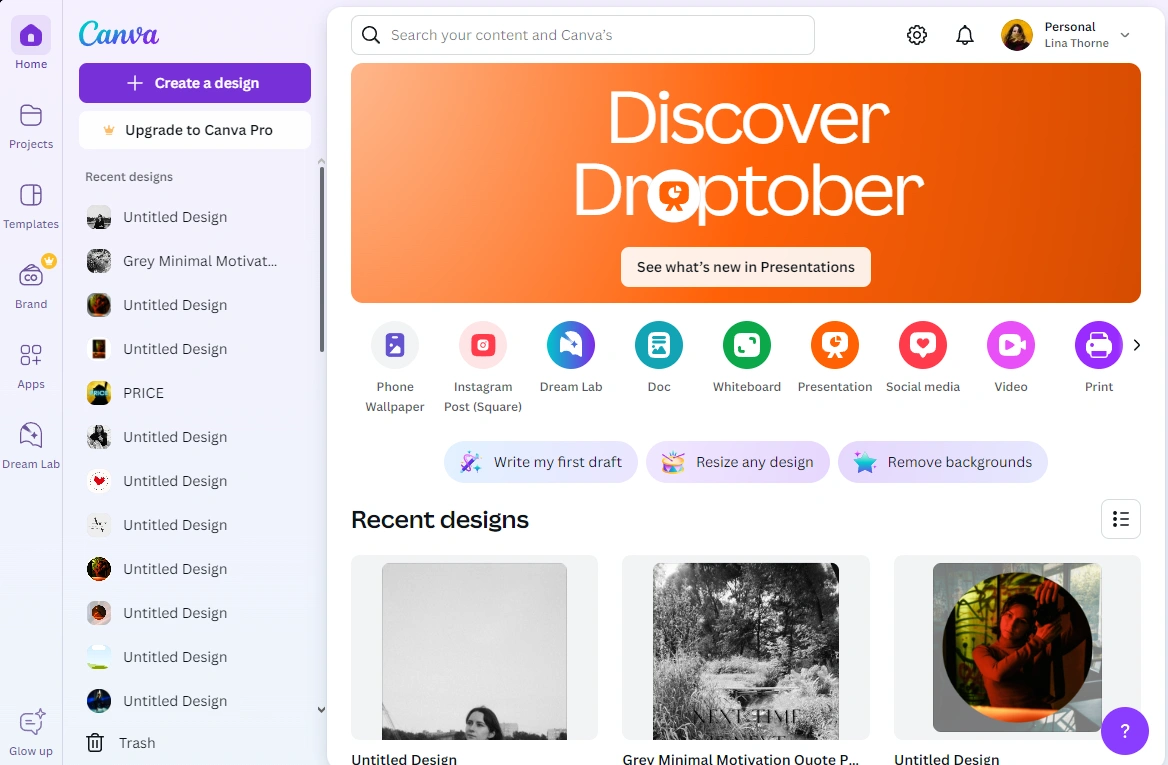
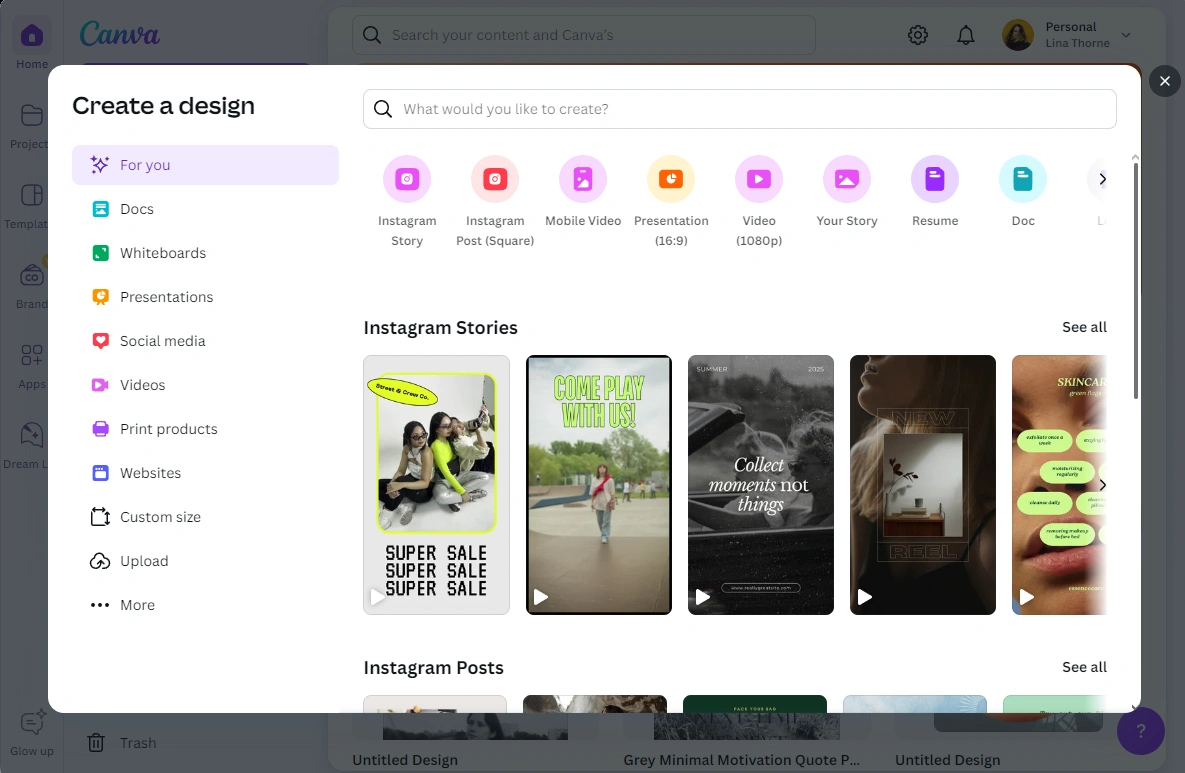
- Choose a template. For example, it can be an Instagram Story.
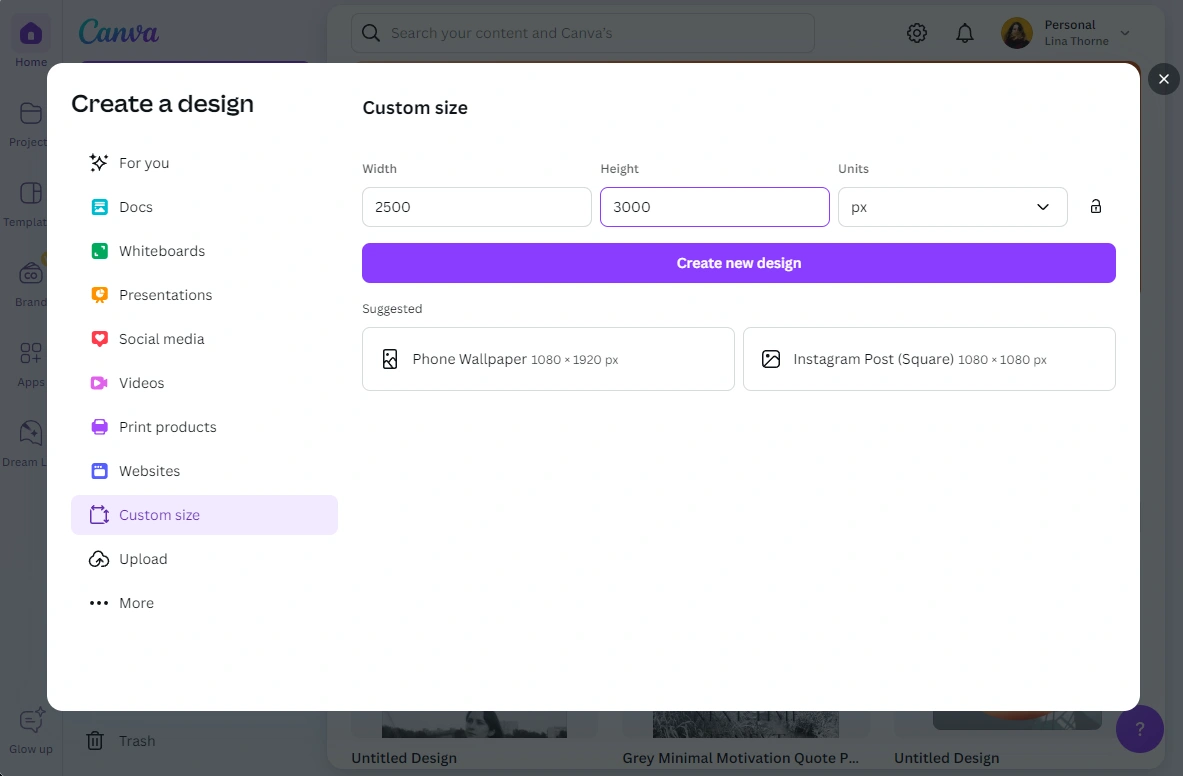
- If you want to enter your own pixel dimensions, pick the “Custom size” option, then enter the necessary values.
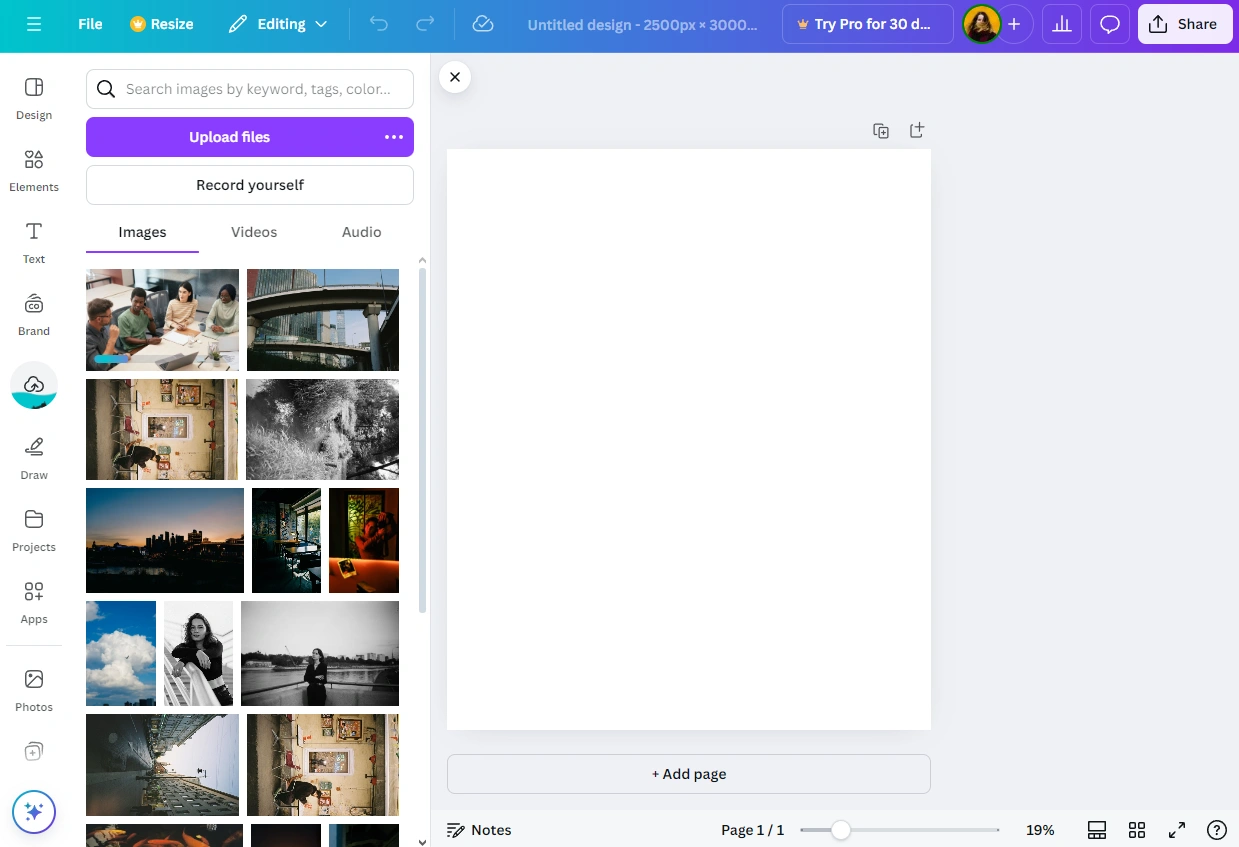
- Once the editor opens, you will see a blank template. In the bar on the left choose the Uploads sections and import the photo that needs to be blurred.
- Click on the uploaded photo to add it to your template. Then adjust its size, so that it covers the whole blank template.
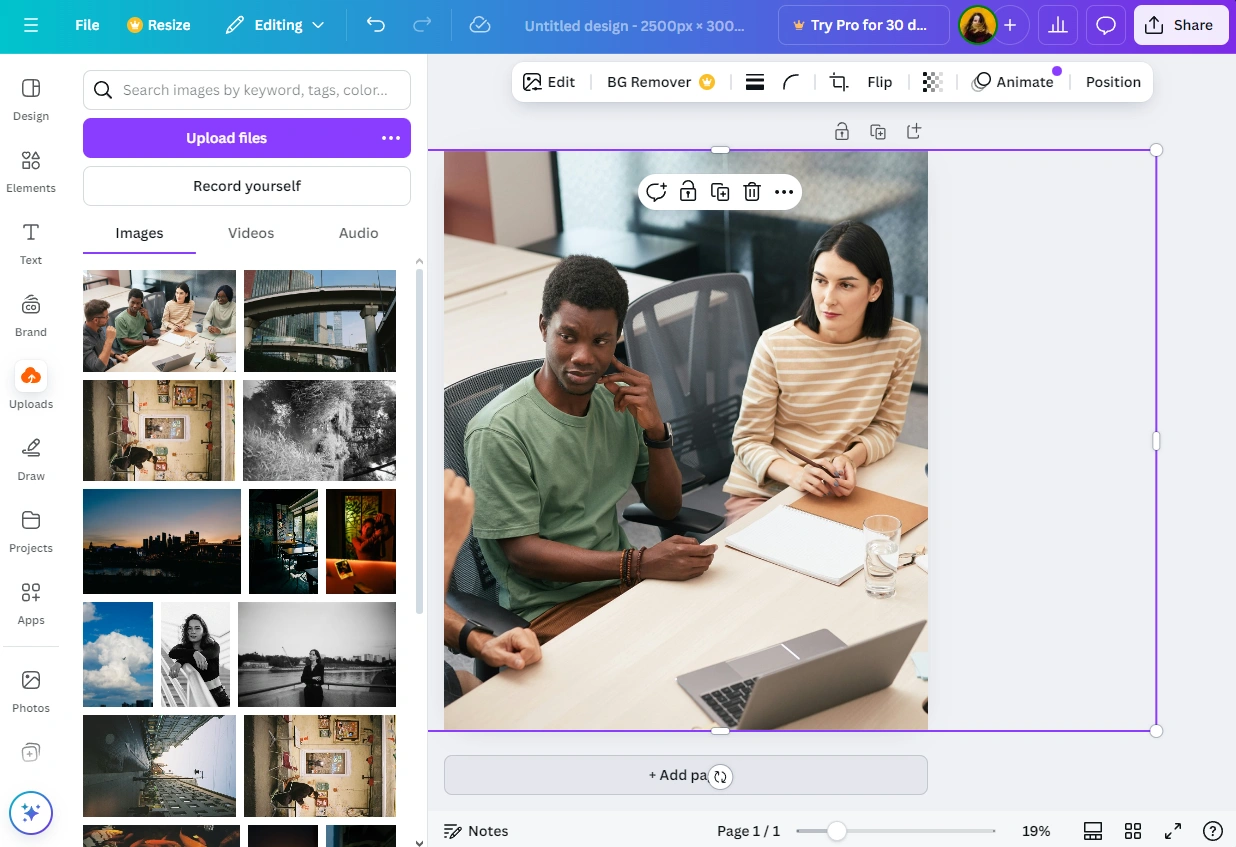
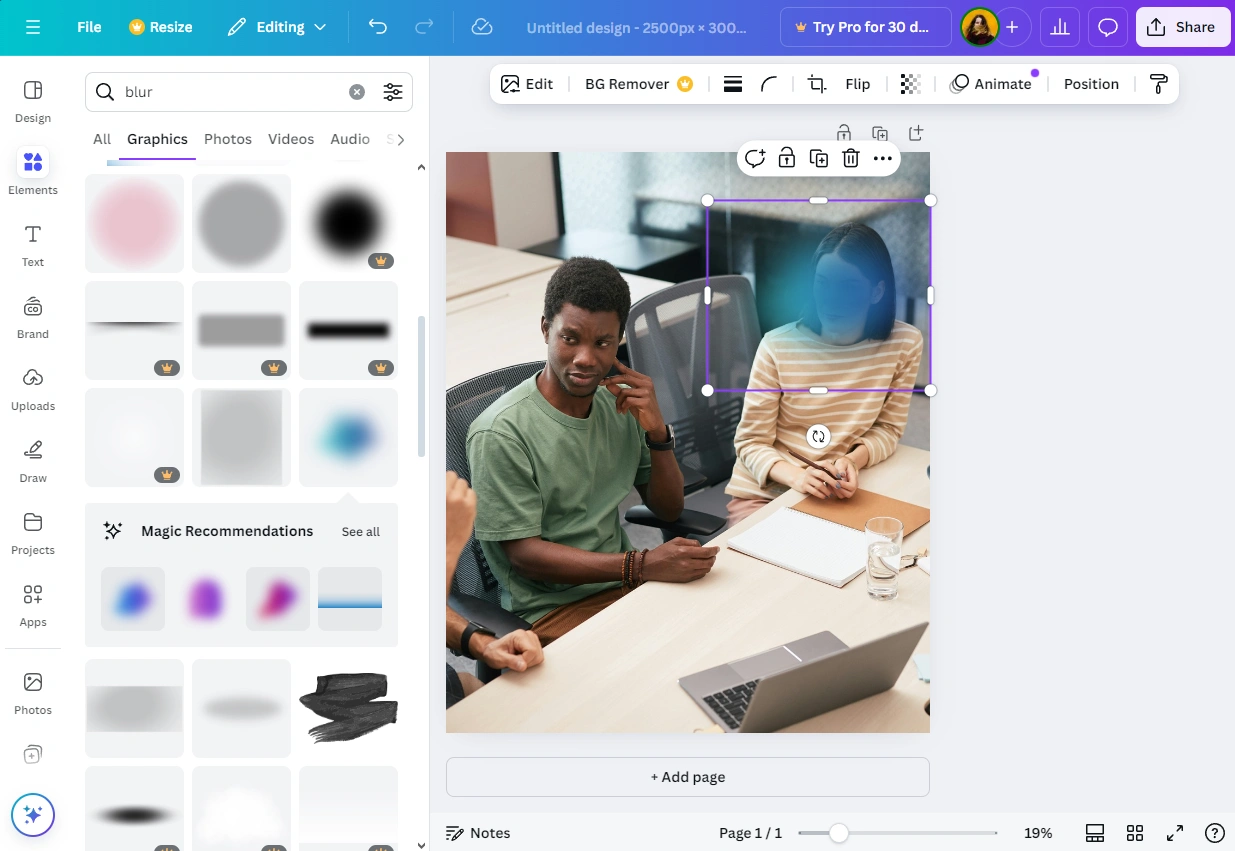
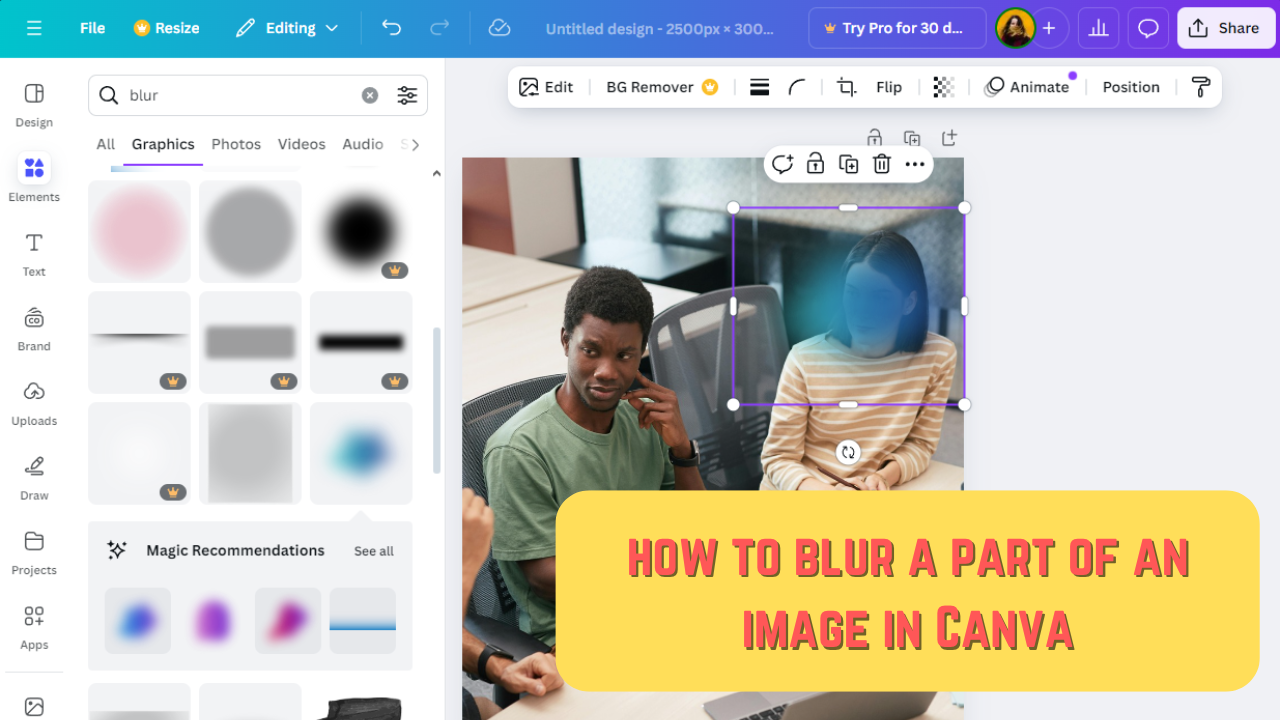
- Next, go to the “Elements” section and type in Blur in the search bar. You will see a selection of various blurs. Please note that all the elements marked with a crown are available only in Canva Pro.
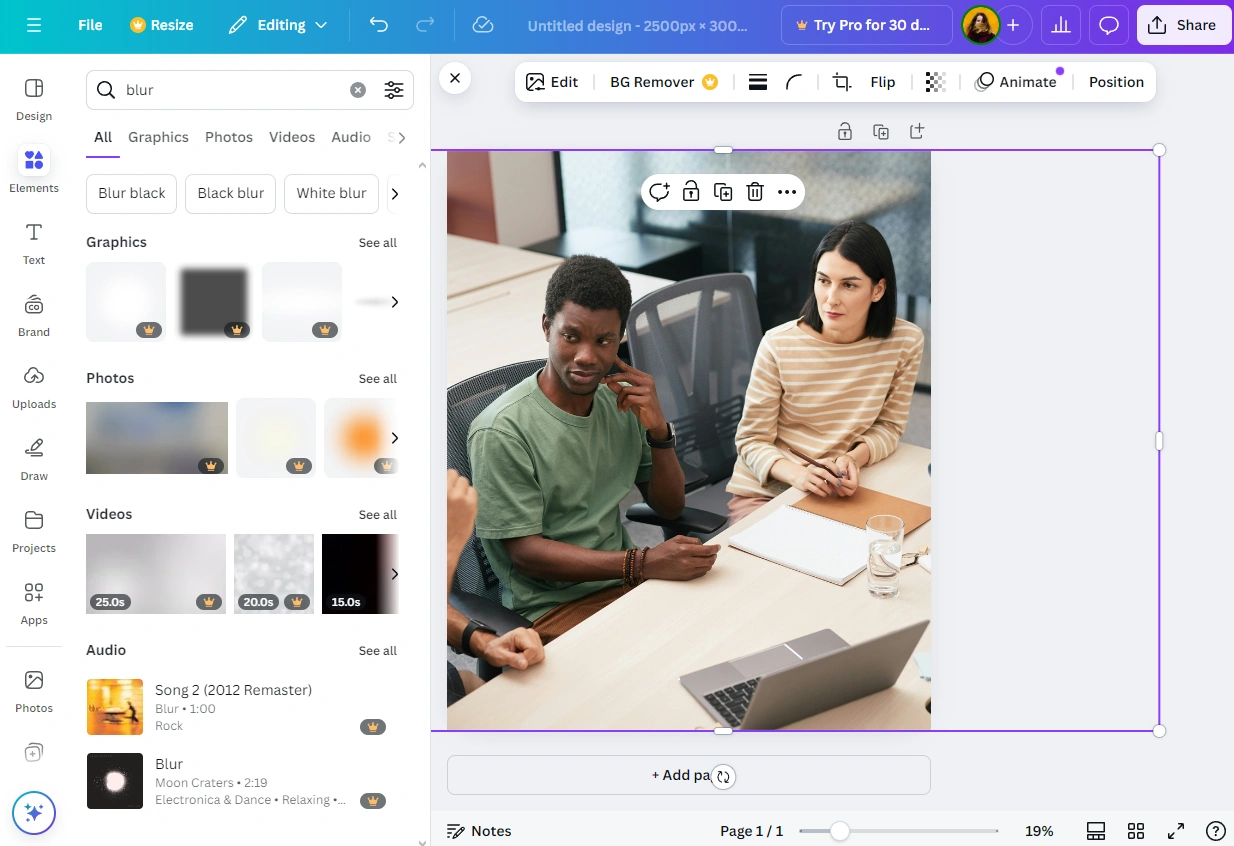
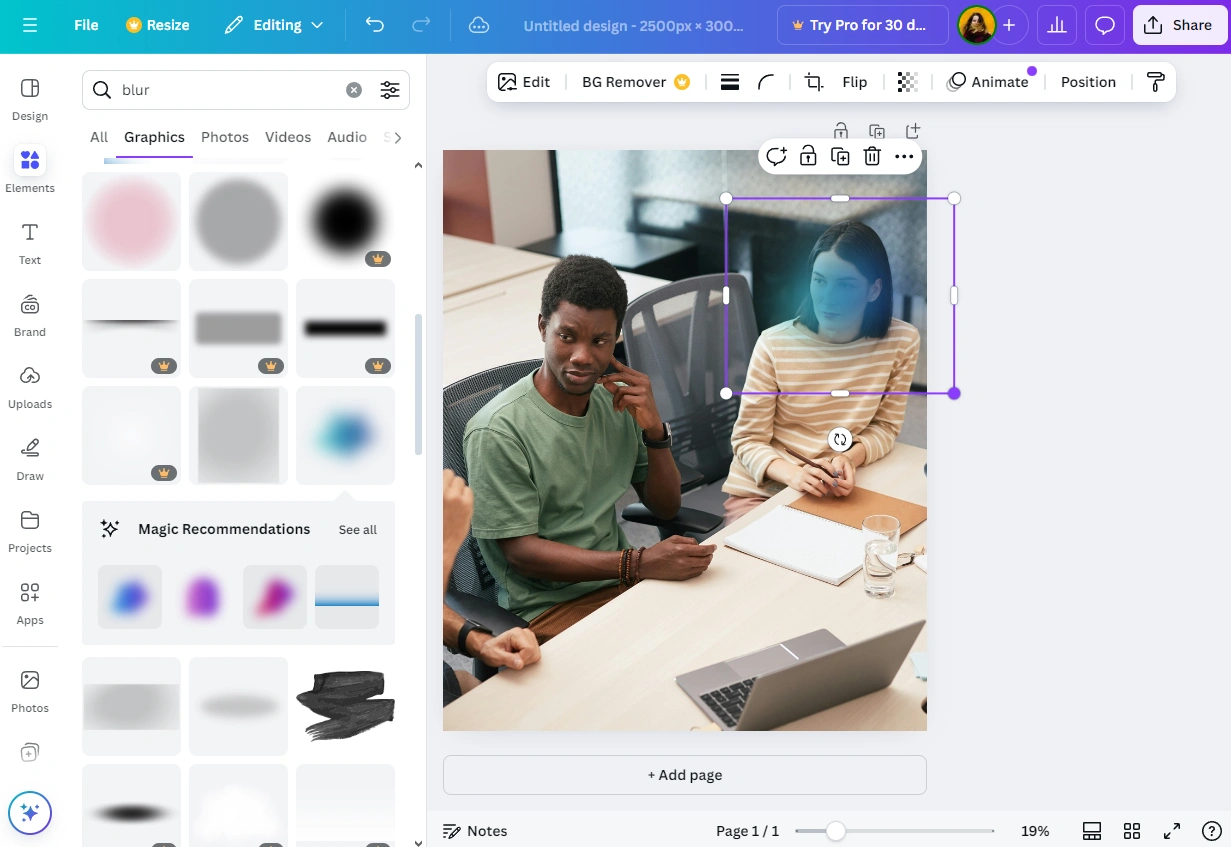
- Go to the “Graphics” category and choose a blur that you like. Once it appears on your image, drag it to the object that you want to conceal with the cursor.
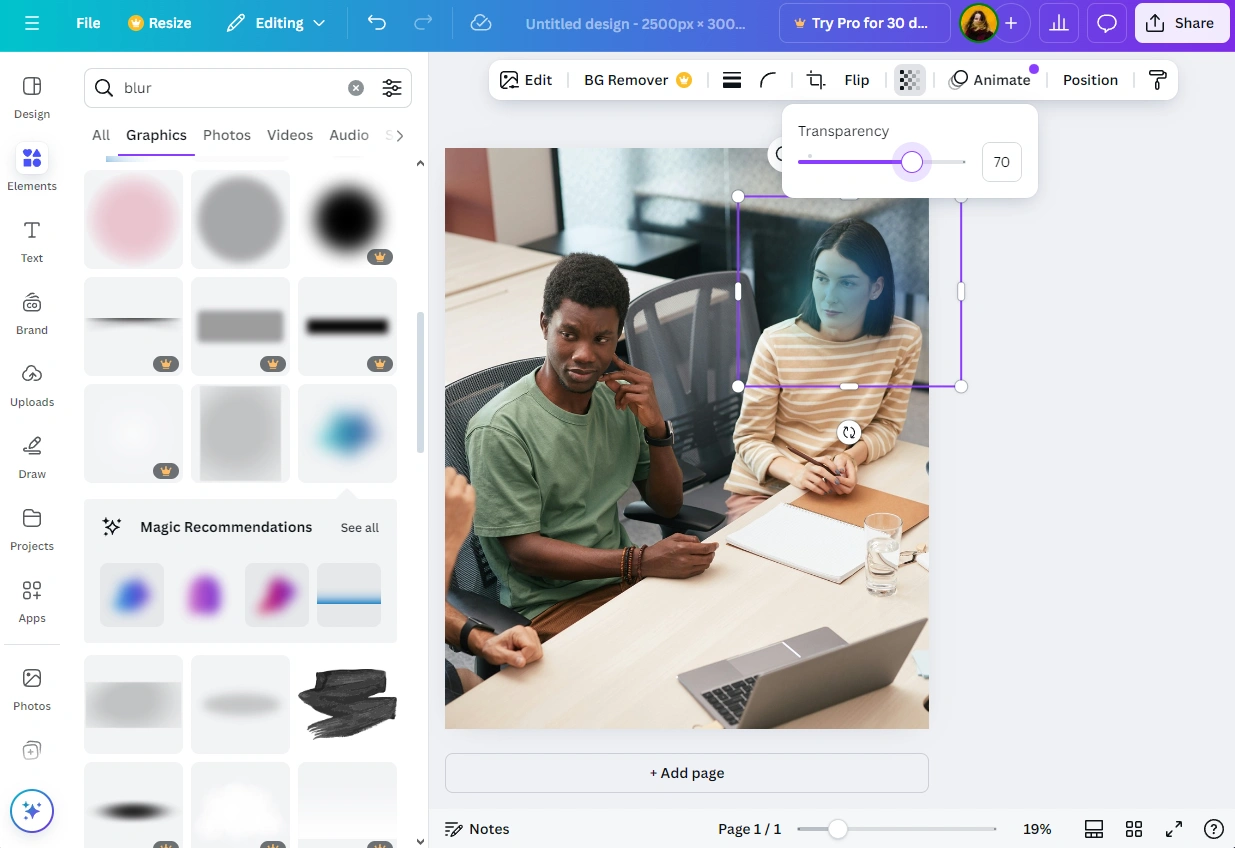
- Use the Transparency slider at the top to make your blur more transparent.
- If you need to make your blur more intense, add another Blur element on top of the first one.
And that’s it!
Obviously the main benefit of this method to blur an image in Canva is that it’s super quick and easy. In fact, it’s probably the easiest method in this article. Plus, there are a couple of options with colored blurs.
Adding a colored blur is quite unusual. However, if you use this method, you will get a blur that looks kind of amateurish. All the blurs that look more or less professional are available only in Canva Pro, so you’ll have to pay to use any of them. You won’t get much freedom with a shape here either.
If you need an unusual or quick way to conceal something in an image, you can go for this method. But if you need something more professional-looking, then the next method will be ideal for you.
How to Blur Part of an Image in Canva with Blur
This is the best method to blur a part of an image in Canva since it produces the most aesthetically-pleasing results, and you will have a lot more control here. Follow these steps:
- Click on the “Create a Design” button, then go to the “Upload” section and import the image that you want to blur.
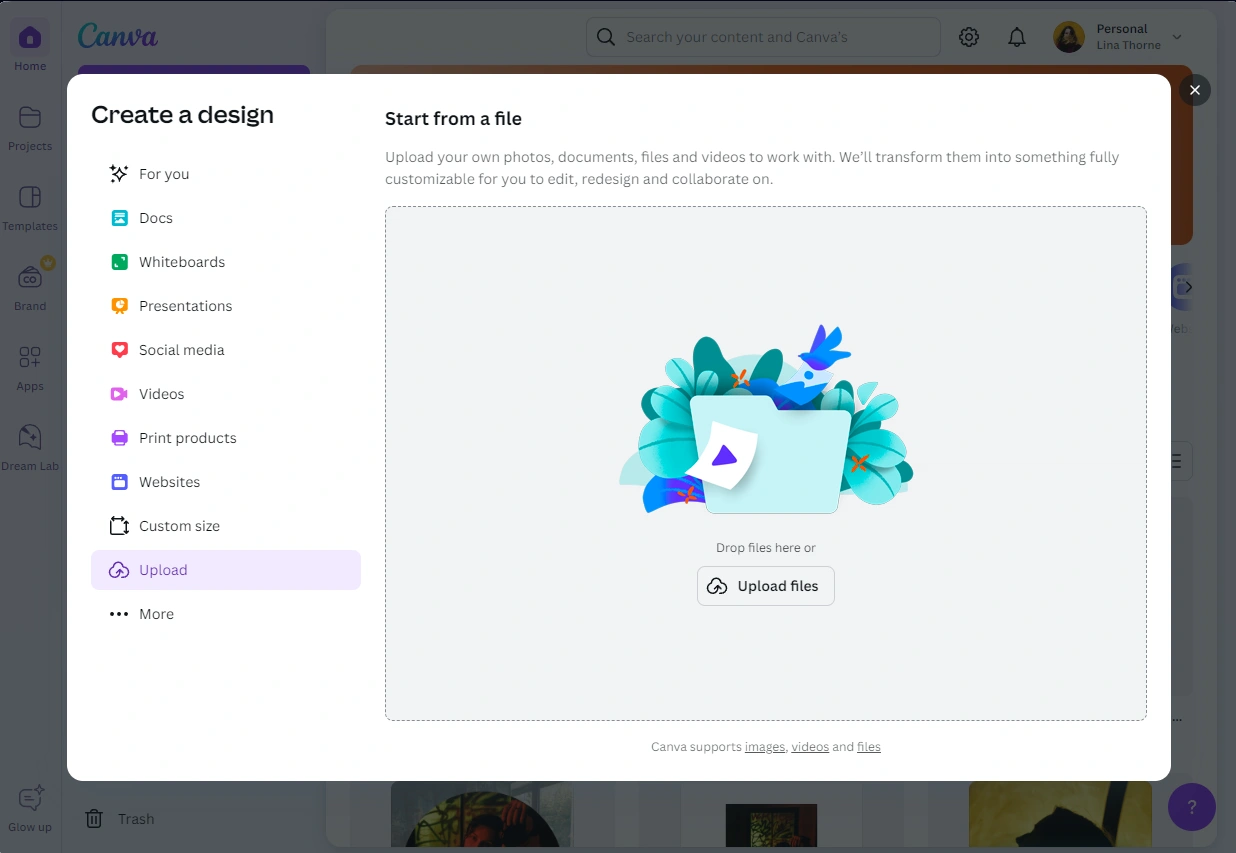
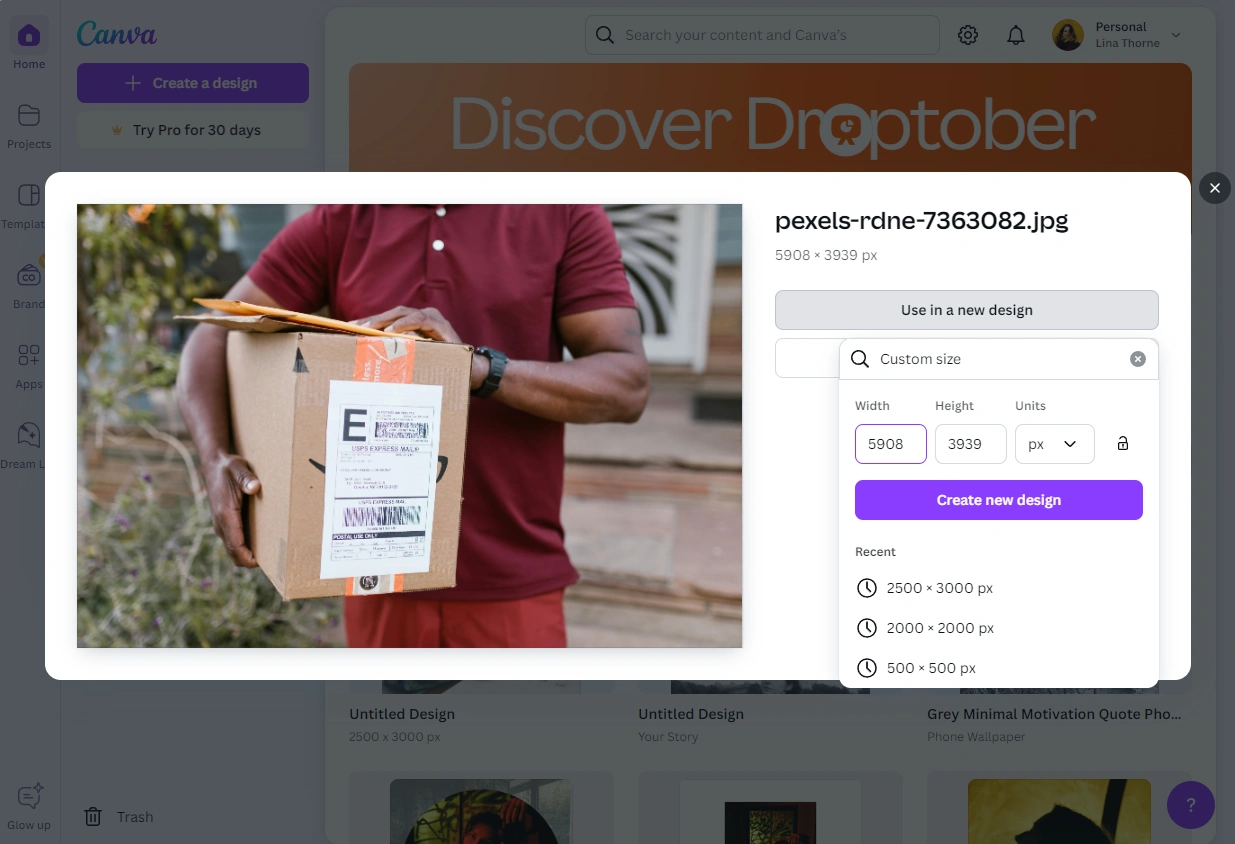
- Once it’s uploaded, click on the “Use in a new design” button. Change the pixel dimensions if necessary or keep them as is, then click on “Create new design”.
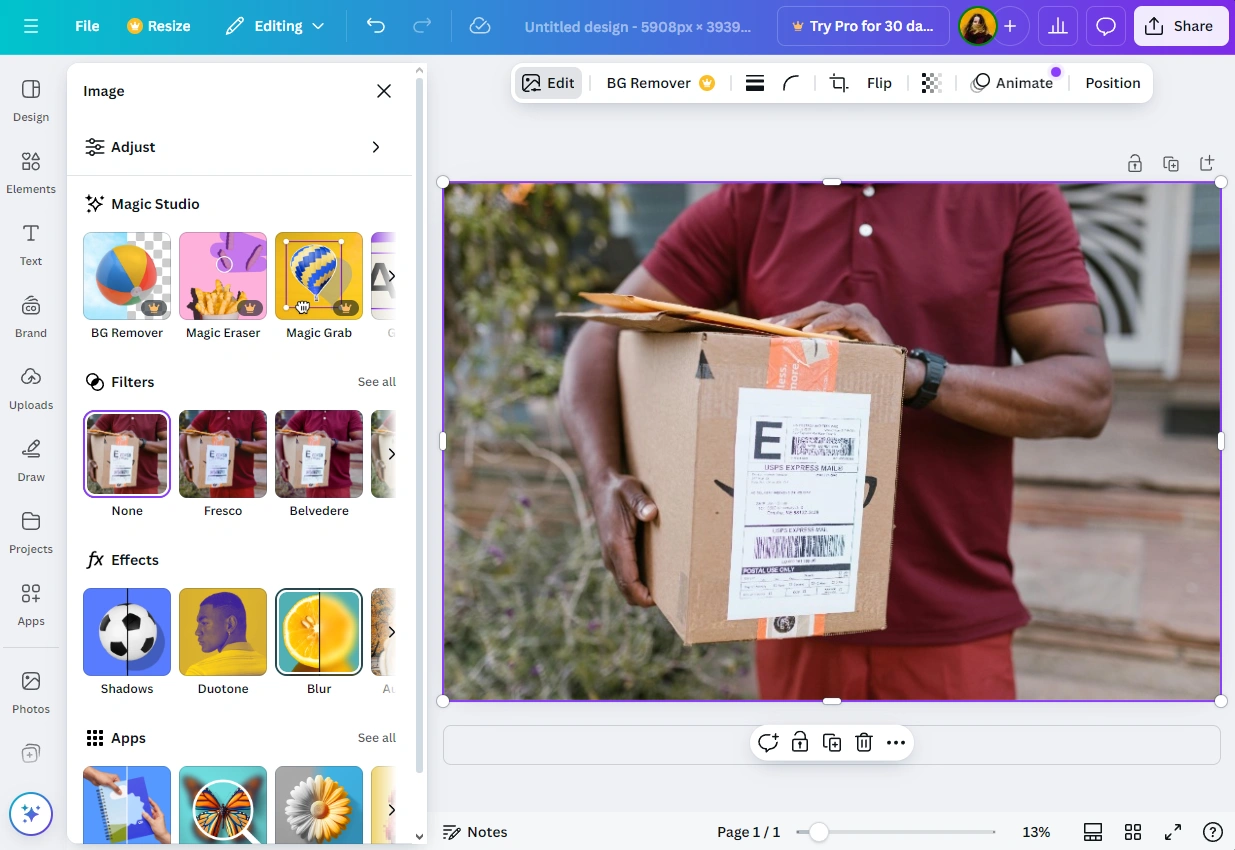
- When the editor opens, click on the photo to select it and hit the “Edit” button.
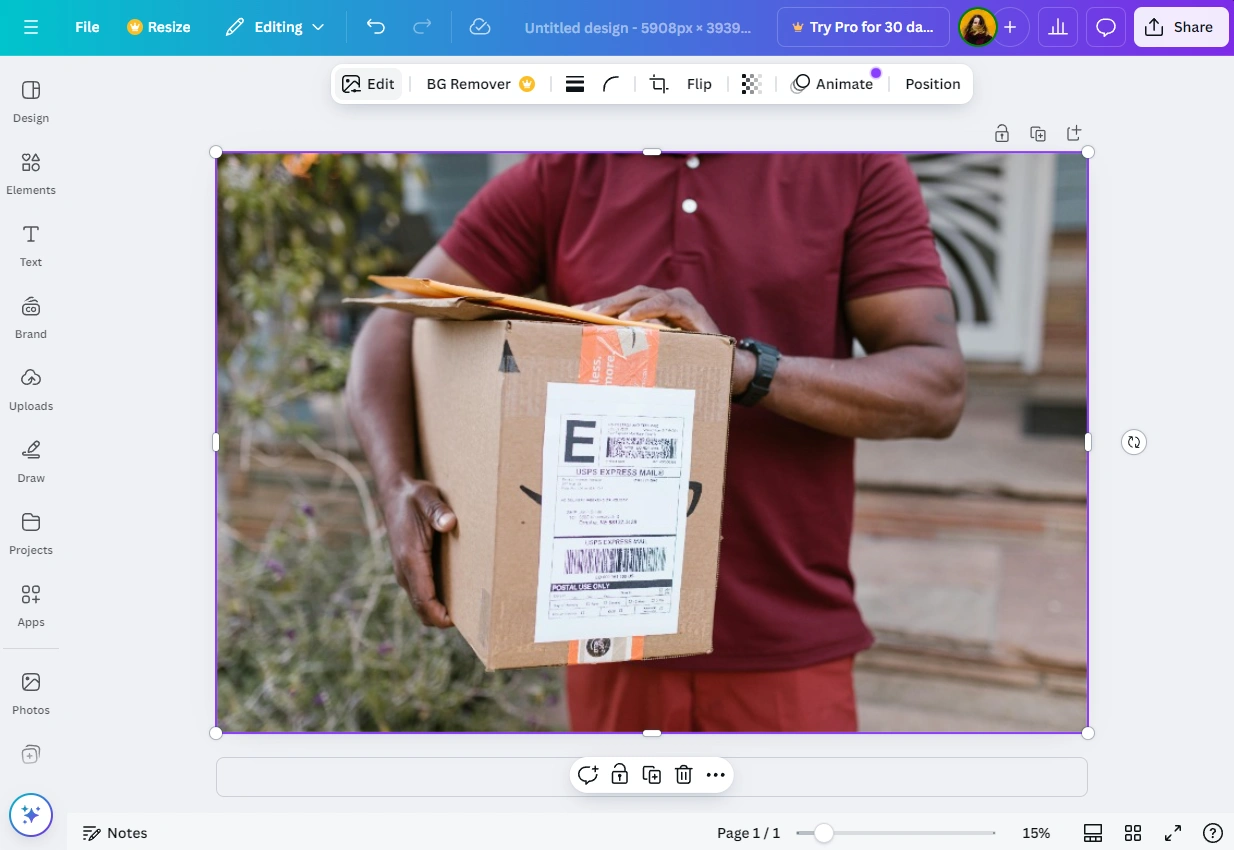
- Find the Effects section in the panel on the left, then search for the Blur effect.
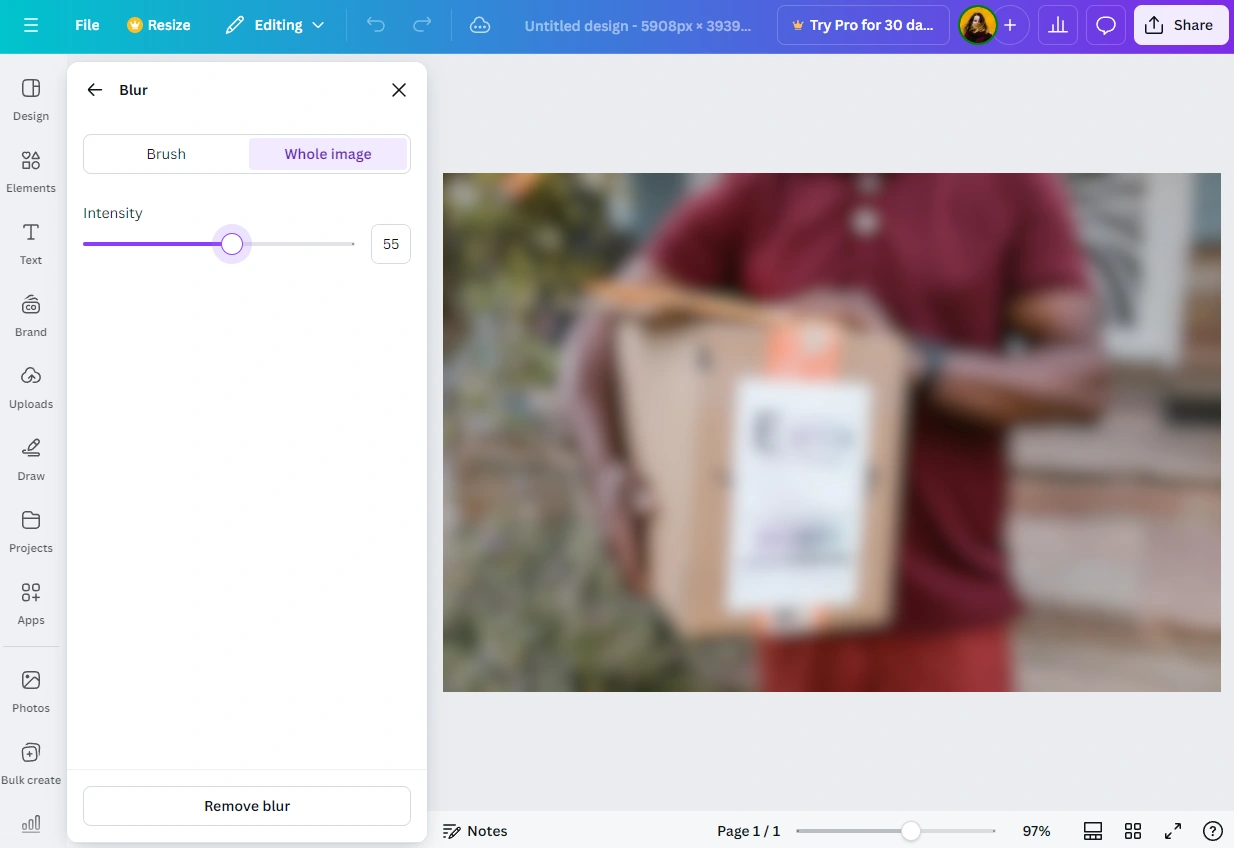
- Click on the “Whole Image”, then adjust the level of intensity, if you want your entire image to be blurred.
- Select “Brush” if you want to blur only a part of your image. Also, make sure that the “Add Blur” is selected.
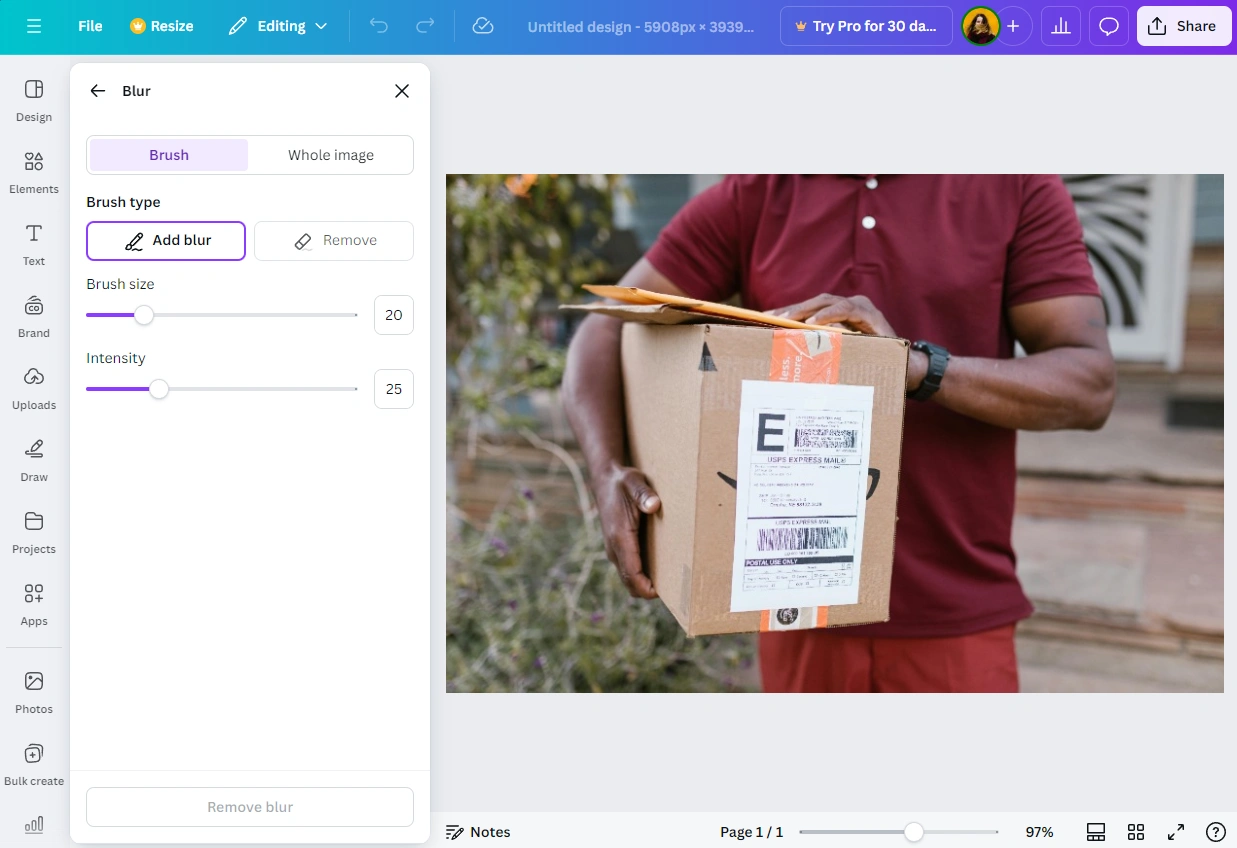
- With the Brush size slider, you can increase or decrease the size of the blurring brush.
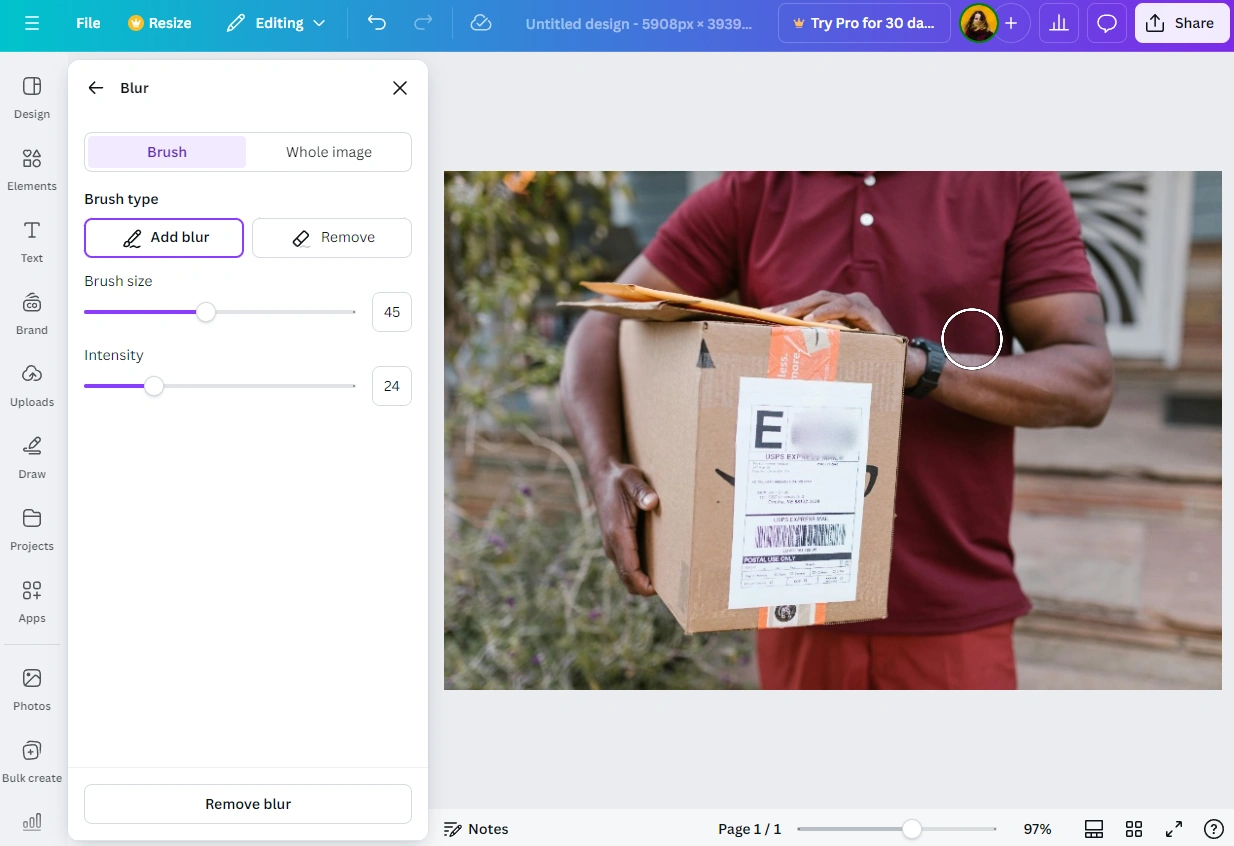
- If you need to erase a part of the blur, switch to “Remove”. Then paint over the area of the blur that needs to erased.
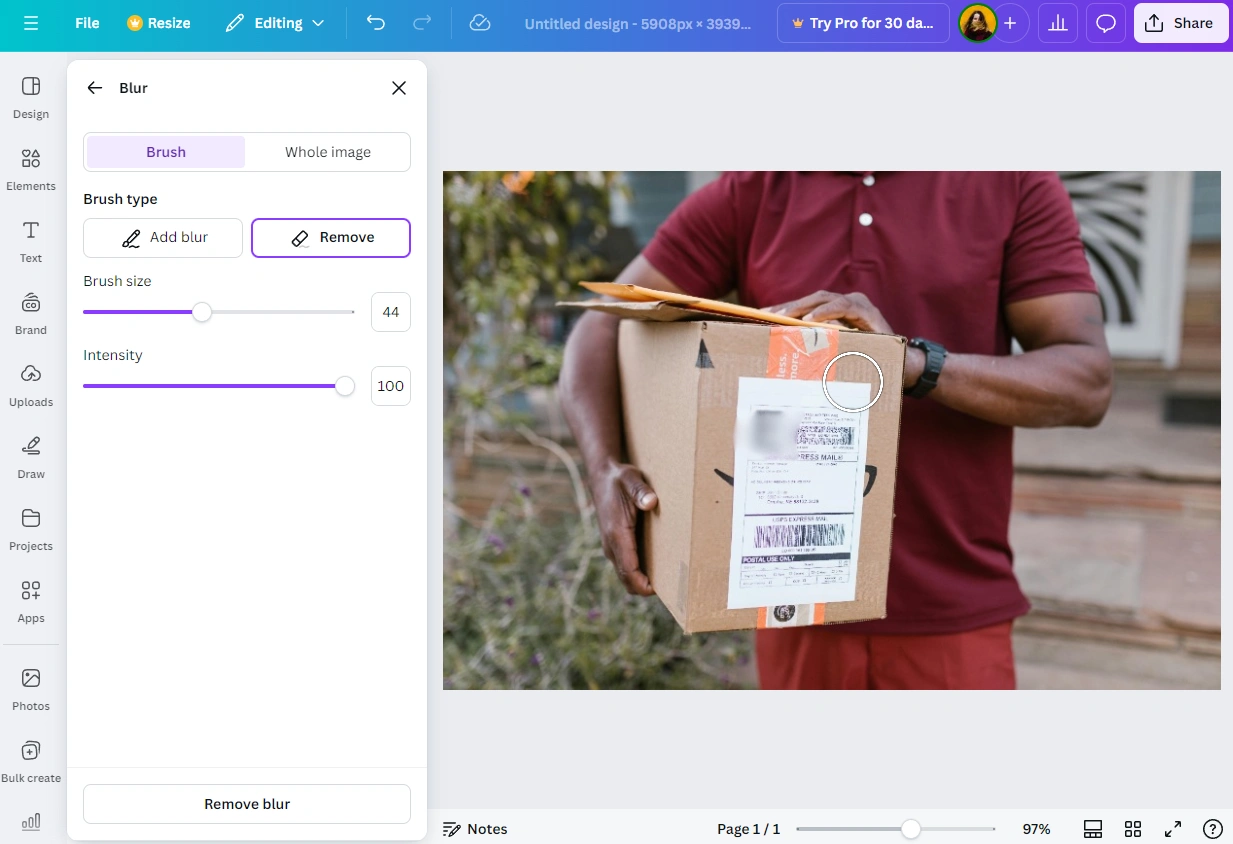
- The intensity slider allows you to make the blur more or less intense. Also, you can make the blur more intense by painting over the same area a couple of times. Keep in mind that you might need to experiment with different brush sizes and blur intensities to get the desired result.
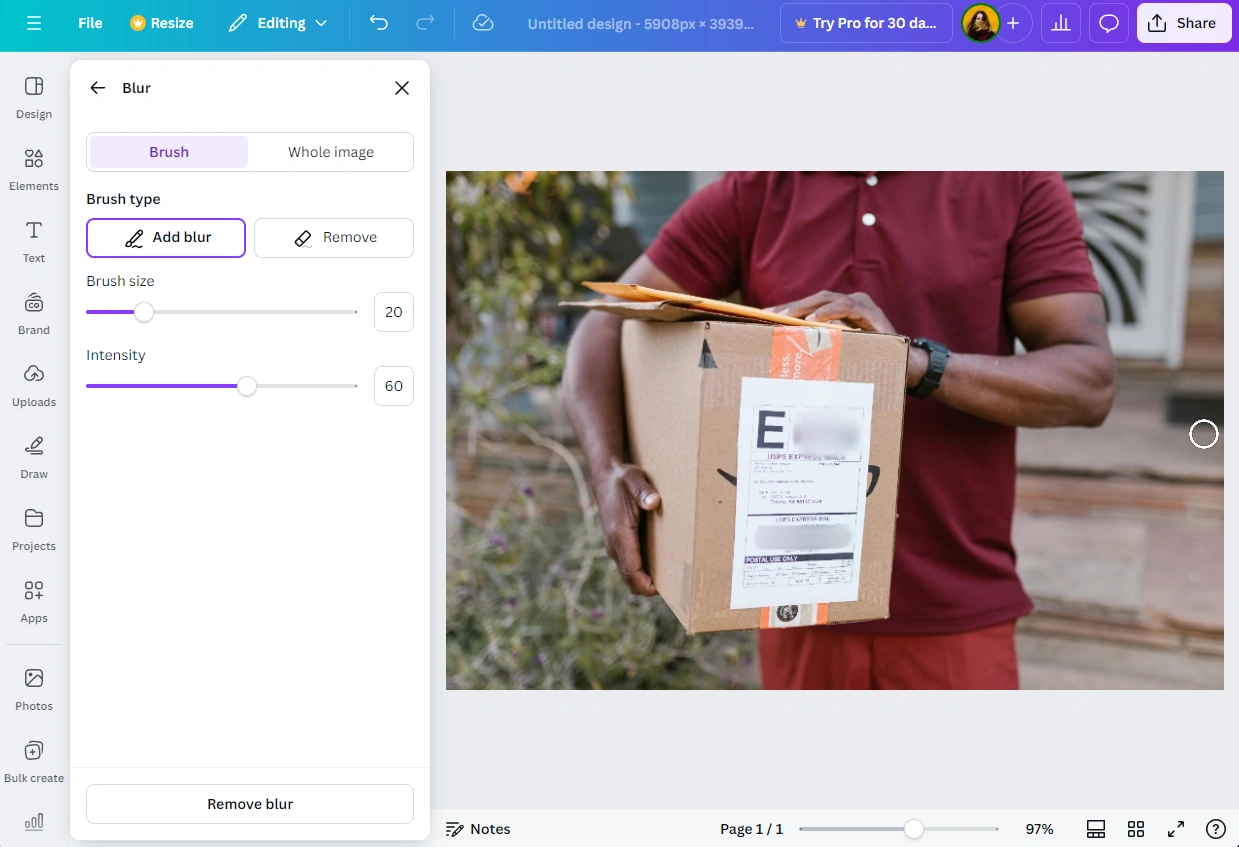
All done! Isn’t this method much better than the previous one?
How to Blur Part of an Image in Canva with Auto Focus
This method is different from the other two because here you will be able to blur the background and a little bit of the foreground. It kind of creates a shallow depth of field. Don’t worry, it’s pretty easy. Just do the following:
- Import the photo that you want to blur into the app. You can use either of the two methods mentioned above. Then select the photo by clicking on it and click on the “Edit” button.
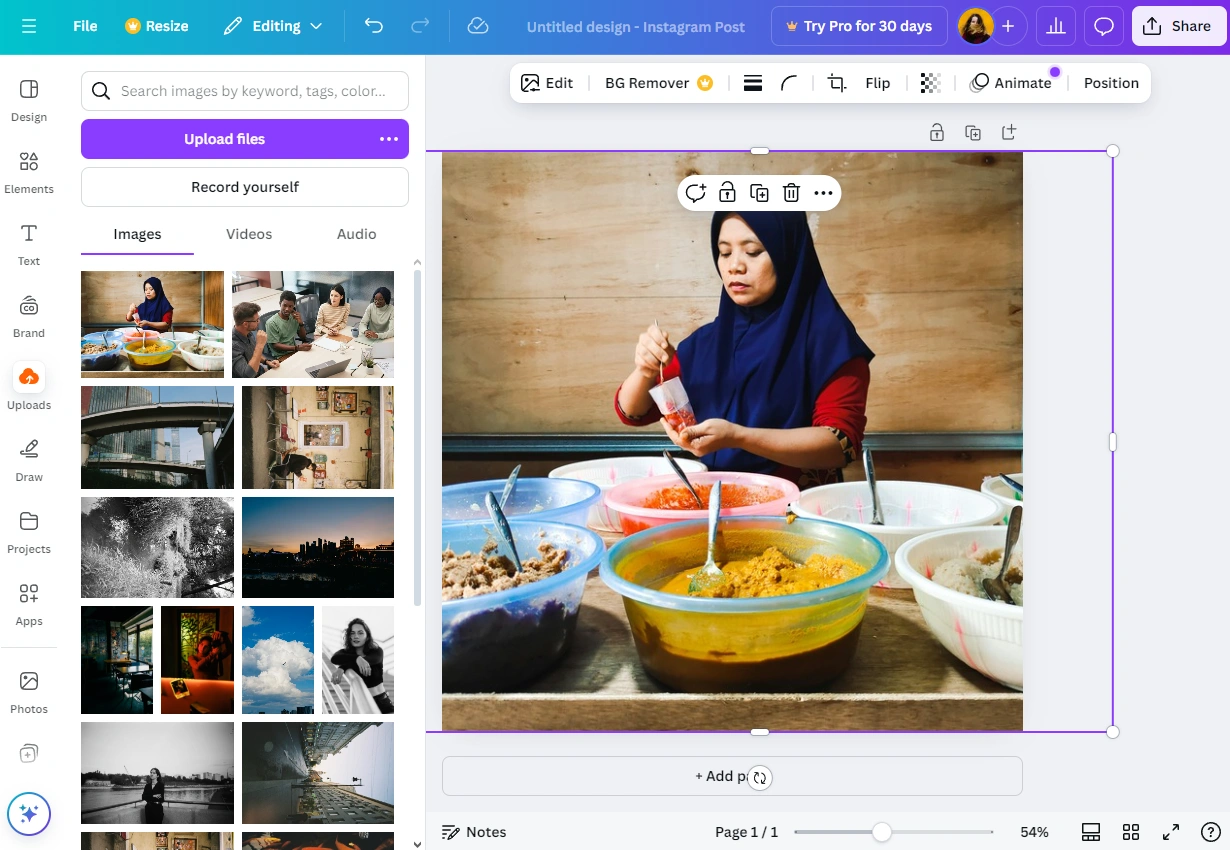
- In the panel on the left go to the “Effects” section and find “Auto Focus”, then click on it and wait for the app to analyze your image.

- Use the Blur Position slider to adjust the selection that’s not affected by the blur. Canva tries to do its best to determine what the main subject is, but it’s not always accurate. So, you might need to do some tweaking.
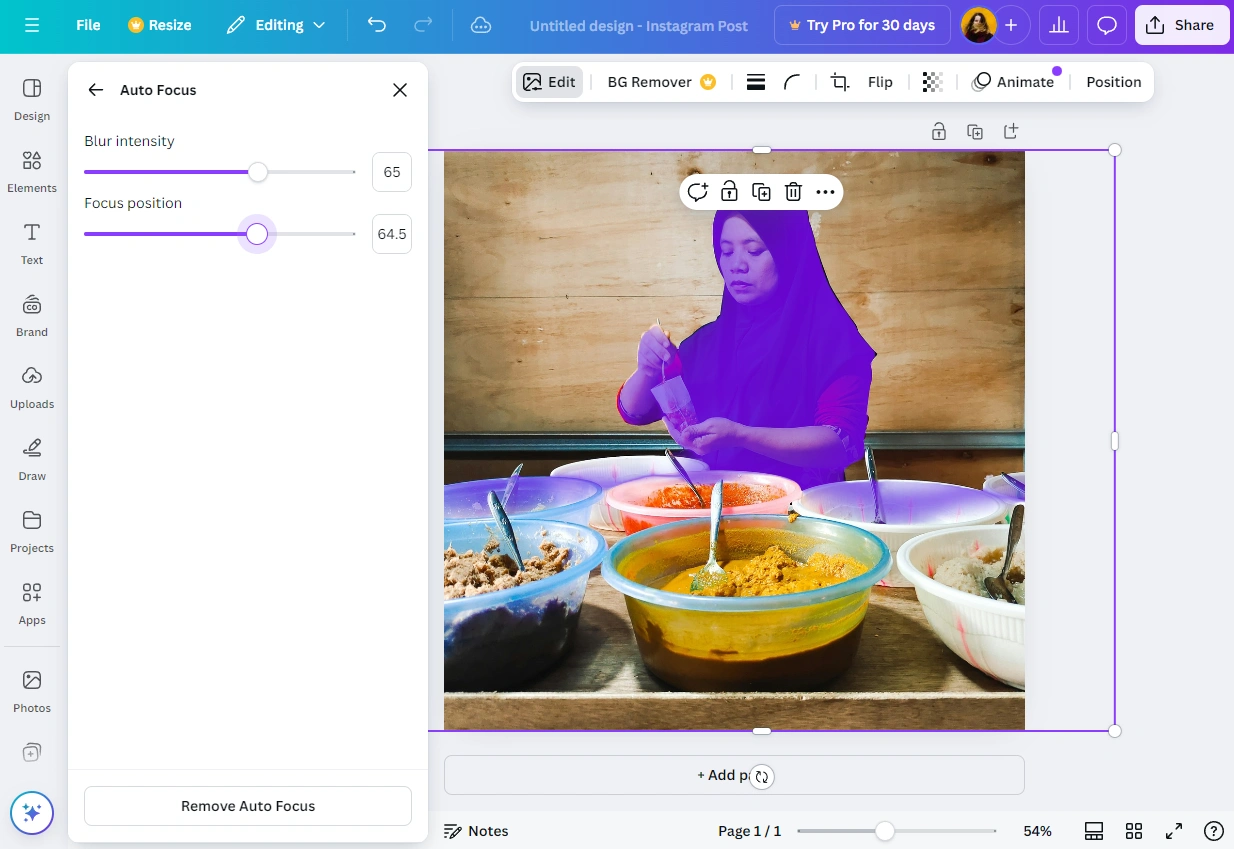
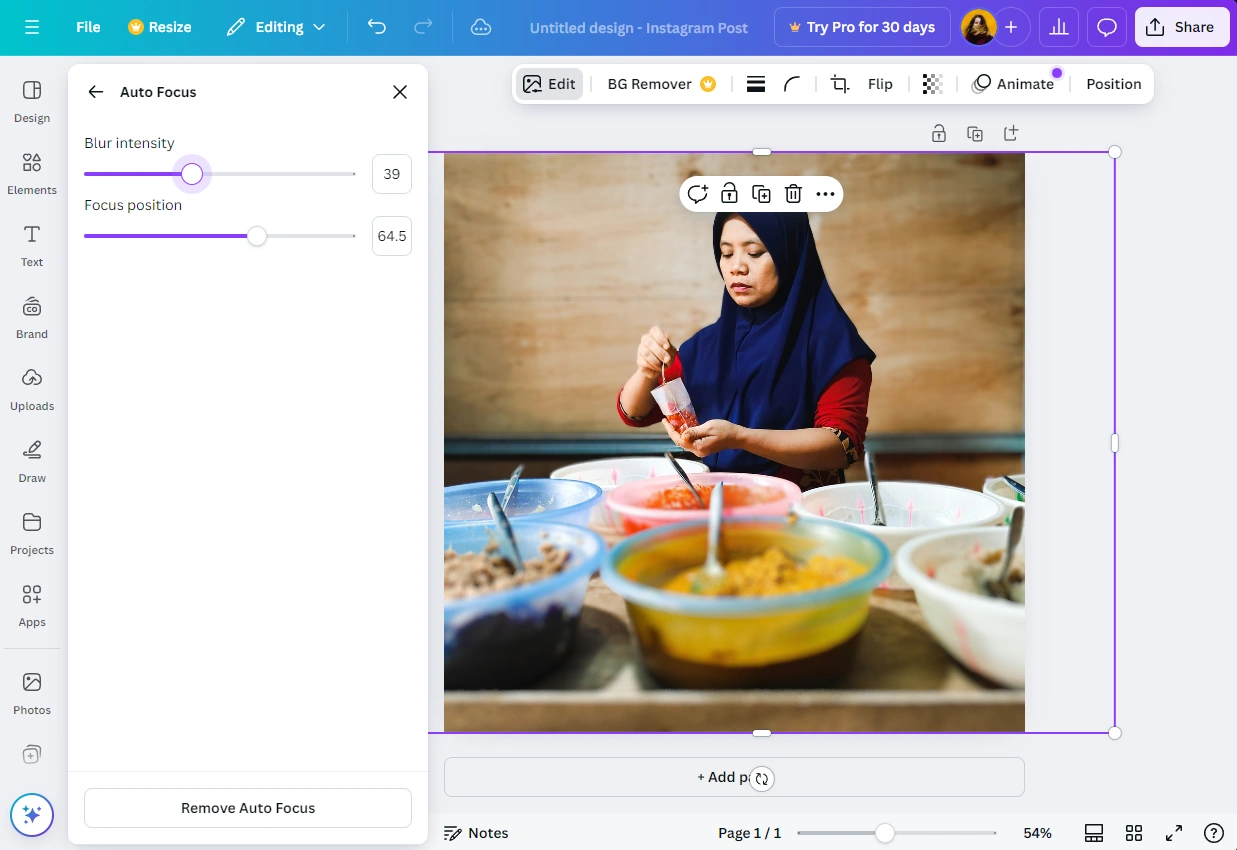
- Toggle the Blur Intensity slider to increase or decrease the intensity of the blur.
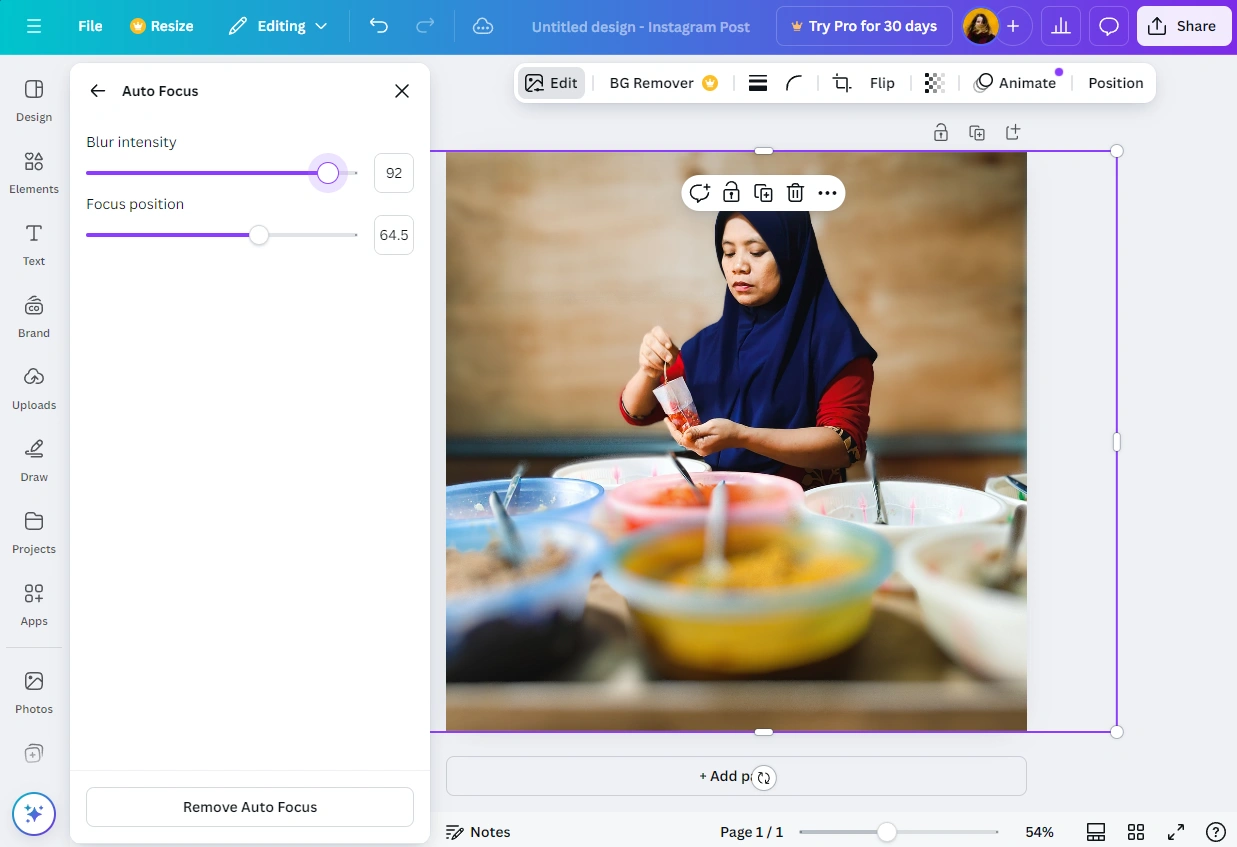 It’s a good idea to experiment here a bit to achieve more natural-looking results.
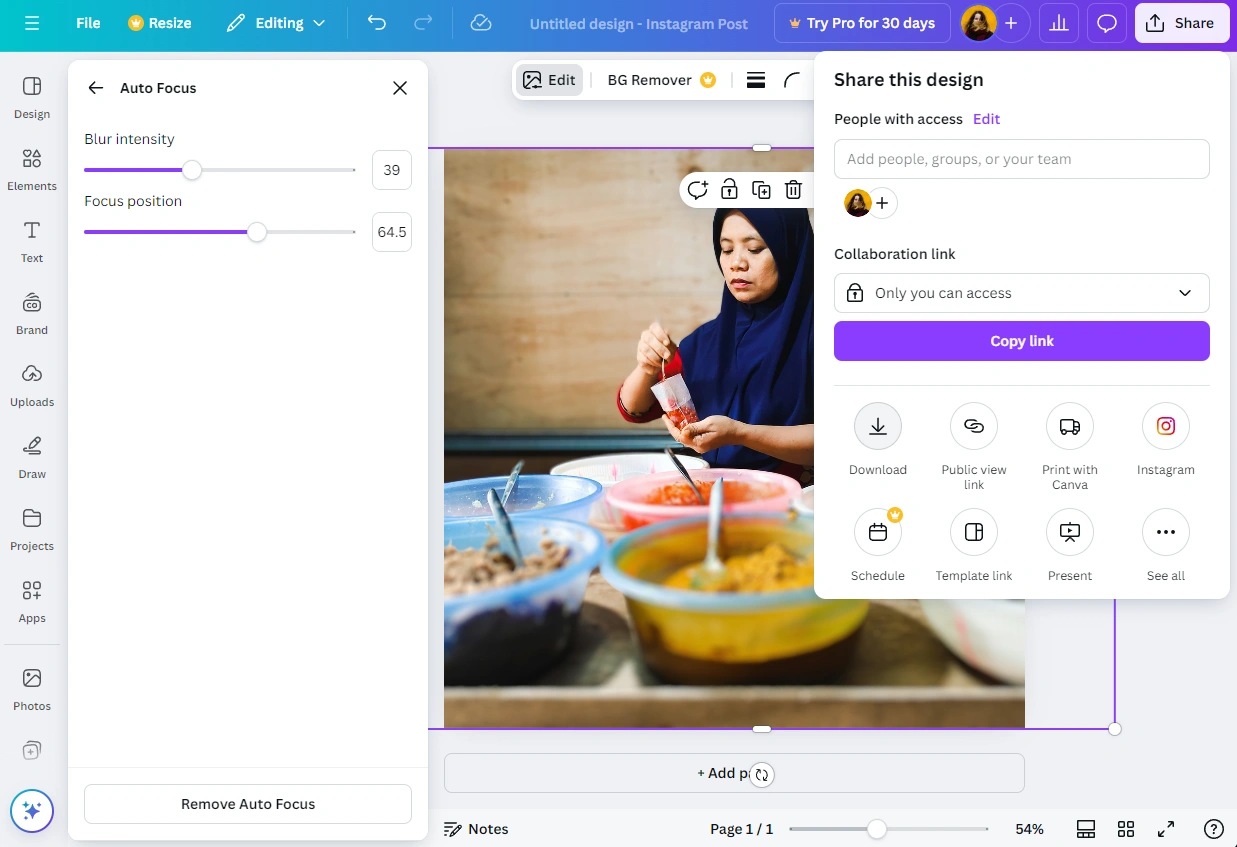
- It’s time to proceed to exporting! Click on the “Share” button in the upper right corner. You will see a few exporting options. It’s possible to share your modified image on social media right away, for instance. If you simply need to download it, click on the “Download” button and specify the settings, then click “Download” again.
All done!
How to Blur Objects in Multiple Images
It’s pretty easy and quick to use Canva if you need to blur objects in one or two images. But what if you need to process a batch of them? The bulk create feature is only available in Canva Pro. So, you won’t be able to blur parts of multiple images in Canva for free. Fortunately, you can do that in another browser-based app – Visual Watermark!
Even a total beginner will have no problem using either Canva or Visual Watermark. In Canva you will be able to add blurs of different intensities to different parts of your image. This is where Canva kind of prevails. In Visual Watermark you can adjust the blur intensity, but this adjustment will be applied to all the blurred areas in an image. To put it simply, you won’t be able to add blurs of different intensities to different parts of an image in Visual Watermark.
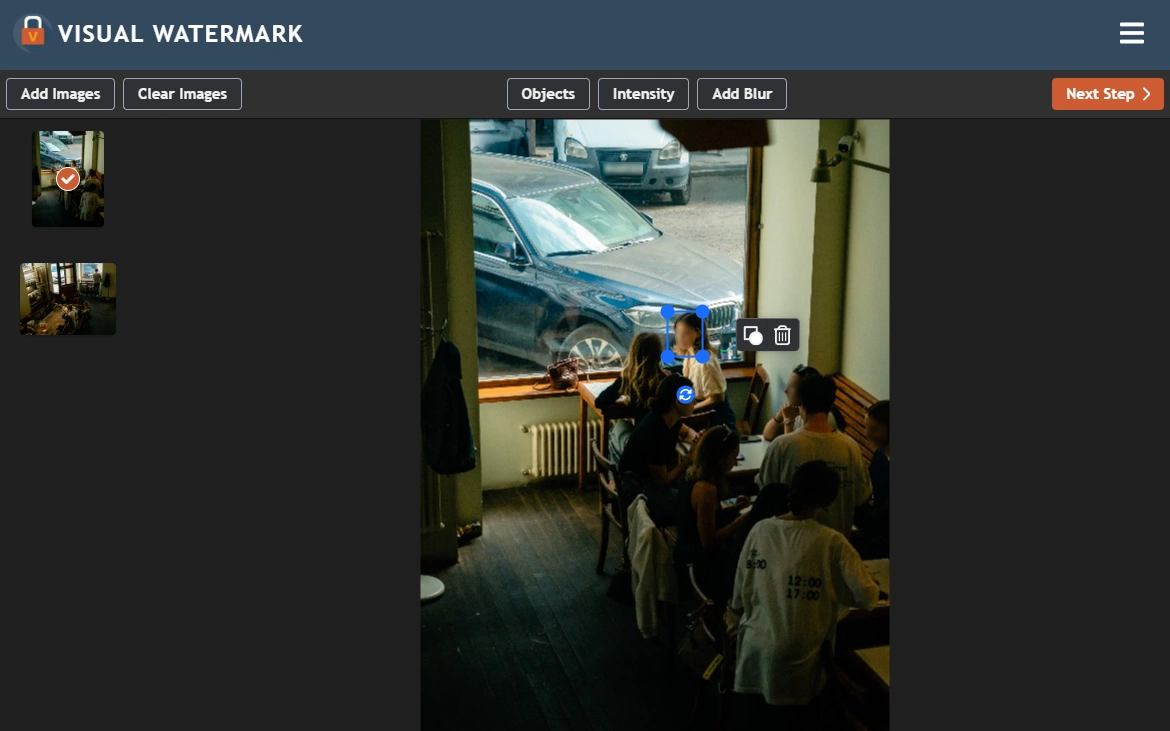
Please note that you won’t find a feature that’s similar to Canva’s Auto focus in Visual Watermark and thus, won’t be able to blur the background. In Visual Watermark you can only blur specific objects like a piece of paper with your address or somebody’s face. You can blur the entire image, as well, by adding a blur then making it as large as your image.
Nevertheless, Visual Watermark has several advantages over Canva.
First of all, you can upload a batch of images and blur multiple objects in them. Naturally, you will need to make adjustments to each image, however, the whole process will be incredibly effortless and time-saving.
Here’s another advantage that will save you a significant amount of time. After you upload images into the app, Visual Watermark will use AI algorithms to automatically detect, then blur faces and license plates. Thus, if these are the parts of an image that you need to blur, the whole process will be much faster. And if you want some of the faces or license plates to be unblurred, you can simply unselect them in the Objects section.
Please note that if you need to blur any other object in your image, you will need to add a blur manually by clicking on the “Add blur” button. In Canva you need to use a brush to blur objects. Which means you’ll get a blur of a random shape. In Visual Watermark, on the other hand, you can add an oval blur, which can be turned into a circle, or a rectangular blur, which can be turned into a square. And you can switch from one shape to another at any point of the editing process, which can be very useful.
But what if the object that you need to blur is tilted, you may ask? This isn’t an issue when using a blurring brush…Well, worry not! In Visual Watermark you can easily rotate a blurred area with the help of the icon with two arrows. Once the necessary blurred area is selected, click on this icon, then move the cursor to the left or to the right. This is how you can adjust the angle of rotation of your blurred area. Any blurred area can be removed at any point of the editing process. You just need to click on the bucket icon.
Now, let’s talk about the edge of the blur.
In Canva you can get a smooth edge by lowering the intensity and adjusting the brush size. In Visual Watermark all the blurred areas will have smooth borders automatically. That’s right! You won’t have to experiment with different combinations of blur intensity and brush size. The blurred areas will blend into your images seamlessly, and you won’t have to do anything for that!
Finally, let’s address the main difference between these two browser-based apps. Canva offers an amazing selection of various tools and features, different filters and templates. It’s a complex and full-fledged editor. With its help, you can edit images themselves, meaning that you can change exposure and white balance, edit the colors. With such a versatile toolkit you’ll be able to get really creative and even create beautiful designs from scratch.
On the other hand, Visual Watermark is suitable only for basic image editing. On Visual Watermark’s website you will find tools to watermark photos, crop images, convert photos to JPG, resize images, add text to a single photo or add a watermark to PDF. You won’t be able to do some complex image editing, yet Visual Watermark has everything you need to quickly prepare your images for the web.
Given all of this, it might be a good idea to use both apps. You can do all the complex editing and, for instance, create collages in Canva. Truly enjoy all the creative freedom that this full-fledged image editor can give you. You can play around with different frames, filters and so on. But when you need to do something quick – blur objects in multiple images or crop a batch of photos – you can opt for using Visual Watermark. With its help, you’ll be able to make some minor adjustments to your images in little to no time.
Conclusion
What’s great about Canva is that it has lots of amazing tools and features that are super-easy to use. It’s perfect for creating beautiful designs and editing photos. You can also use it to blur a part of a picture easily and quickly. In fact, this article has taught you how to do exactly that in three different ways.
There’s no doubt that Canva is incredibly useful. However, if you need to blur objects in multiple images or create a blur in a shape of a rectangle, then Canva won’t be of much use to you since in it you can process only one image at a time and you will need to use a brush for blurring. Luckily, you can add oval or rectangular blurred areas in Visual Watermark. And it supports batch-processing, so you’ll be able to process multiple images at a time!
 Visual Watermark
 by
by 