Cutting out something in Photoshop is not the same as cutting out objects from, say, a printed magazine with a pair of scissors. In a good way. Because in Photoshop, if you accidentally cut off the wrong piece, you can restore it with a couple of clicks. You can easily fix mistakes or change your mind and start over. The best software for cutting out images is, of course, Adobe Photoshop. It offers a variety of different tools: some are suitable for more skillful users, while others will be great for beginners.
You might think that cutting an object is a challenging task…and you might be right to some extent. Cutting out a cup from a plain background is a much easier and quicker task than dealing with stray hair or complex-shaped objects. For the latter, you will need much more precision.
Fortunately, this guide features detailed instructions on how to cut out an image in Photoshop using different tools and methods. Therefore, you will be able to cut out any object no matter how complex it is and how good you are at image editing.
How to Cut Out An Image in Photoshop with Quick Selection Tool
This method will work great if you want to cut out something in Photoshop that has defined edges and is against a plain background. For instance, a cup of coffee on a white background.
Follow these steps:
- Import the necessary image into Photoshop.
- In the toolbar on the left pick the Quick Selection Tool. You can also activate it by pressing W on your keyboard. If you don’t see this tool, right-click on the Object Selection Tool or the Magic Wand Tool and switch to the necessary option.
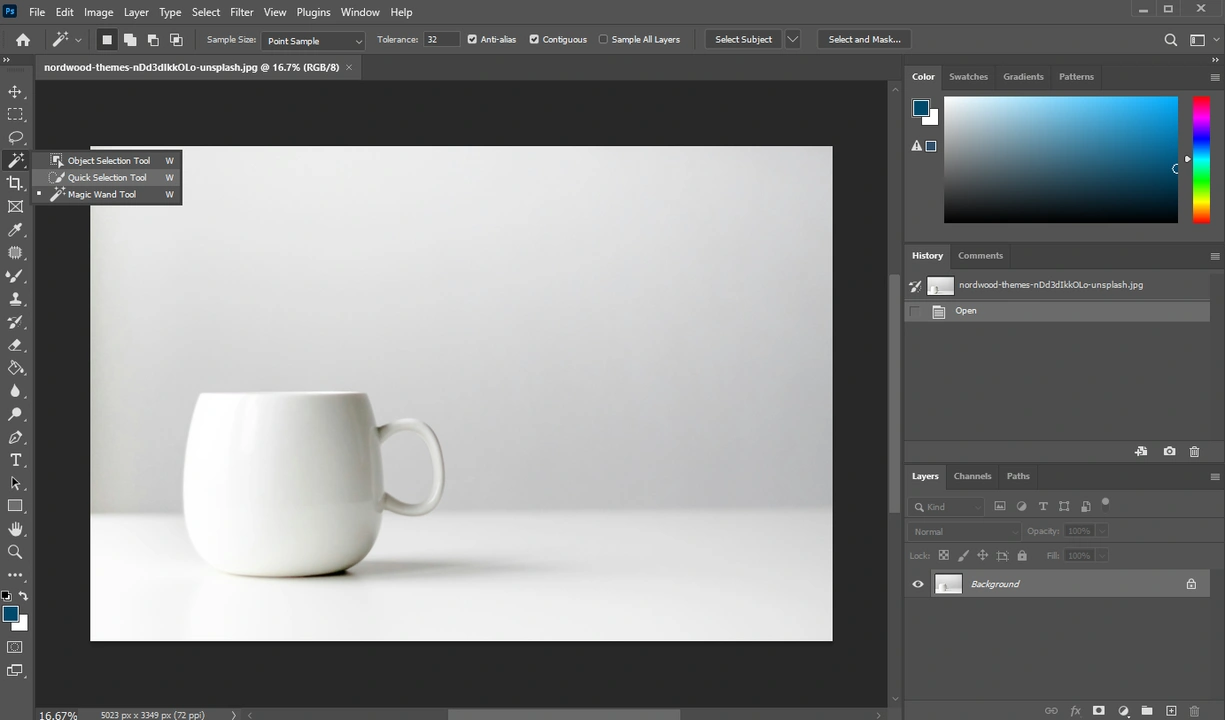
- If there’s only one object that you want to cut out, you can click on the Select Subject button at the top. Photoshop will analyze your image and select the subject automatically.

- Alternatively, you can drag the Selection Brush over the areas that need to be selected.
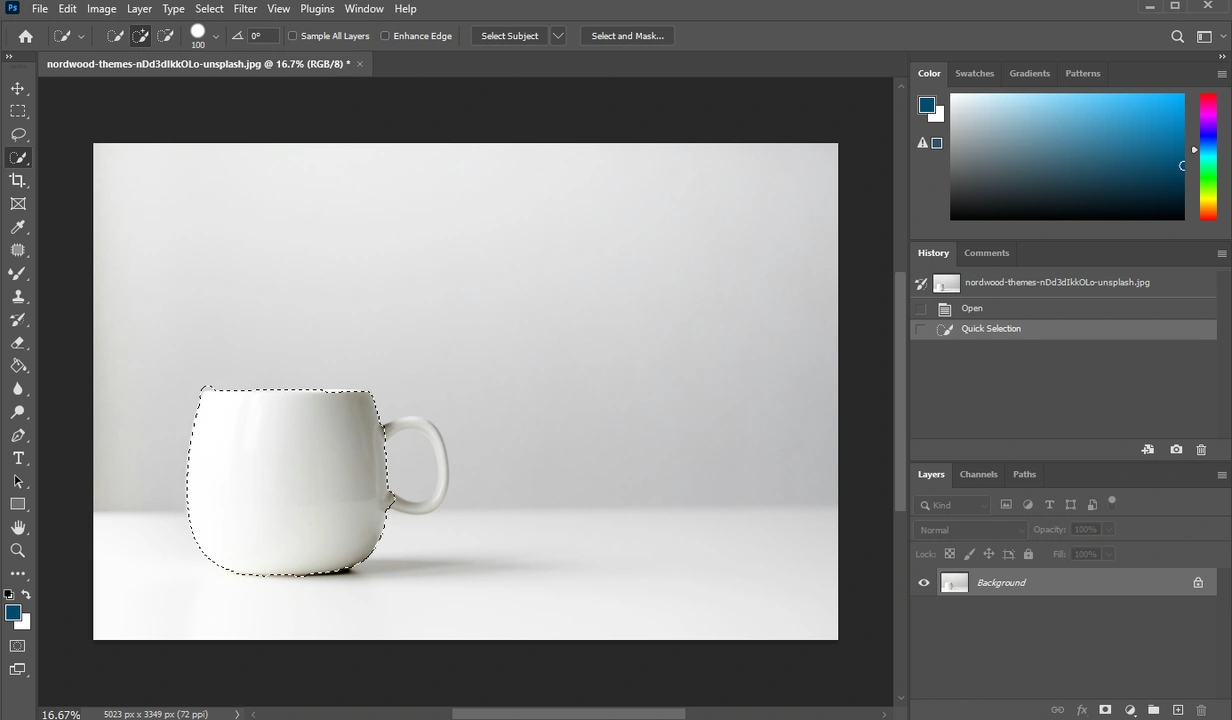 Here’s a tip. You can adjust the size of the Selection Brush by pressing the [“ and “] on your keyboard. To make a general selection of your object, use a bigger brush. Whereas, when you need to select smaller details or refine edges, pick a smaller size for your brush.
 - If an important area wasn’t added to the selection, press Shift – if you are on Windows or Mac – and drag the cursor over the necessary area.
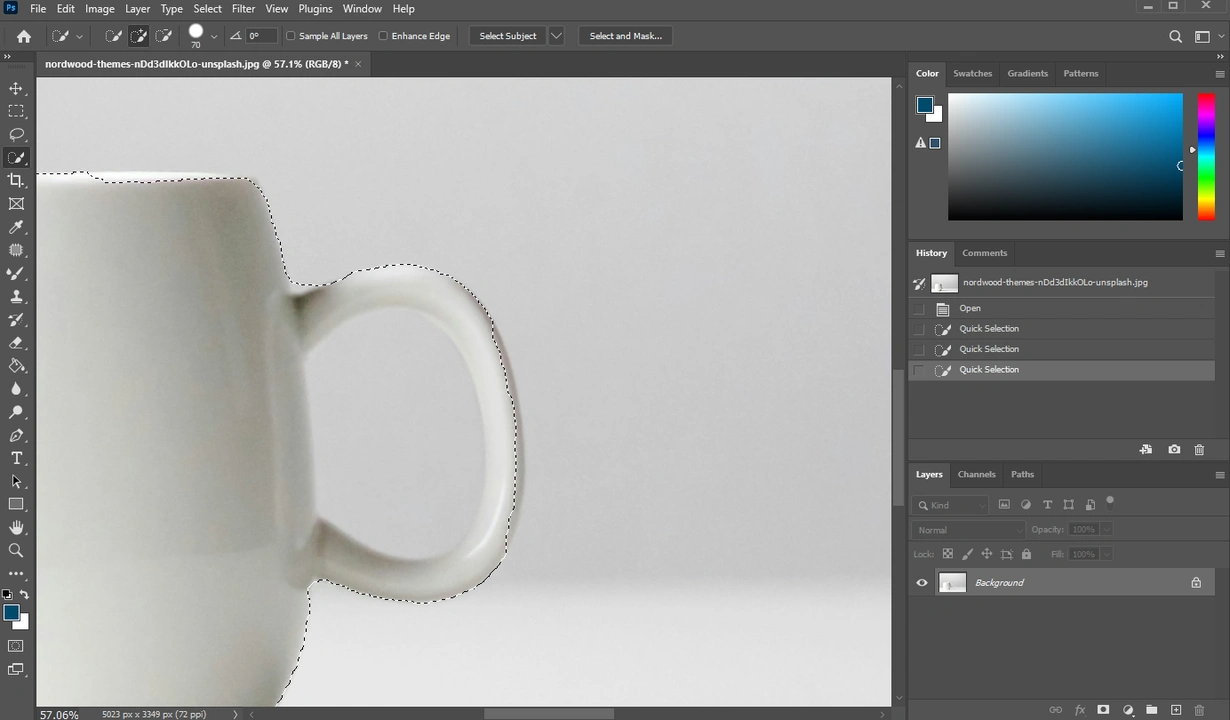
- If there’s an extra bit in your selection, hold Alt on Windows or Option on Mac, then drag the cursor over it.
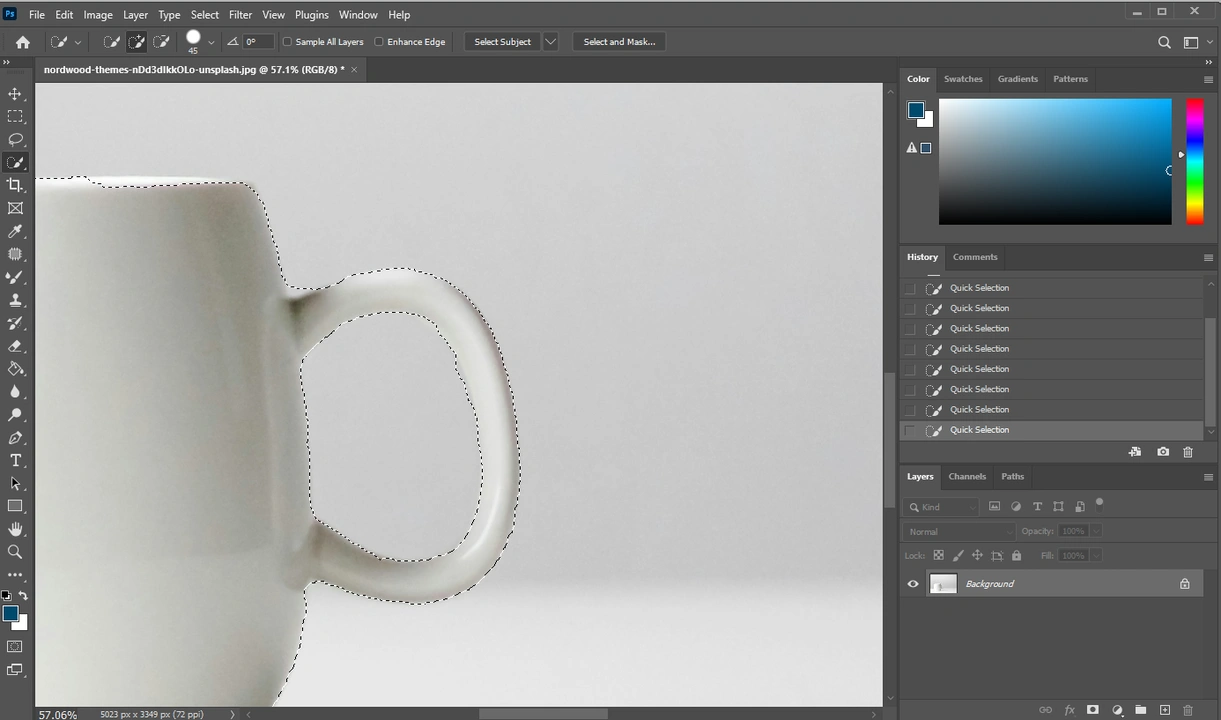
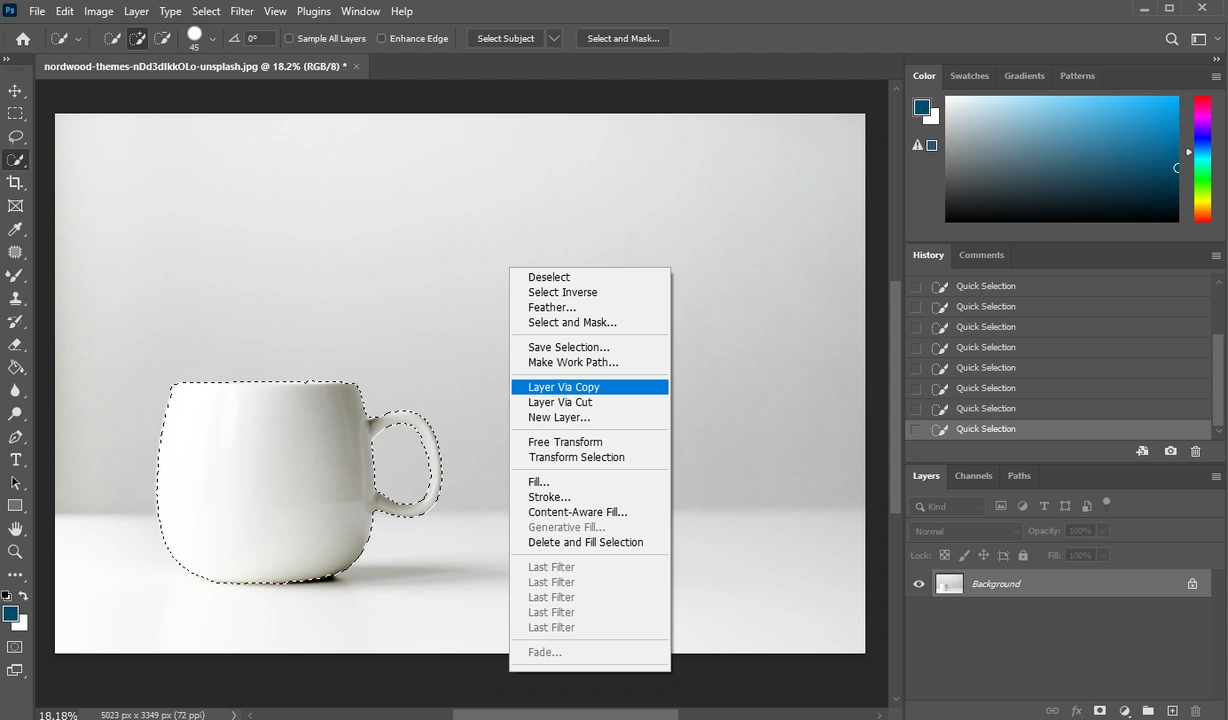
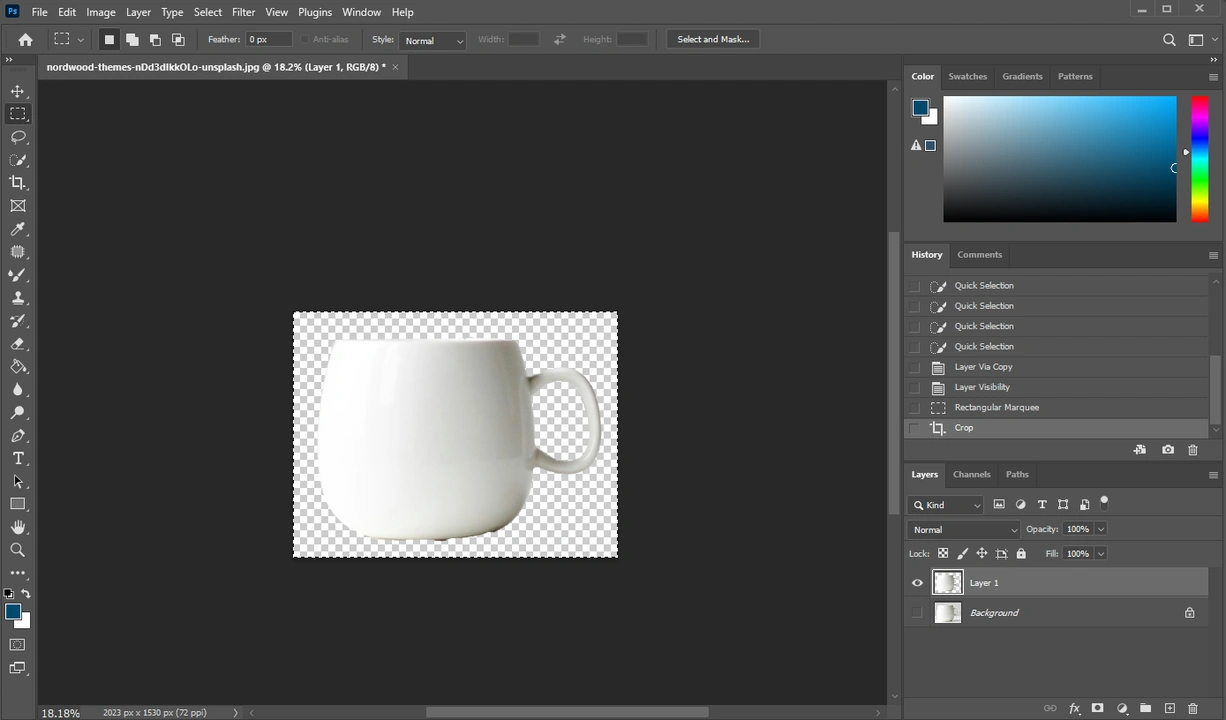
- Does the selection look good? Now you can right-click on the image, then select “Layer via Copy” or “Layer via Cut”.
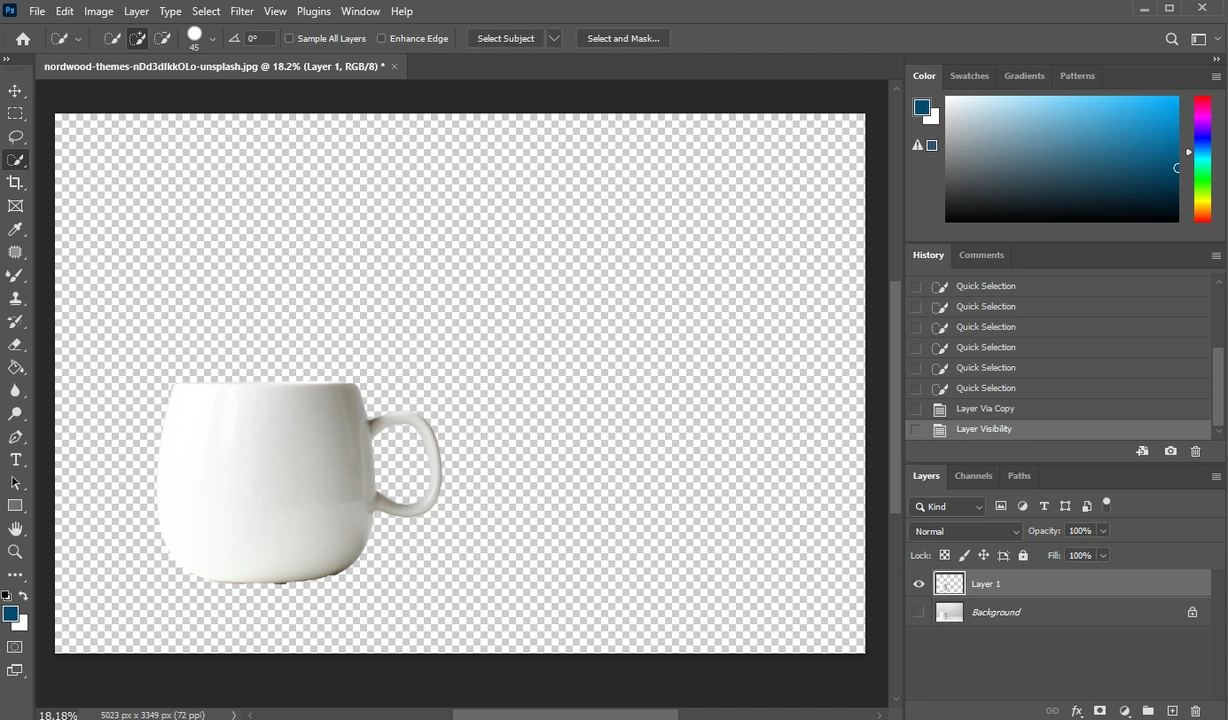
 Your new layer will have the selected object on a transparent background. You can then delete the background layer and save your image as a file.
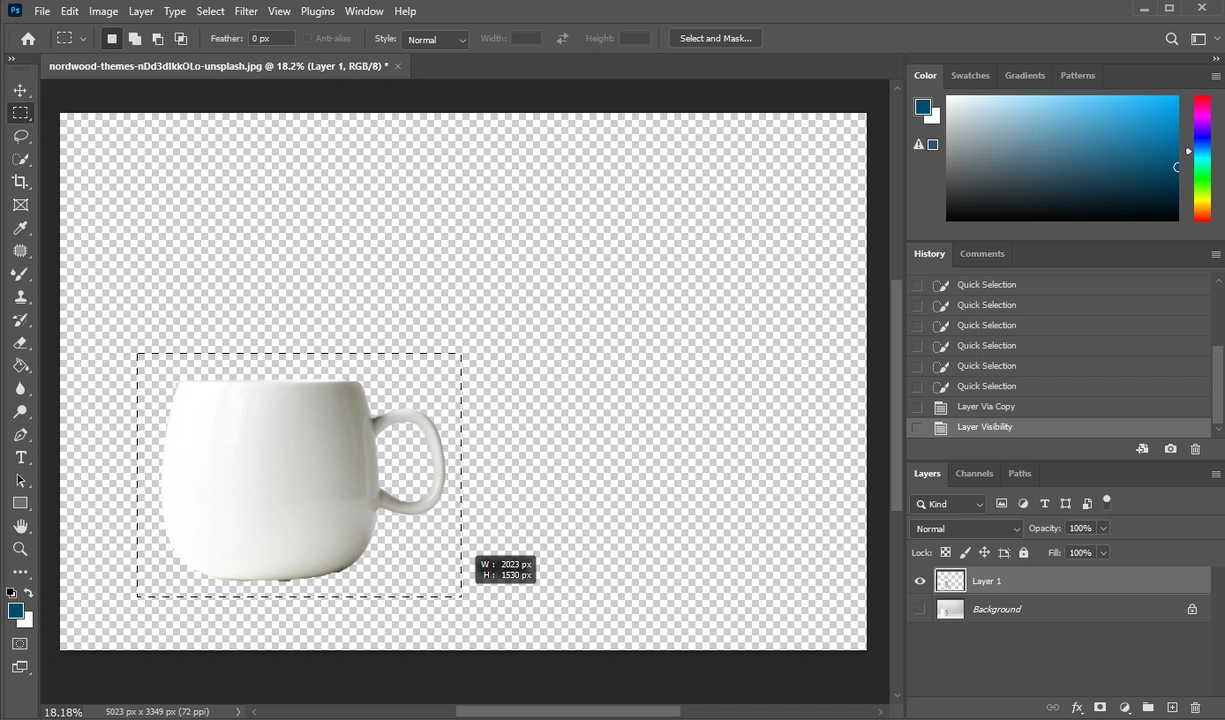
- If there is too much of the transparent background, press M to activate the Marquee Tool and draw a rectangle around your selected object.
- Then you will simply need to crop the image by going to Image > Crop.
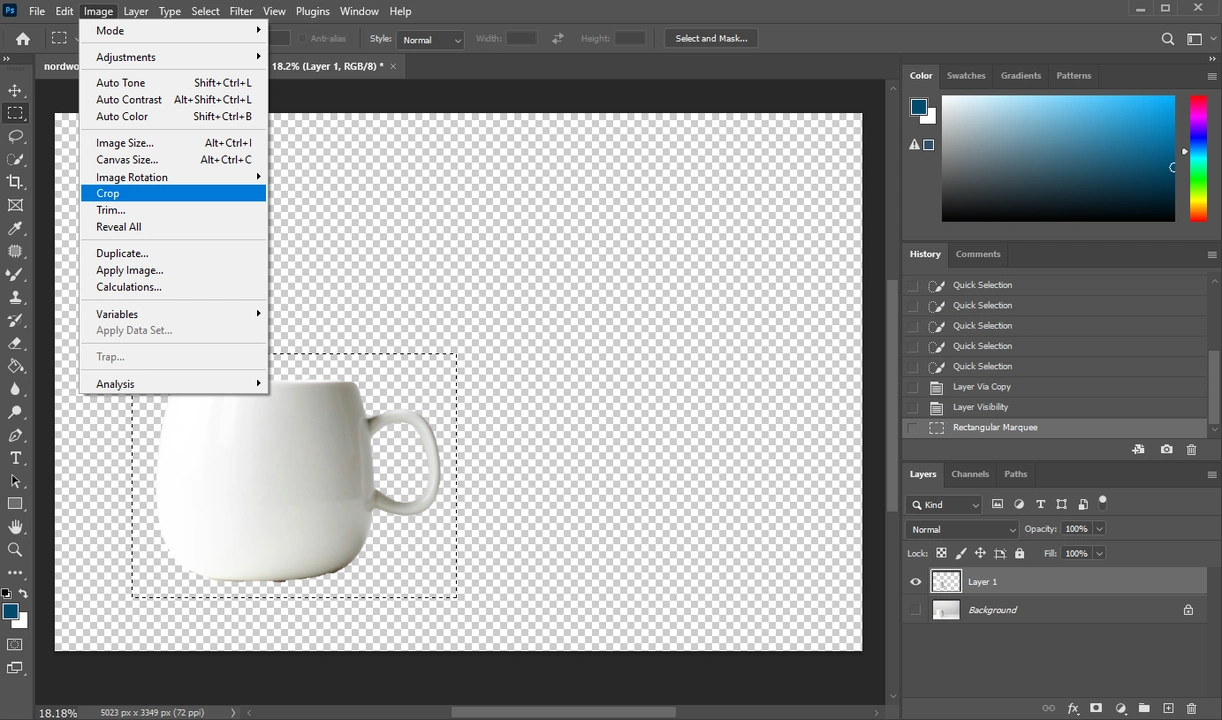 And just like that all the extra background is gone!
- As another option, you can open a second image in Photoshop, then make sure that the selection of your object is still active and press CTRL / COMMAND + C. Switch to the second image, then press CTRL / COMMAND + V. Your cutout object will be inserted into your second image.
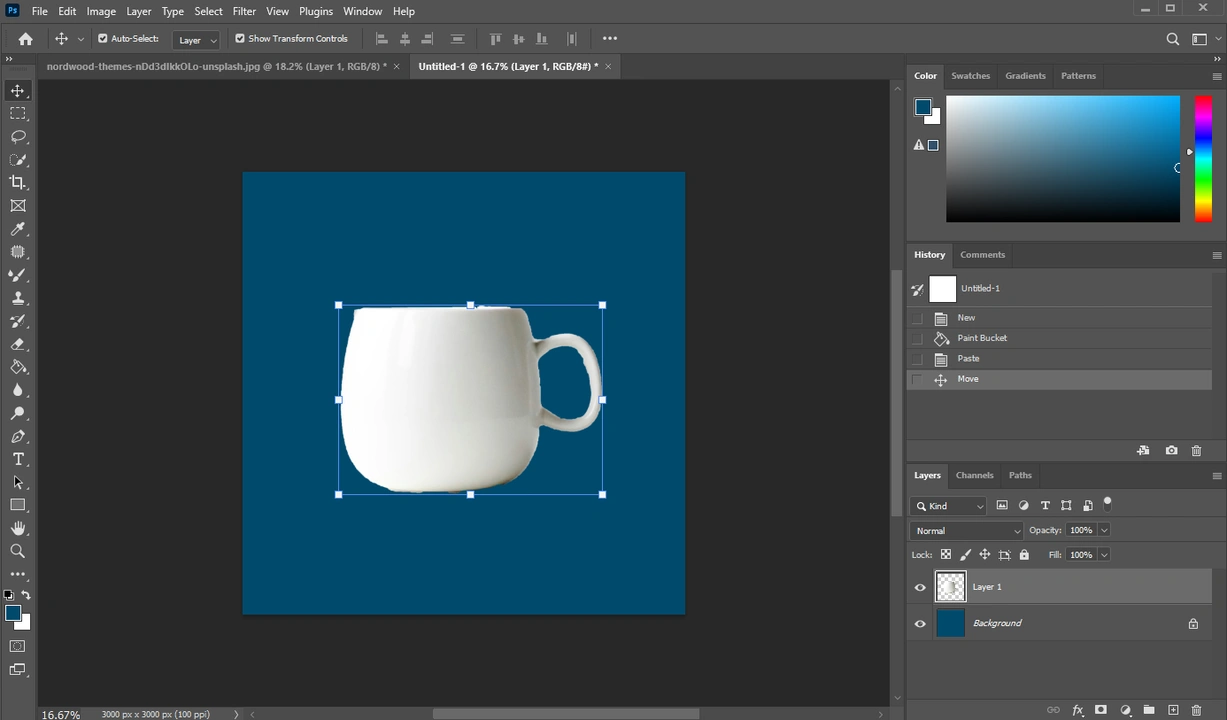
Important! If you want to save your image with a transparent background, you have to save it as a PNG file. This is crucial for your image to have a transparent background. PNG supports transparency, while JPG doesn’t.
How to Cut Out An Image in Photoshop Using Layer Mask
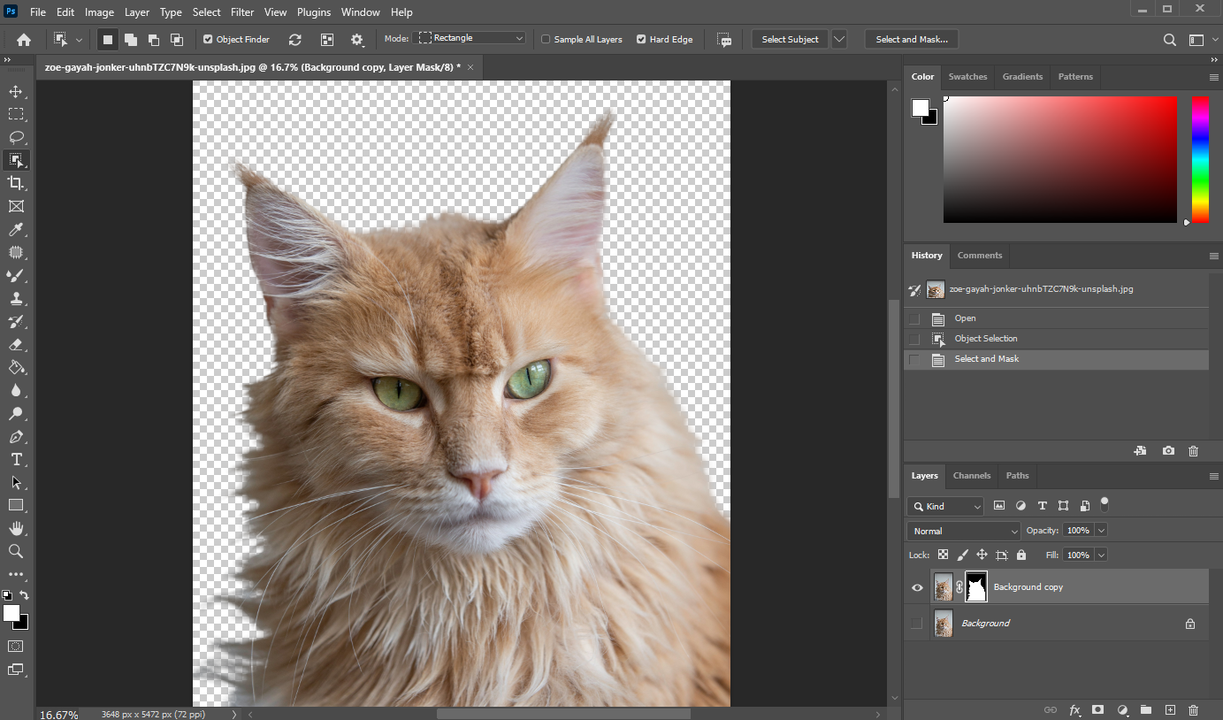
A layer mask kind of isolates the selected part of an image, while blocking the non-selected one. What you need to keep in mind when working with a layer mask is that everything black is hidden, everything white is selected, and grey areas are semi-transparent. Experimenting with the opacity of your brush can actually help you get a natural-looking result.
The best part about Layer Masks is that the editing is non-destructive. It means that a part of your image is not deleted. So, if at some point you notice that a part of an image needs to be removed or, on the contrary, an important part is missing, you will simply need to get back to the Layer mask and paint with black or white over the necessary area.
Alright, let’s see how you can cut out an image in Photoshop with the help of the Layer Mask:
- Open your image in Adobe Photoshop.
- Select the Object Selection Tool or use the shortcut W. Hover the cursor over the object, then click on it.
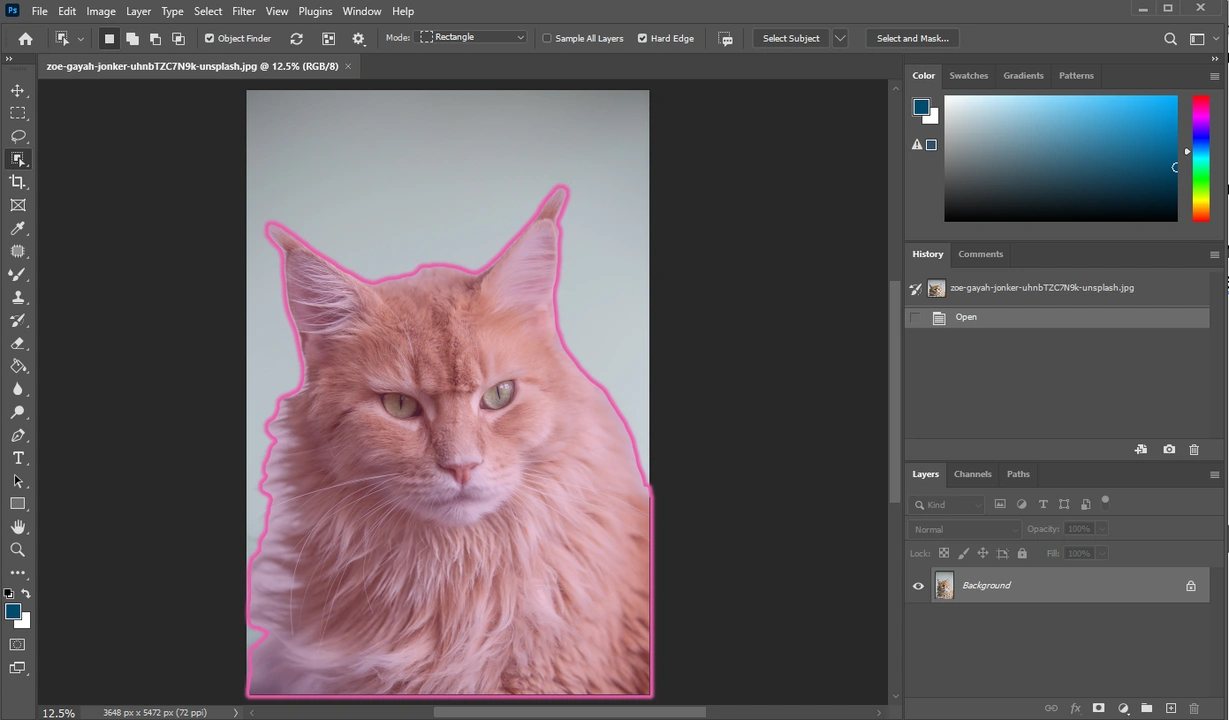
- Click on Select and Mask at the top.

- You will be taken to the Select and Mask workspace. It might be a good idea to change the View mode to White or Black, then set the Opacity to 100%. This way you will see all the tricky areas much better.
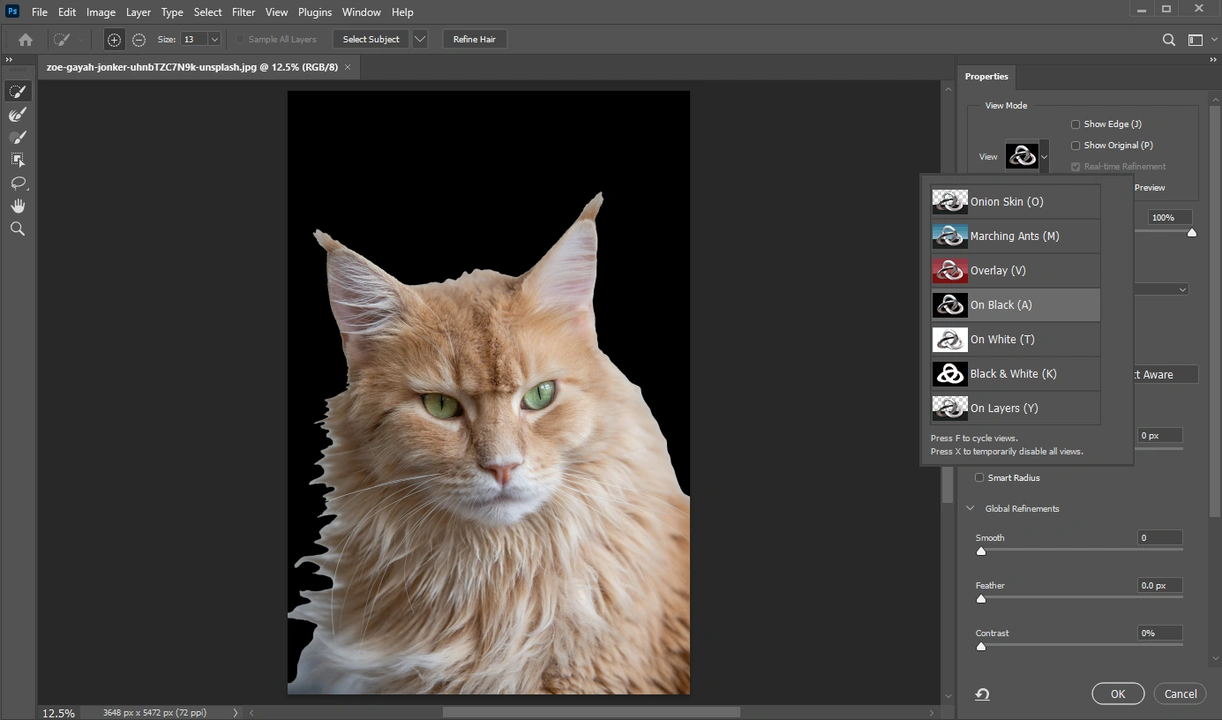
- Similarly to the previous method, you can add and subtract areas from your selection here. Use the Shift to add and Alt / Option to subtract.
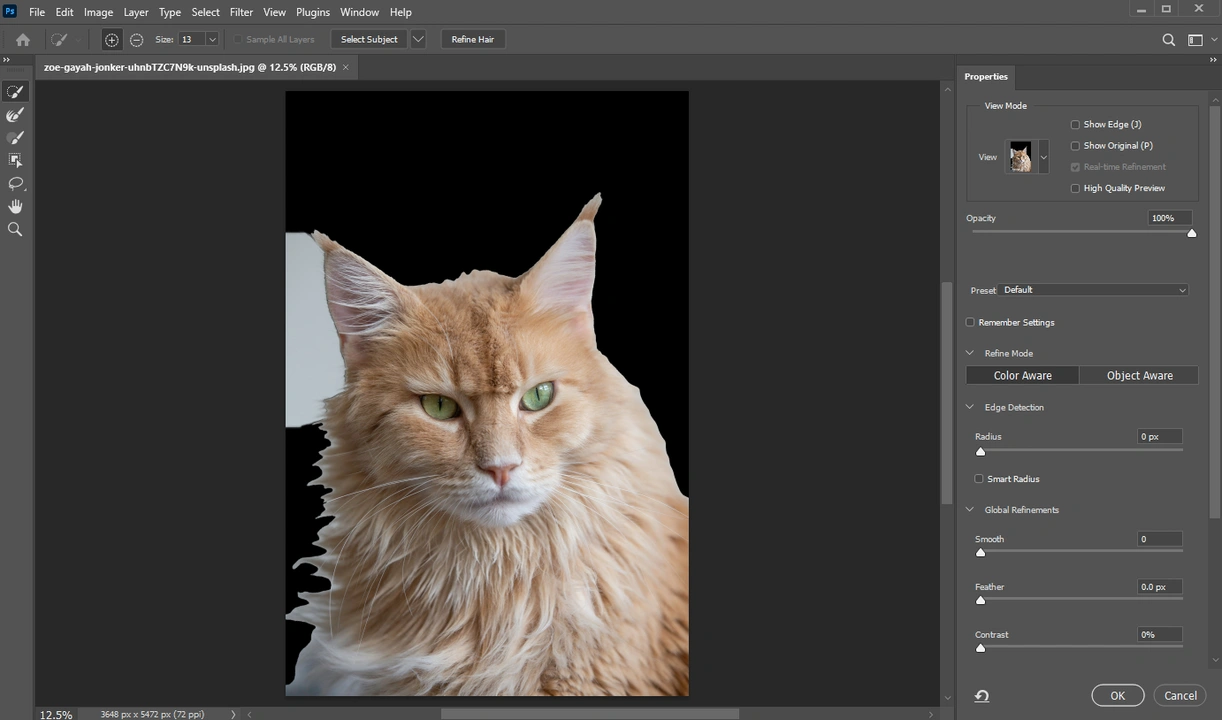
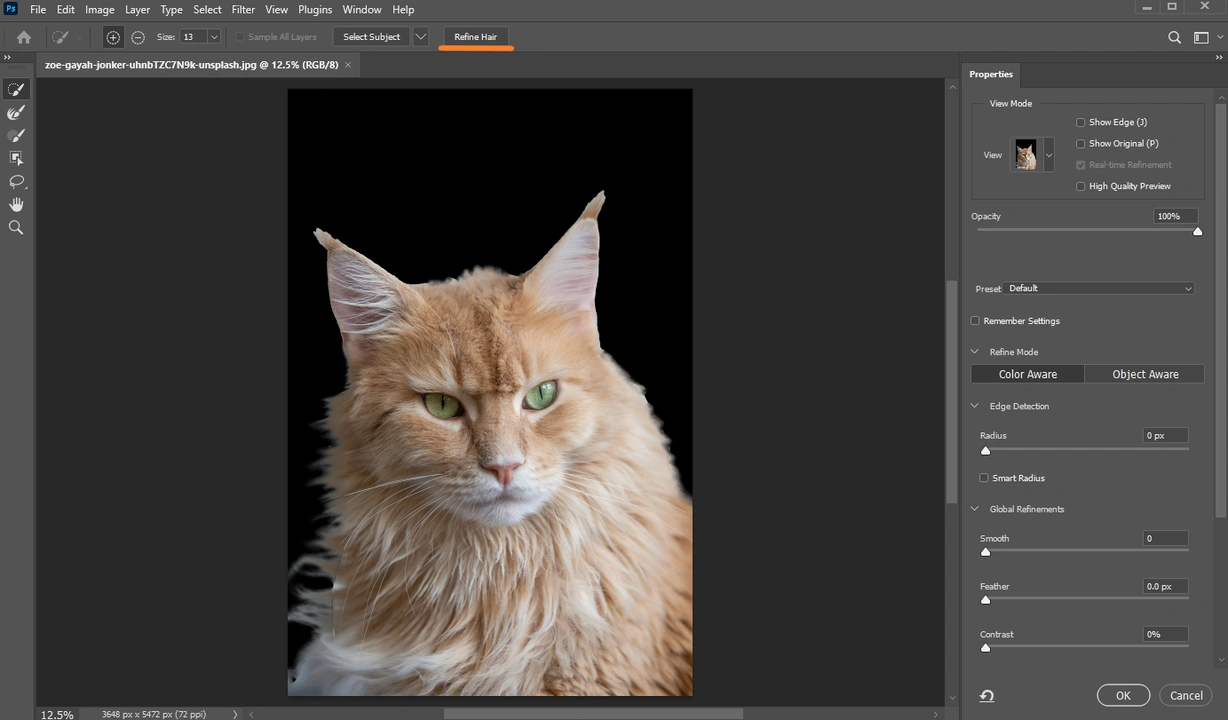
- If your subject has wispy hair, you can click on the Refine Hair button.
- If the Refine Hair button doesn’t help, you can use the Refine Edge brush instead.
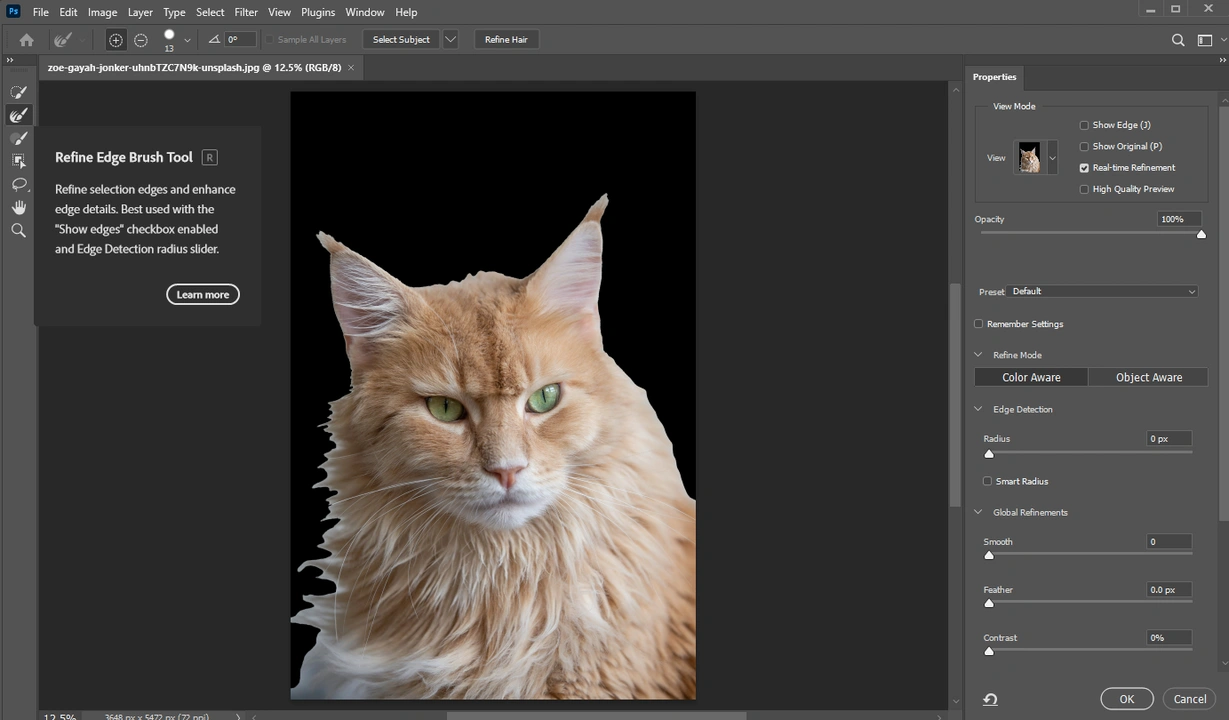 Select it in the panel on the left, then paint over the edges.
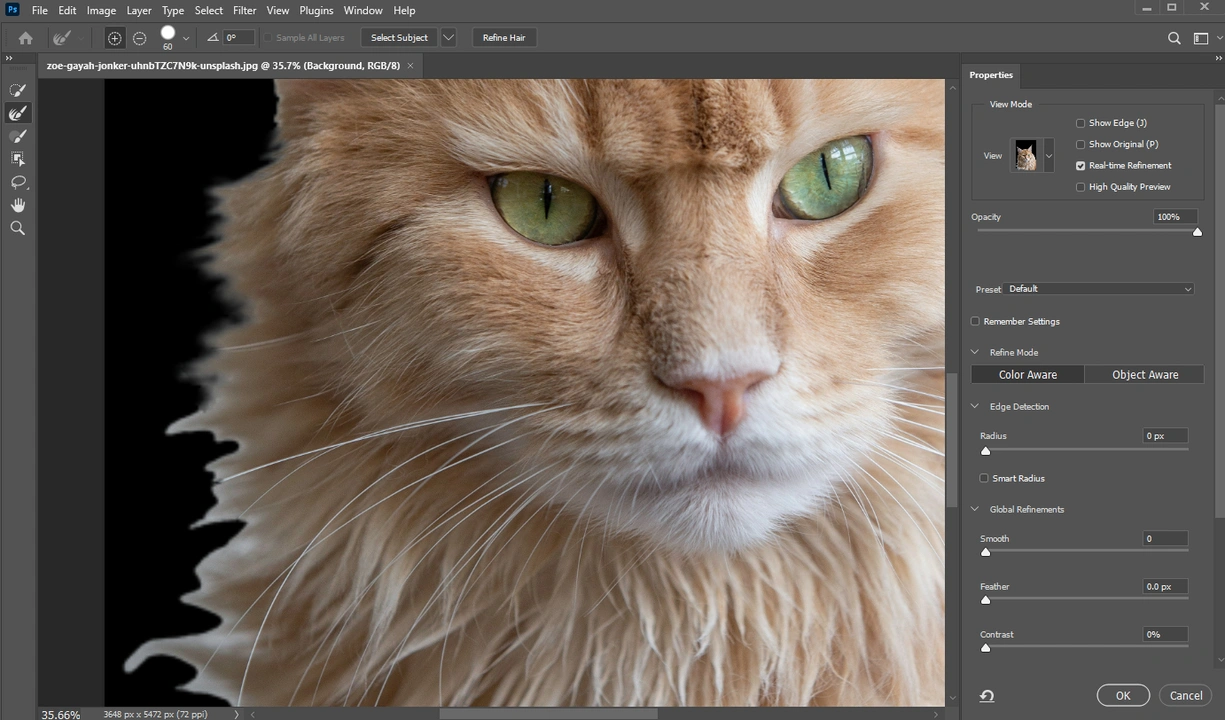
- If you don’t like the result, undo the changes by clicking on CTRL / CMD + Z and try to switch from Color Aware to Object Aware in the Refine Mode section. Then paint over the edges again.
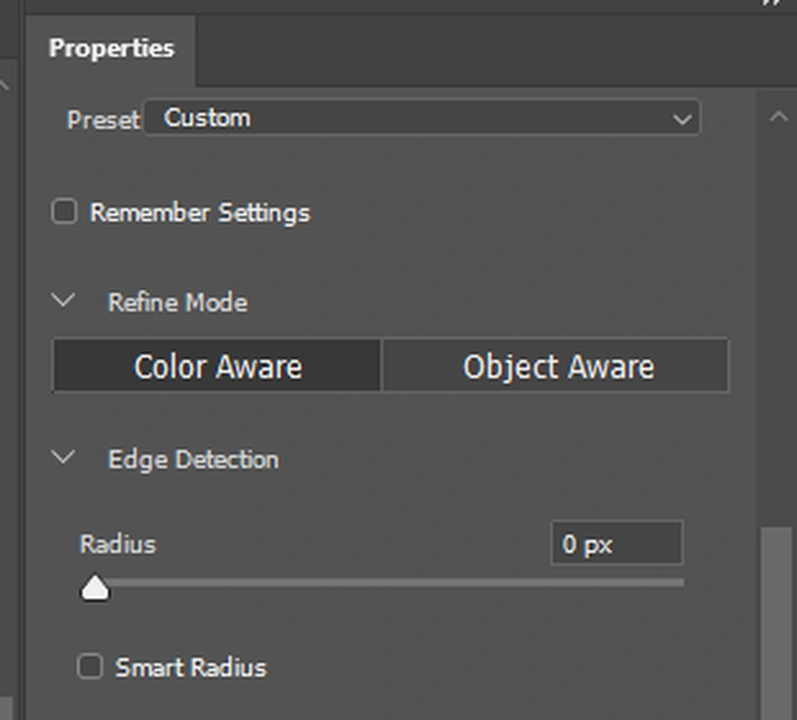
- To get a more natural looking result, experiment with the Smooth, Feather, Contrast, Shift Edge and Radius sliders in the panel on the right. Also, try enabling the Decontaminate Colors option.
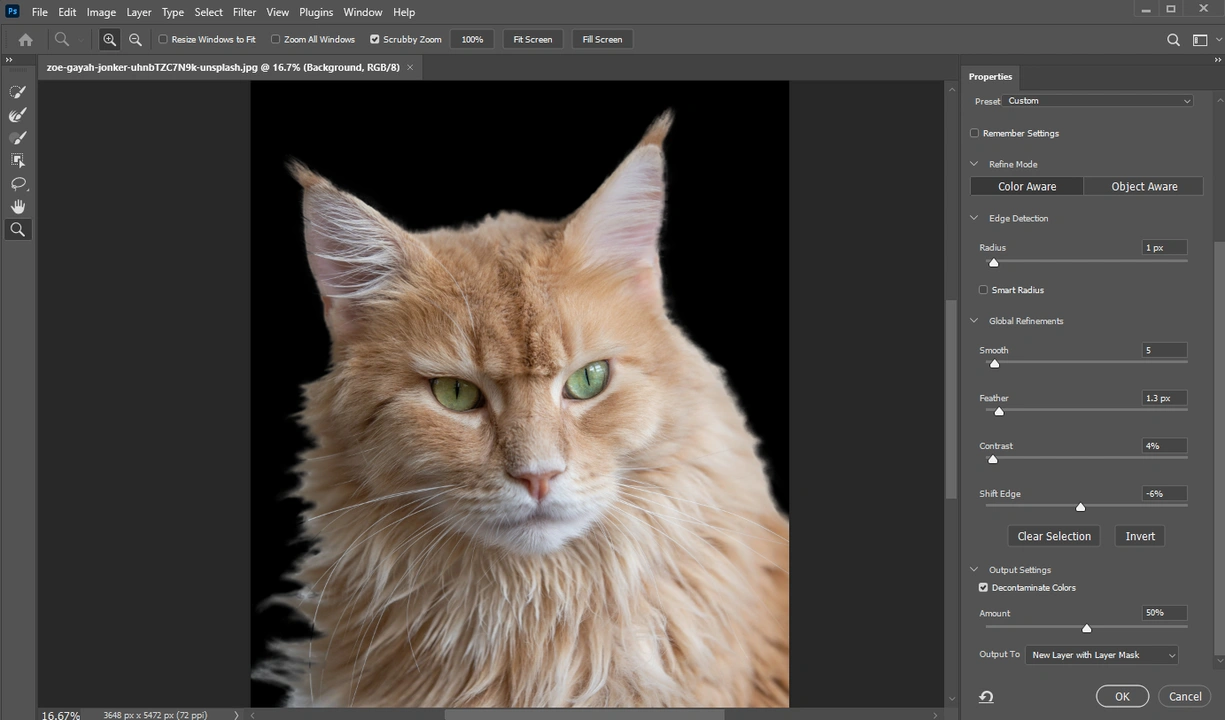
- Select New Layer with Layer Mask in the Output To menu.
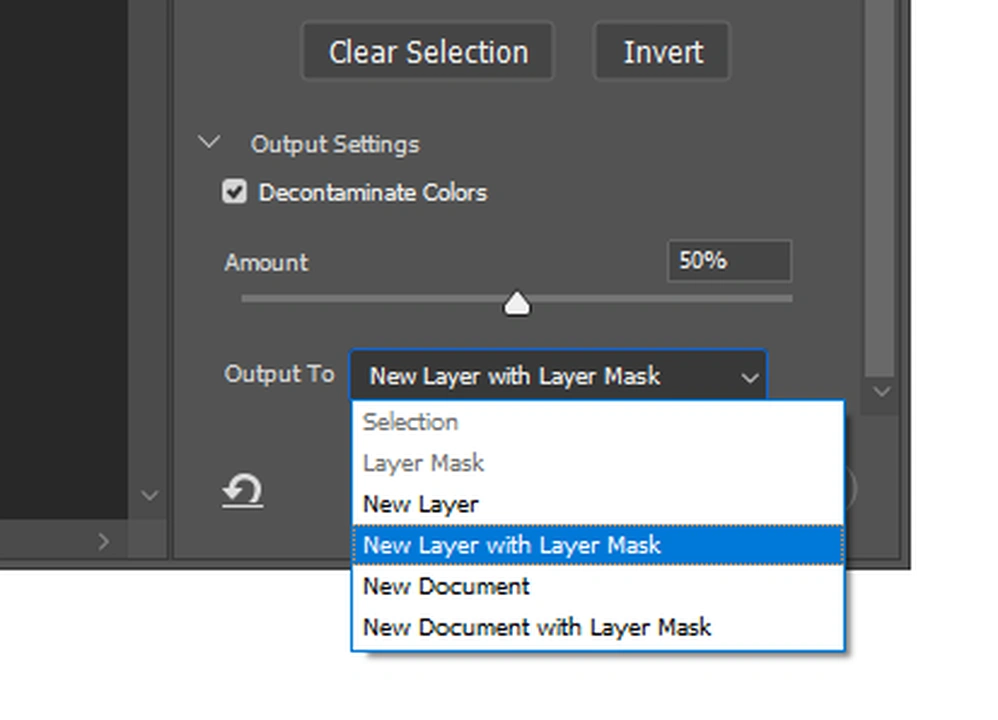 This way your selection will be put on a new layer, and you will be able to make some further changes if necessary.
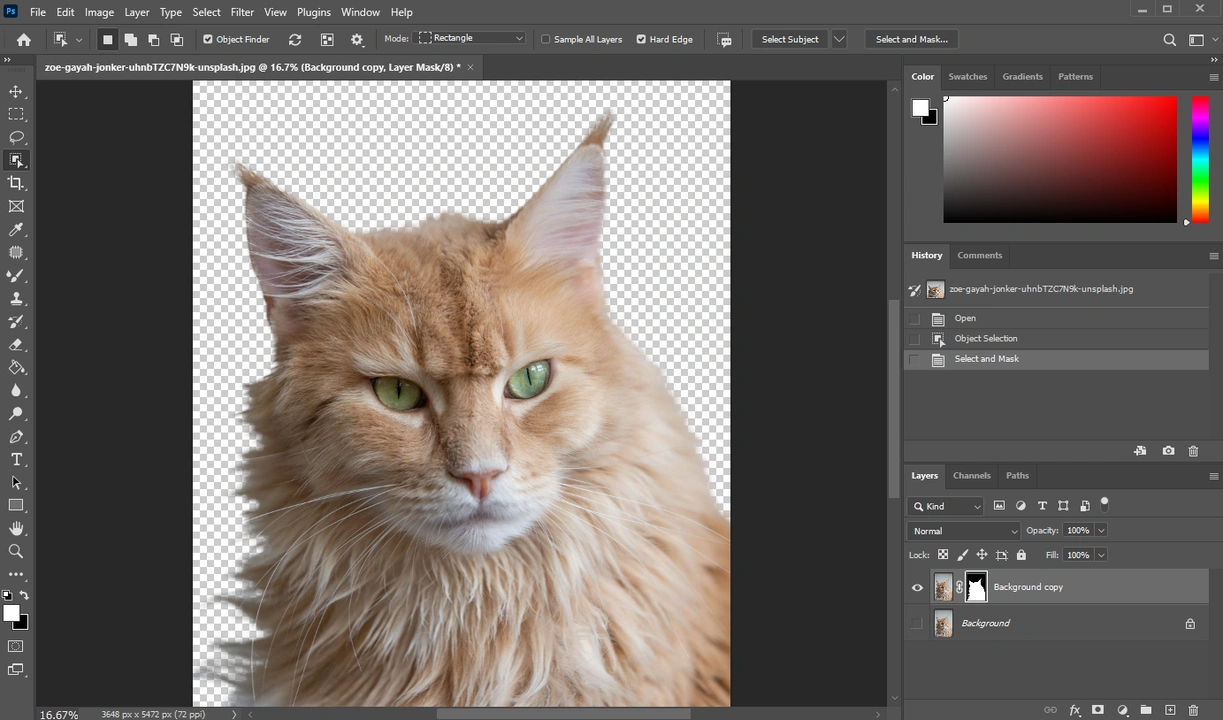
All done! As you can see, this method is slightly more complicated as well as requires more time and experimenting. But that’s how you can cut out an image that doesn’t have defined edges in Photoshop.
How to Cut Out An Image in Photoshop Using Pen Tool
This method is more difficult than the previous two mostly because it requires much more precision and skill. So, if you’re new to Photoshop, you might need to practice first.
Let’s take a look how to cut out something using this method:
- Once the necessary image is open in Photoshop, press P on the keyboard to activate the Pen Tool or simply select it in the panel on the left.
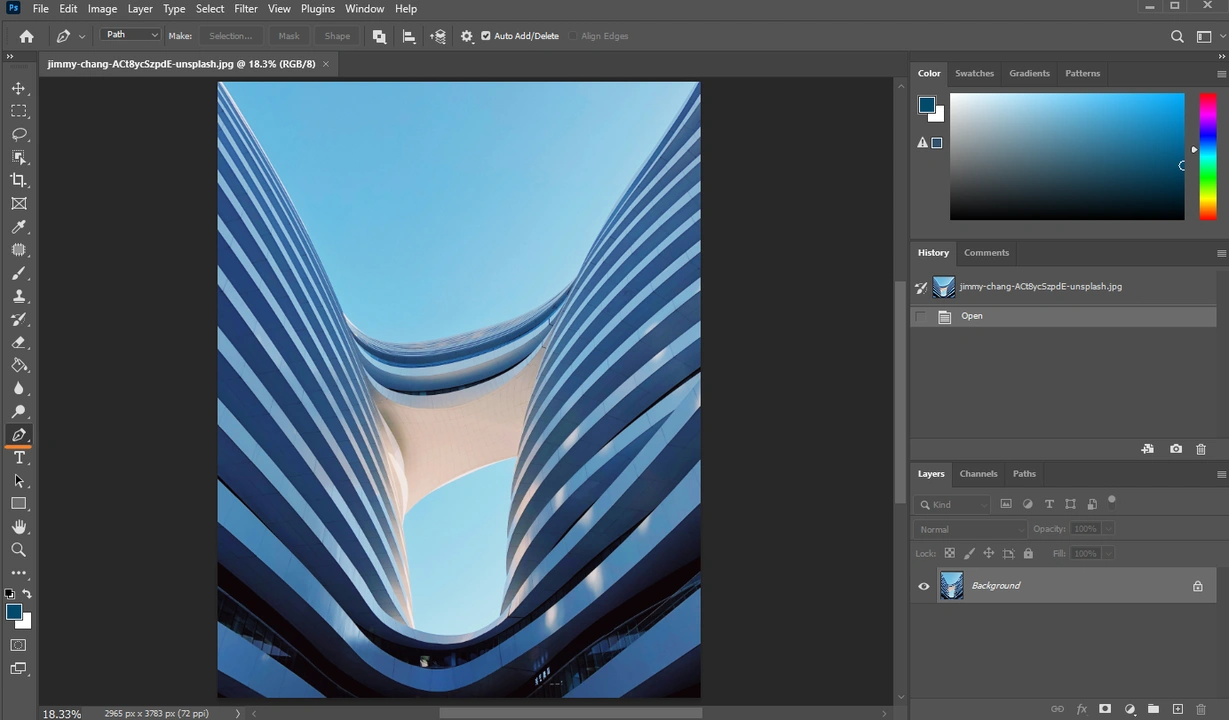
- Click on the edge of the object that needs to be cut out. This will create the first anchor point. Press CTRL / CMD and “+” to zoom in or CTRL / CMD and “-“ to zoom out. This might be useful since you will need to be quite precise when creating a path.
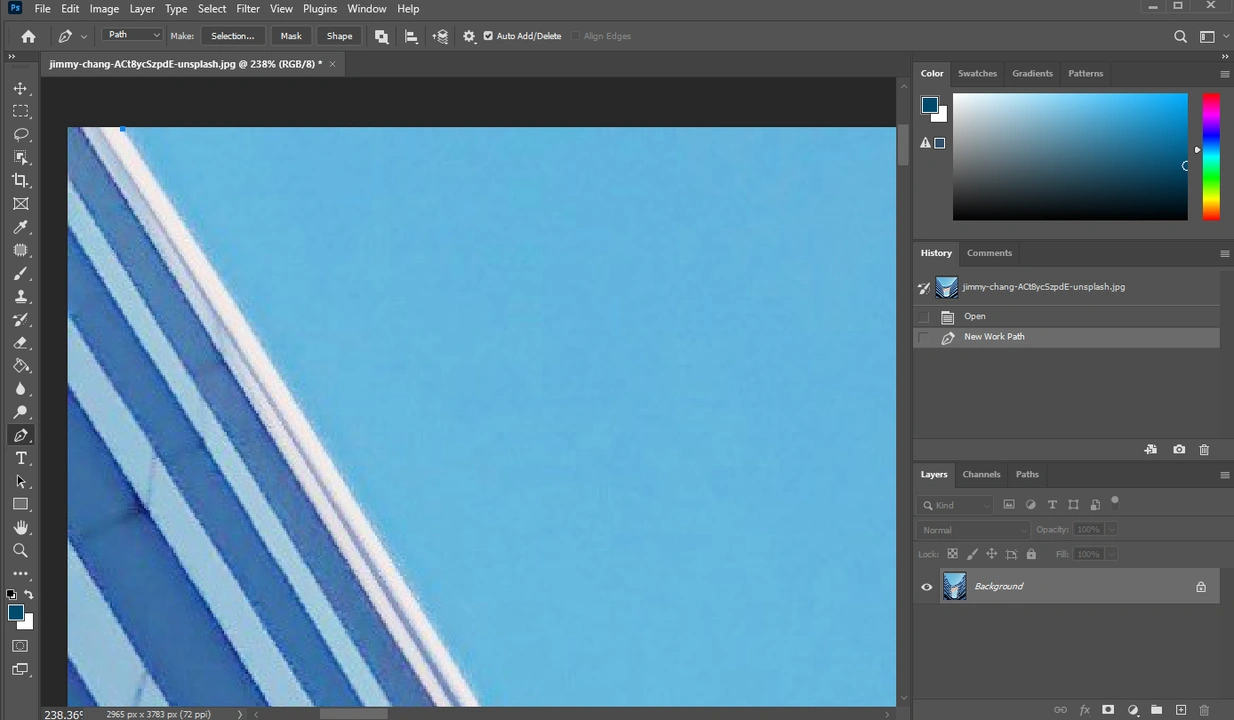
- Click somewhere near the first anchor point. This will create the second one and there will be a line between them.
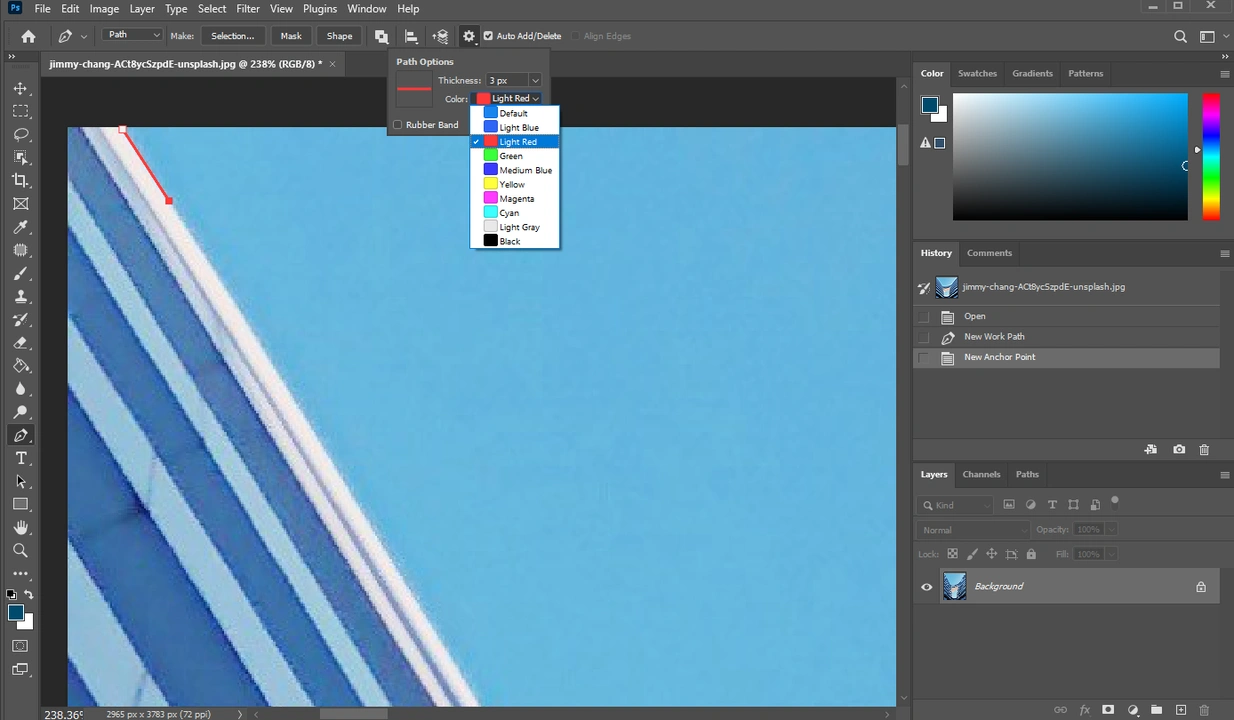
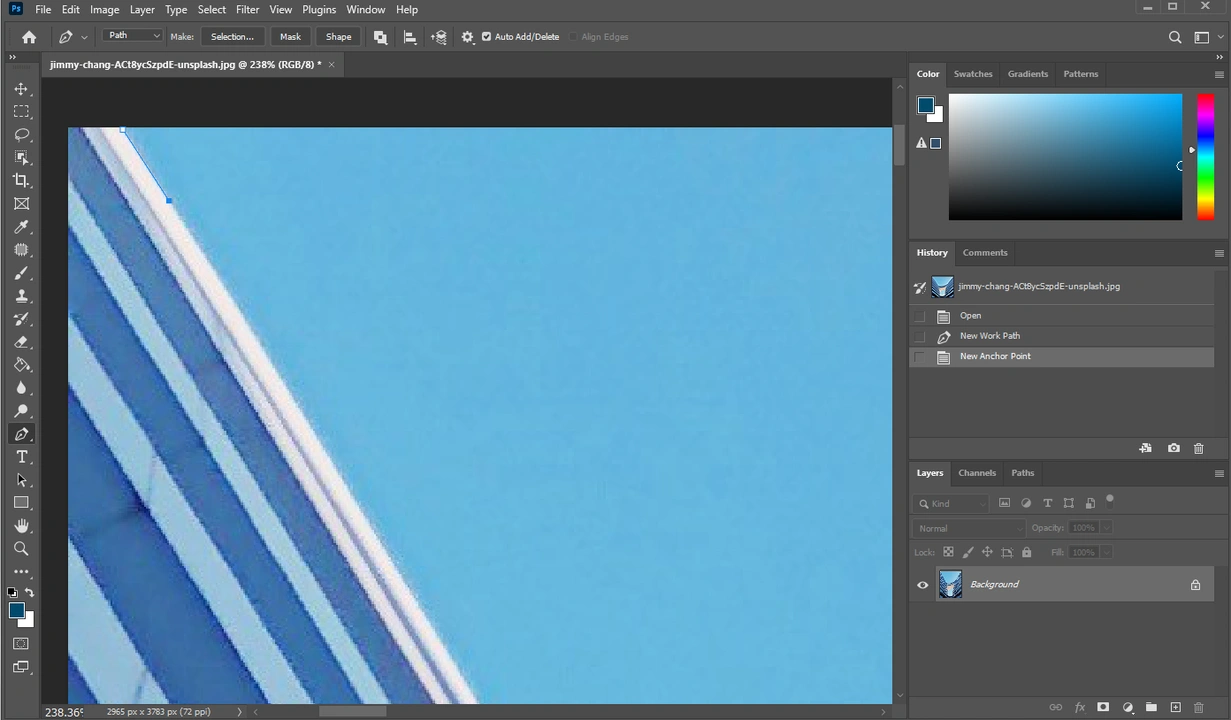 Here’s a tip. Do you want to view the path you’re creating better? Or maybe its default blue color is blending in with the object? Click on the Gear icon in the Options bar at the top. It will open the small Path Options menu – here you will be able to choose a different color and thickness.
- Keep creating one anchor point after another along the edge of your object. Your goal is to trace your object with anchor points.
- You’ve noticed that the lines between the anchor points are straight. What if you need to create a curved one? If that’s the case, click to create your new anchor point, then immediately drag the cursor without letting go of the mouse. You’ll see that the path will start to curve.
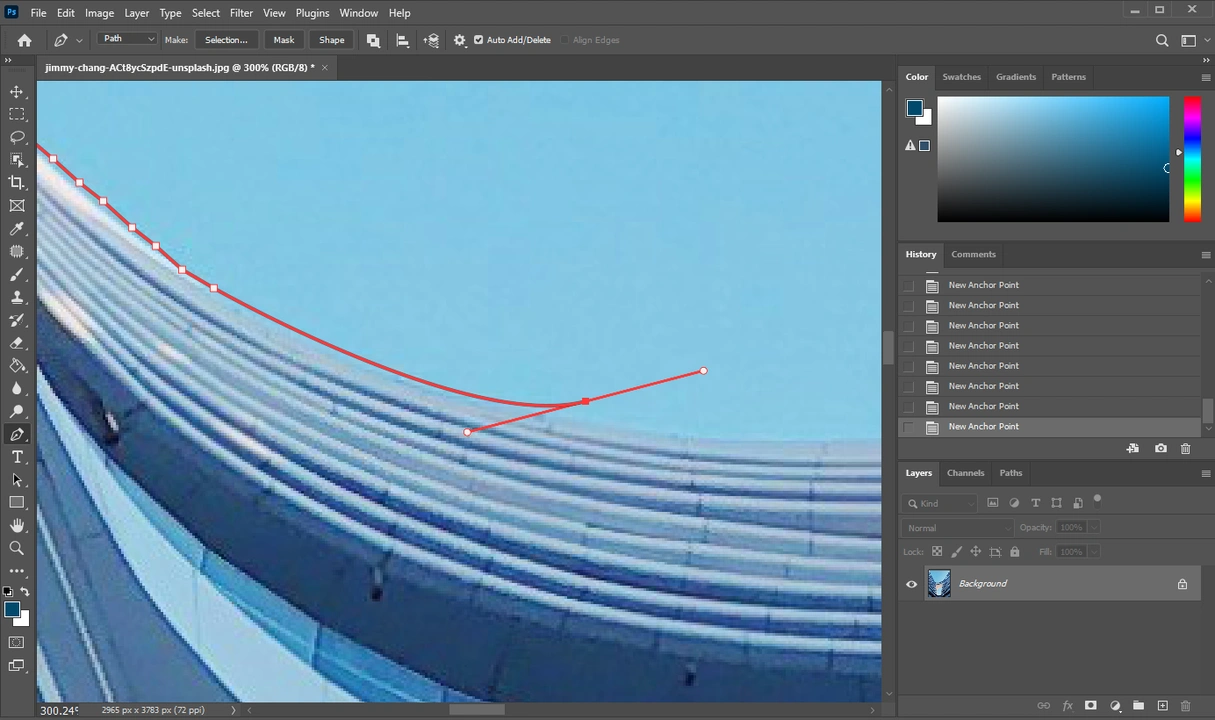
- There are some things that you need to know to make your life easier when working with the Pen tool. Once you create a new anchor point with a curving path, the Control Arms will appear. They dictate the curve between the two anchor points. But why do you need two arms, you may think? You see, the two arms control either side of the curve. The back control arm will adjust the curve of the previous path – the path behind your current anchor point. The front control arm, on the other hand, will control the curve of our next anchor point’s path.
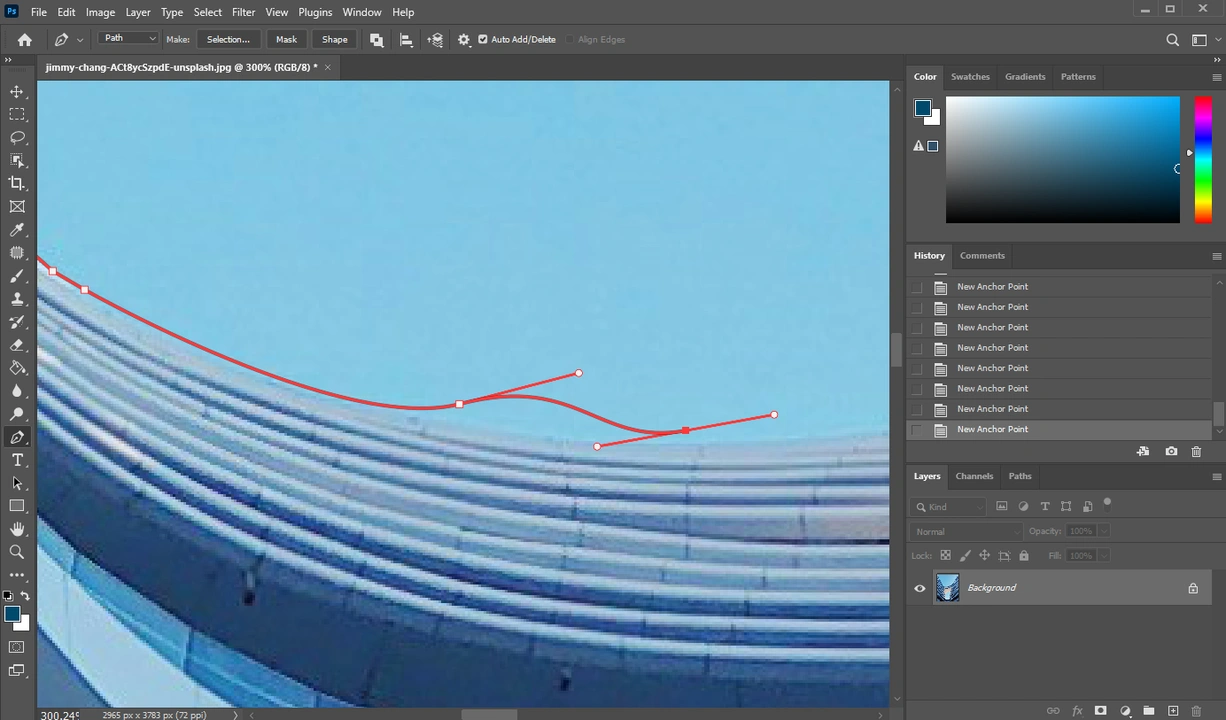 How can you adjust the curve of the path? First of all, to activate the necessary anchor point, press CTRL / CMD and click on it. Then press CTRL / CMD again, click on the point of the necessary control arm – for instance, the back control arm and drag the cursor. Please note that the control arms will be linked, so everything that you do to one control arm will affect the other.
 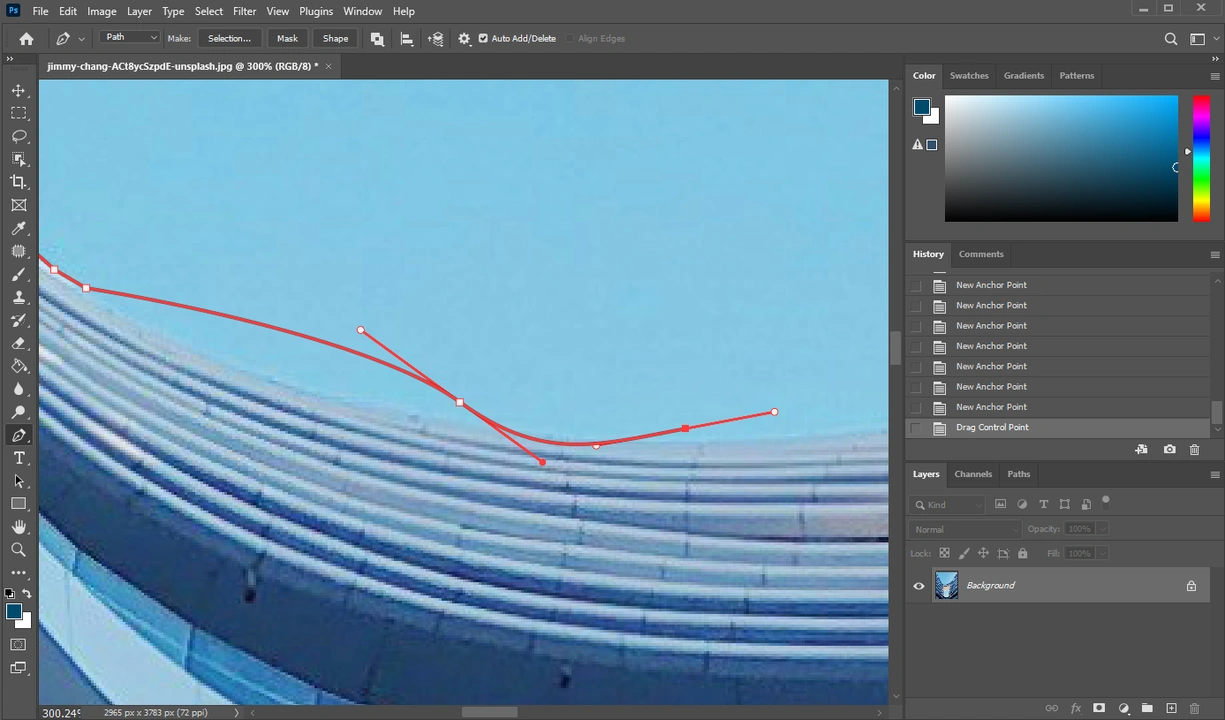 If you want to adjust one of the control arms independently, you will need to hold ALT / OPT, click on the point of the necessary control arm and drag the cursor to adjust the curve.
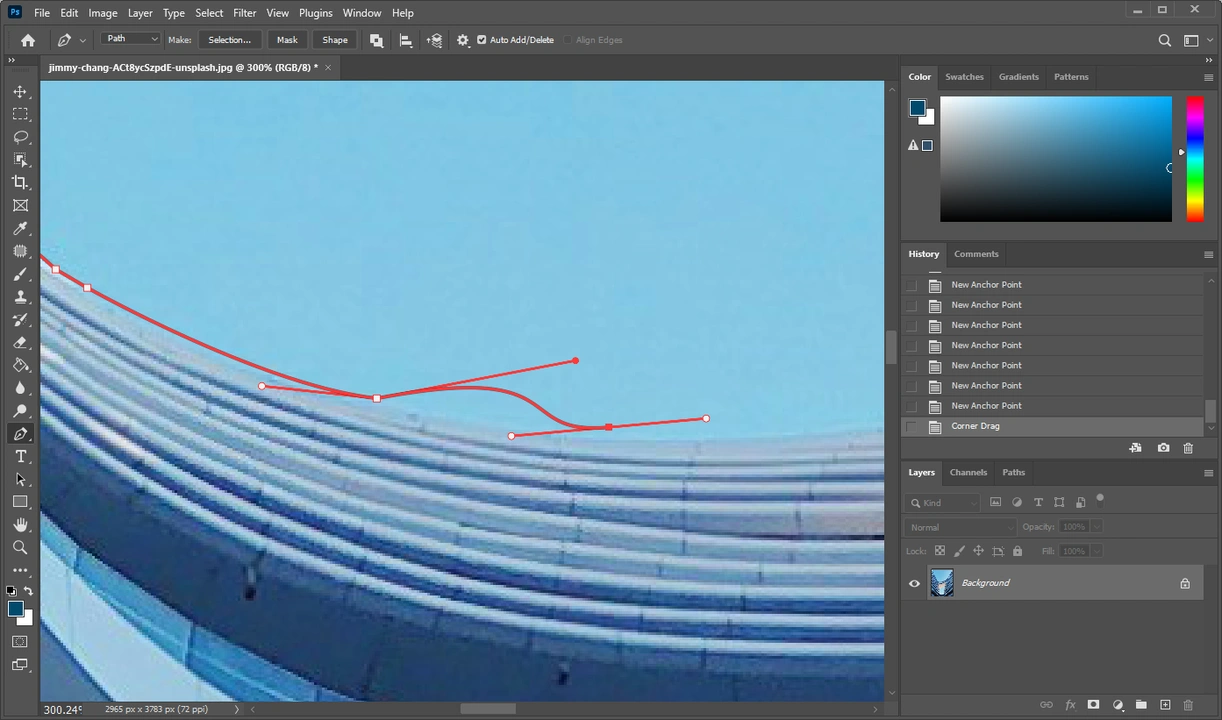
- Now that you’ve made adjustments, are you ready to continue adding to your path? Then hold ALT / OPT and click on the forwardmost anchor point.
- To complete the path, click on the first anchor point that you’ve created. As you can see, some of the background is still visible. That’s okay. This will be taken care of in a couple of moments.
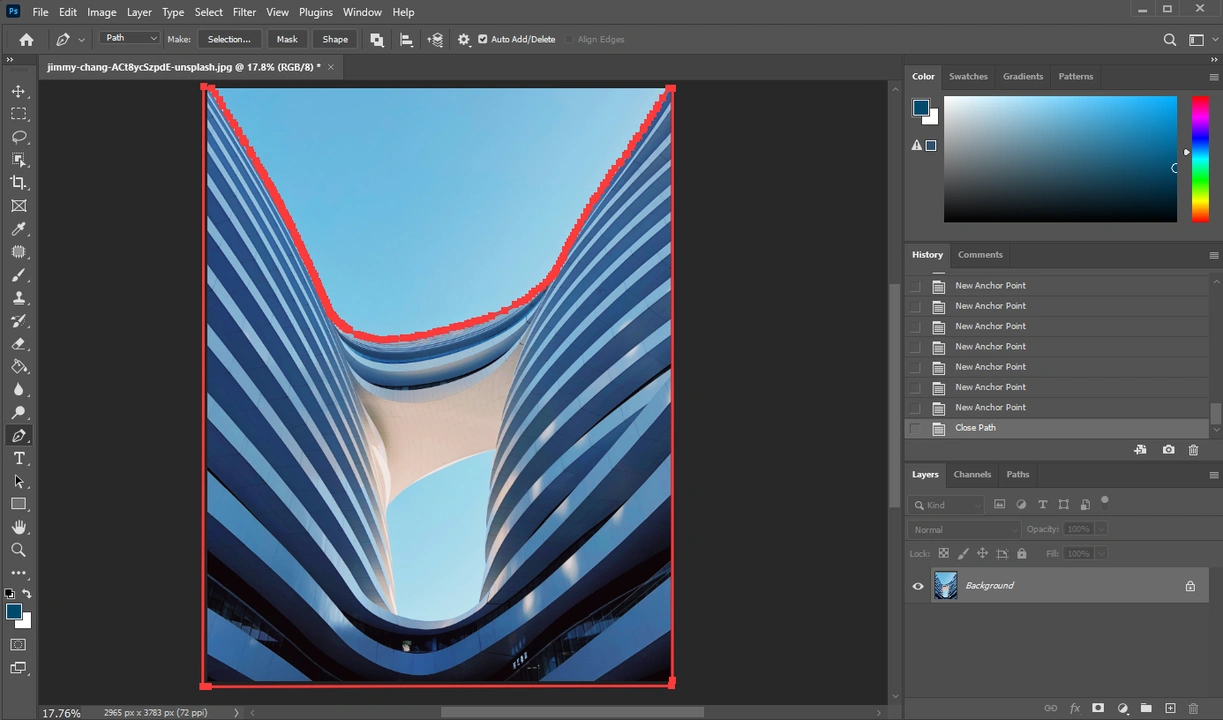
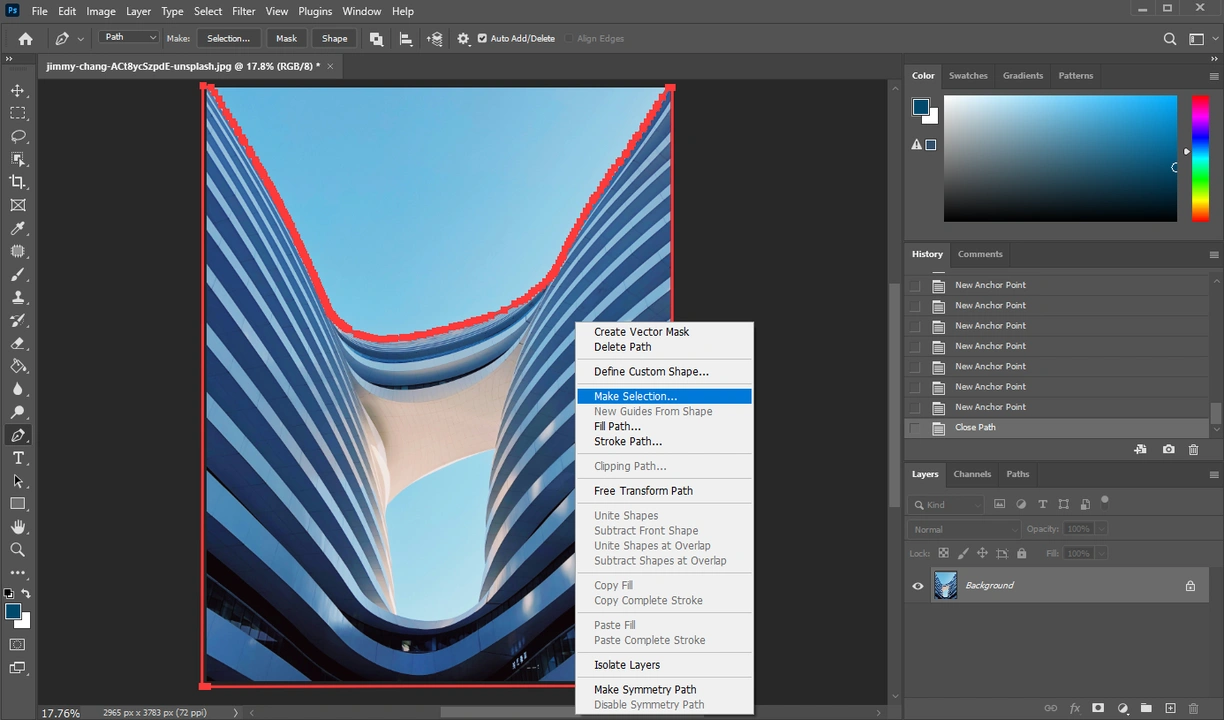
- Right-click on your object and select the Make Selection option.
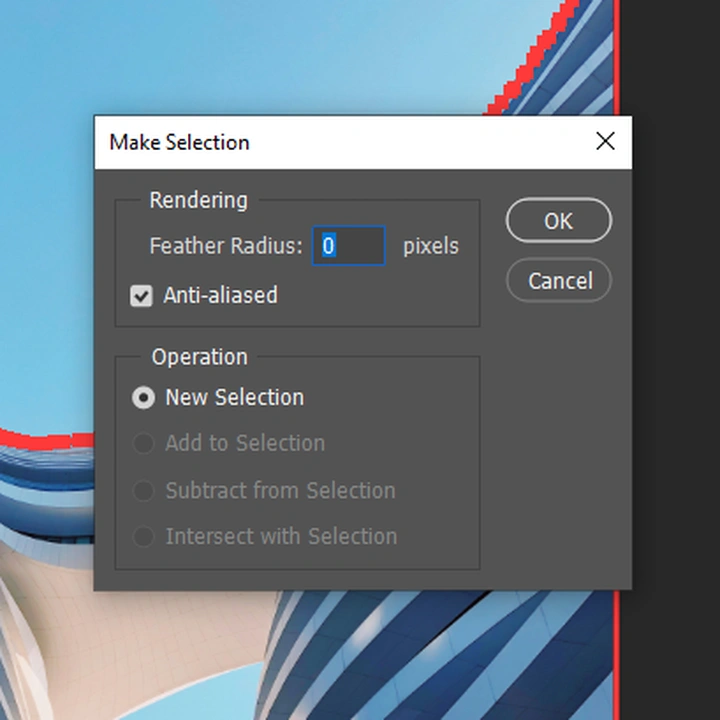
- If you want your selection to have softer edges, adjust the Feather Radius. Then click OK.
- If there’s an area of your selection that should be subtracted, click on the Layer Mask icon.
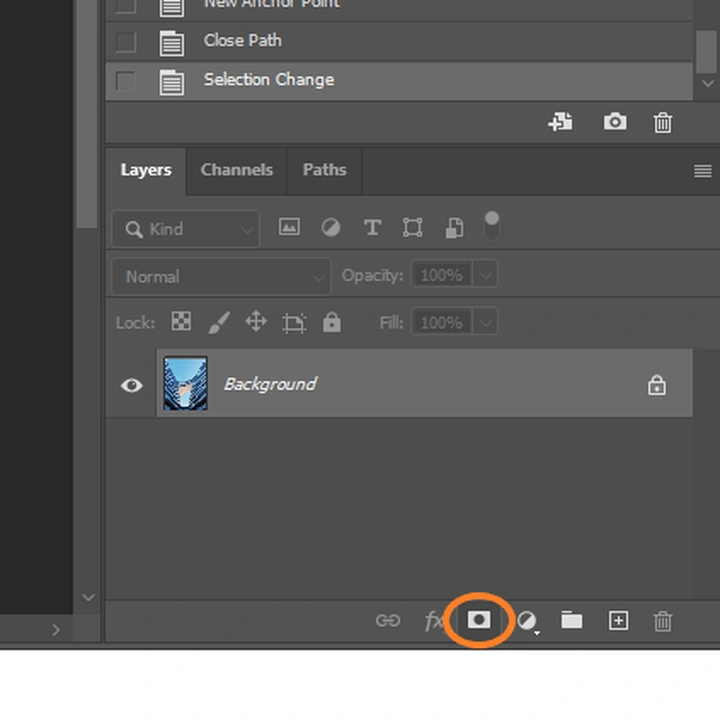
A layer mask will be created and the background will be removed.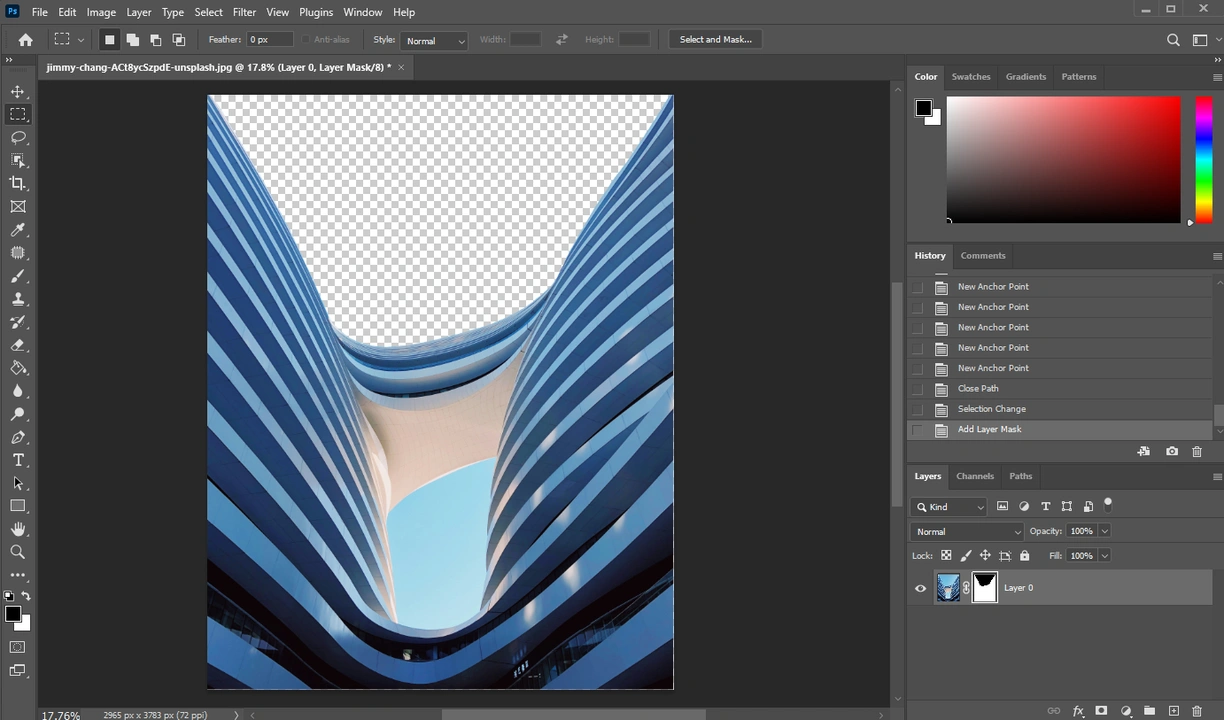
- Now, create a new path.
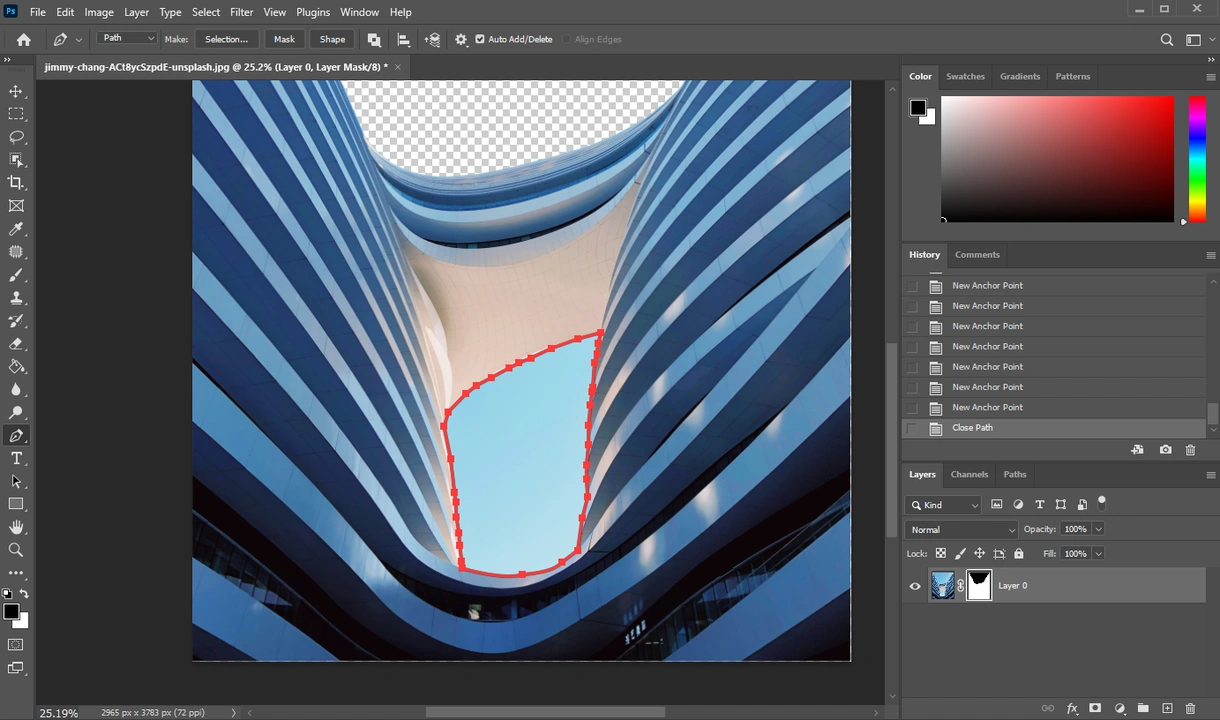
- Right-click and select the Make Selection option again.
- Grab the Paint Bucket and fill this new selection with the black color. Now your object is perfectly cut out!
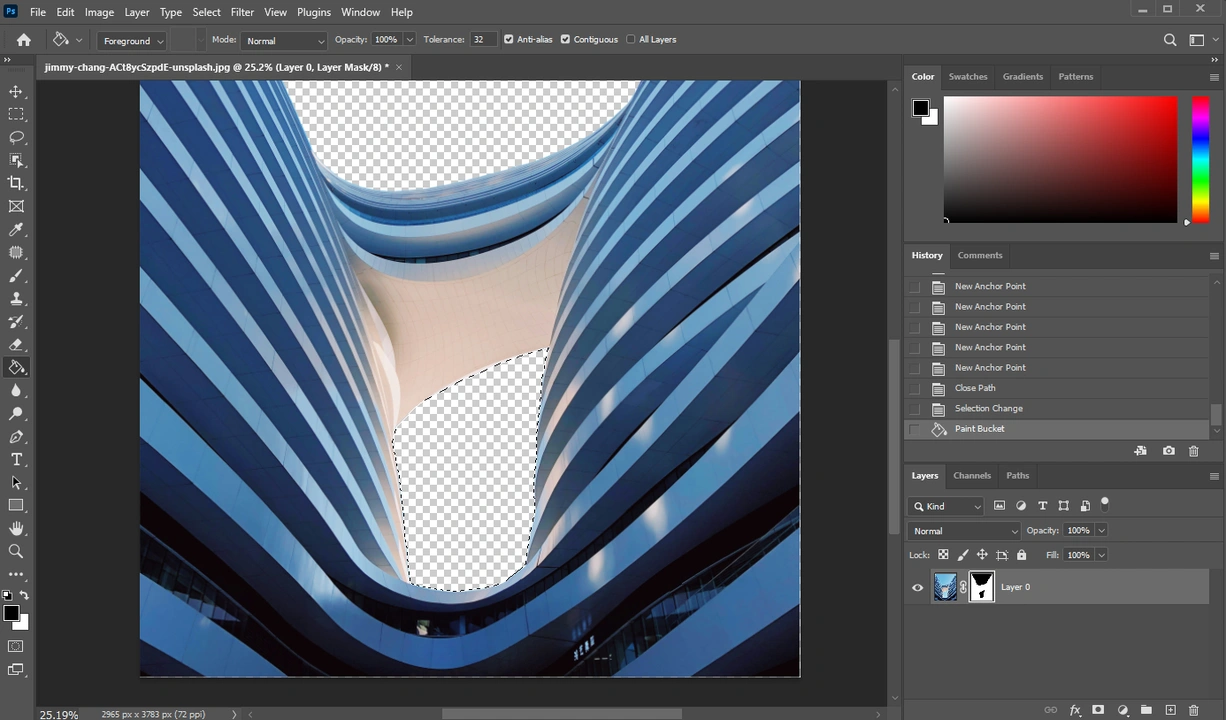
The Pen Tool can be quite tricky to work with, especially if you are not used to it. But this method is perfect for making a more precise selection.
How to Cut Out an Image in Photoshop Using Lasso Tool
Finally, this method is pretty similar to the previous one since here you will also need to manually cut out an image in Photoshop.
Here’s what you will need to do:
- In the panel on the left select the Lasso Tool.
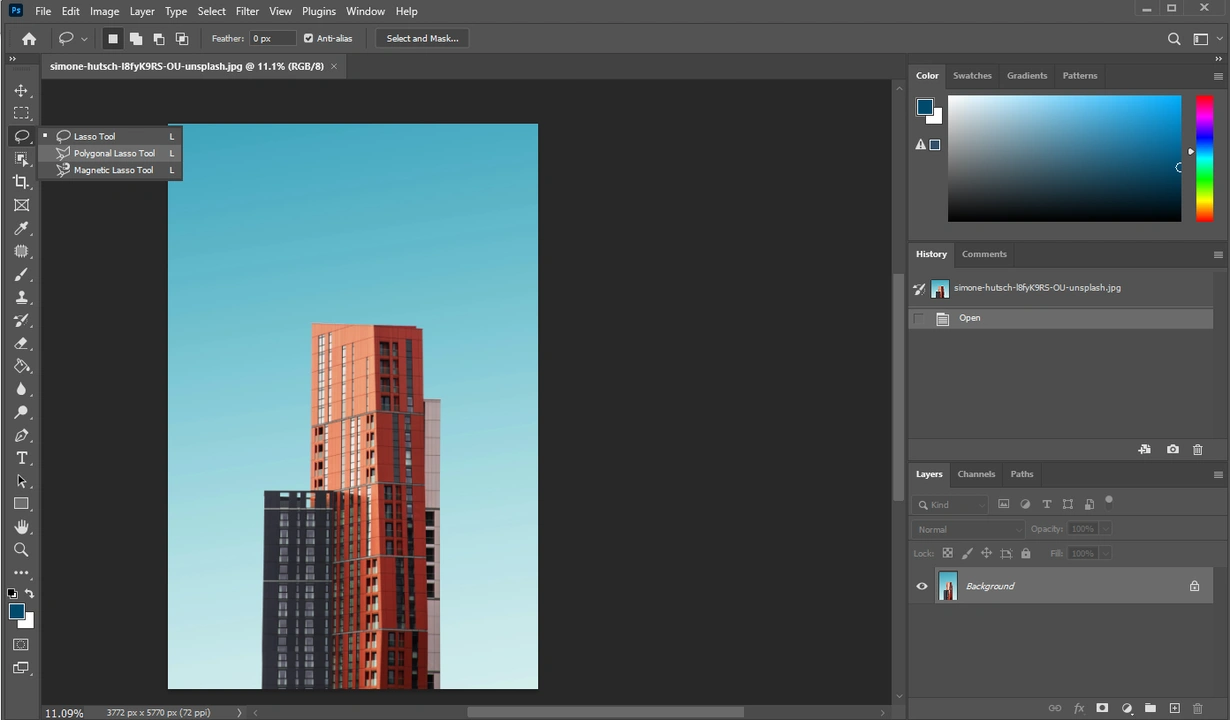
- Click on the edge of your object, then draw your selection around it while holding the left mouse button. Keep pressing the mouse button until you’re ready to finish the selection. There are no anchor points here.
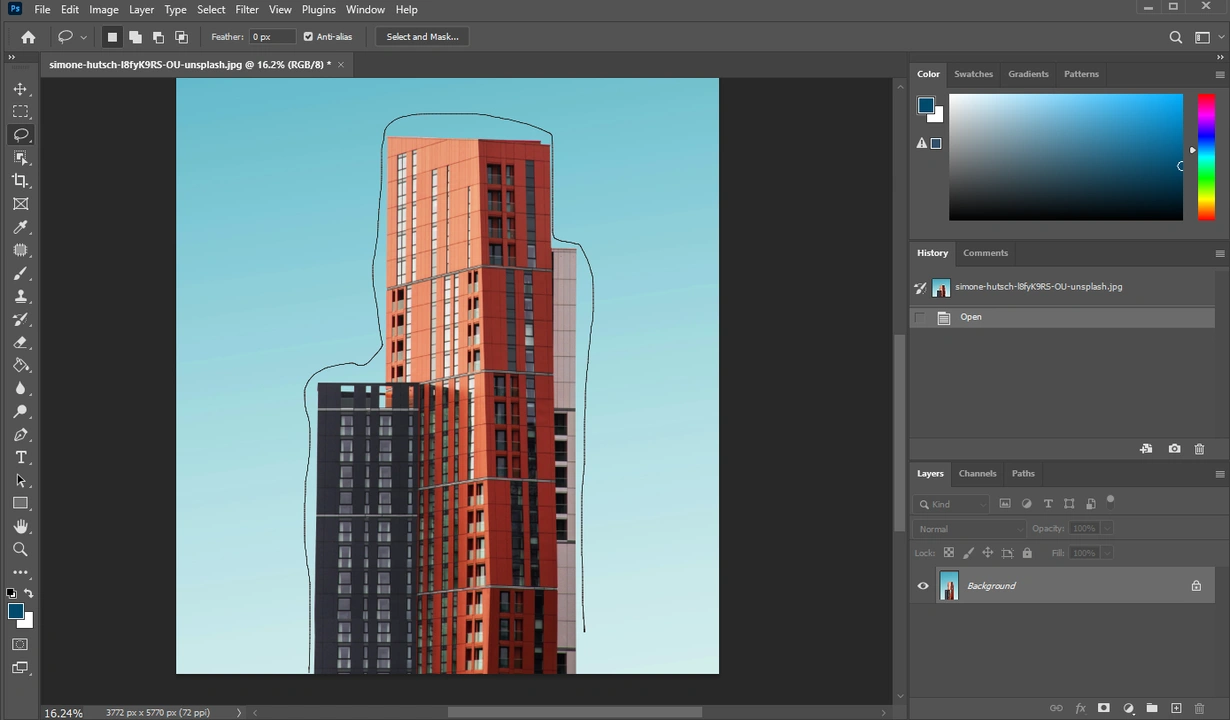
- If you want to select an object with straight edges, it’s better to use the Polygonal Lasso Tool. When working with the Polygonal Lasso Tool, you will need to create new points by clicking along the edge of your object. This is pretty similar to the Pen Tool, except that here you will be able to create only straight lines.
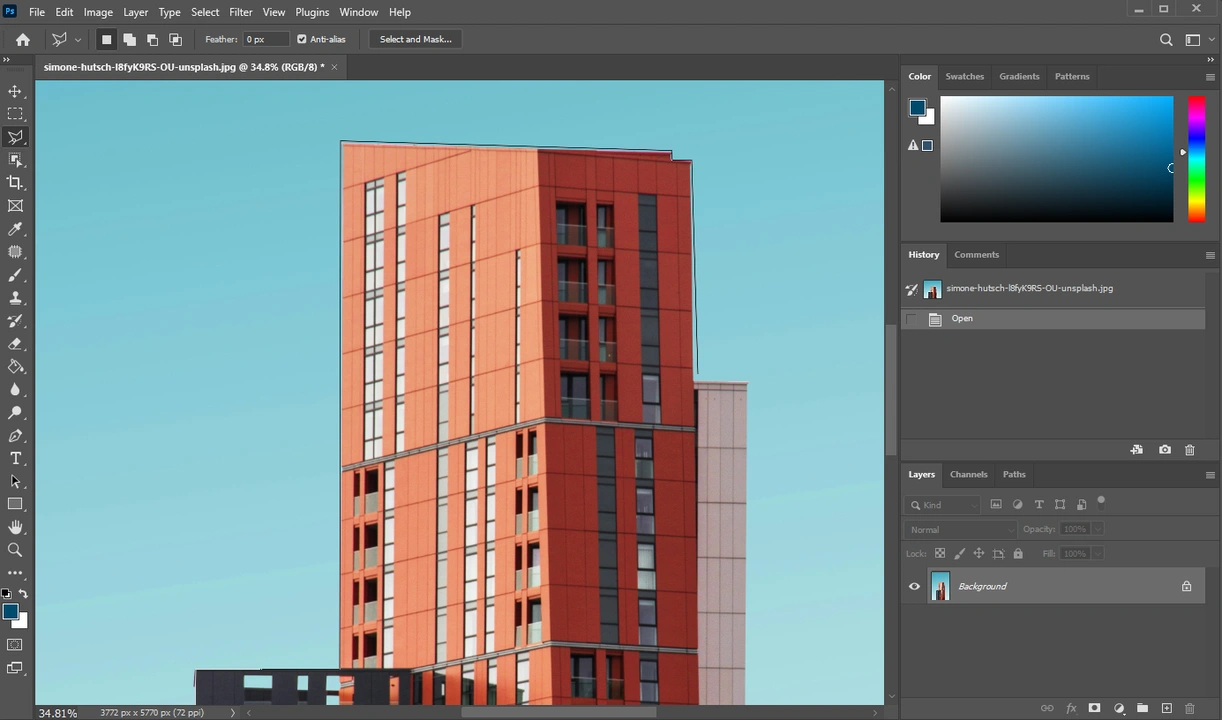
- No matter whether you’re using the Lasso Tool or the Polygonal Lasso Tool, you will need to connect the end to the starting point. This is necessary to create a selection.
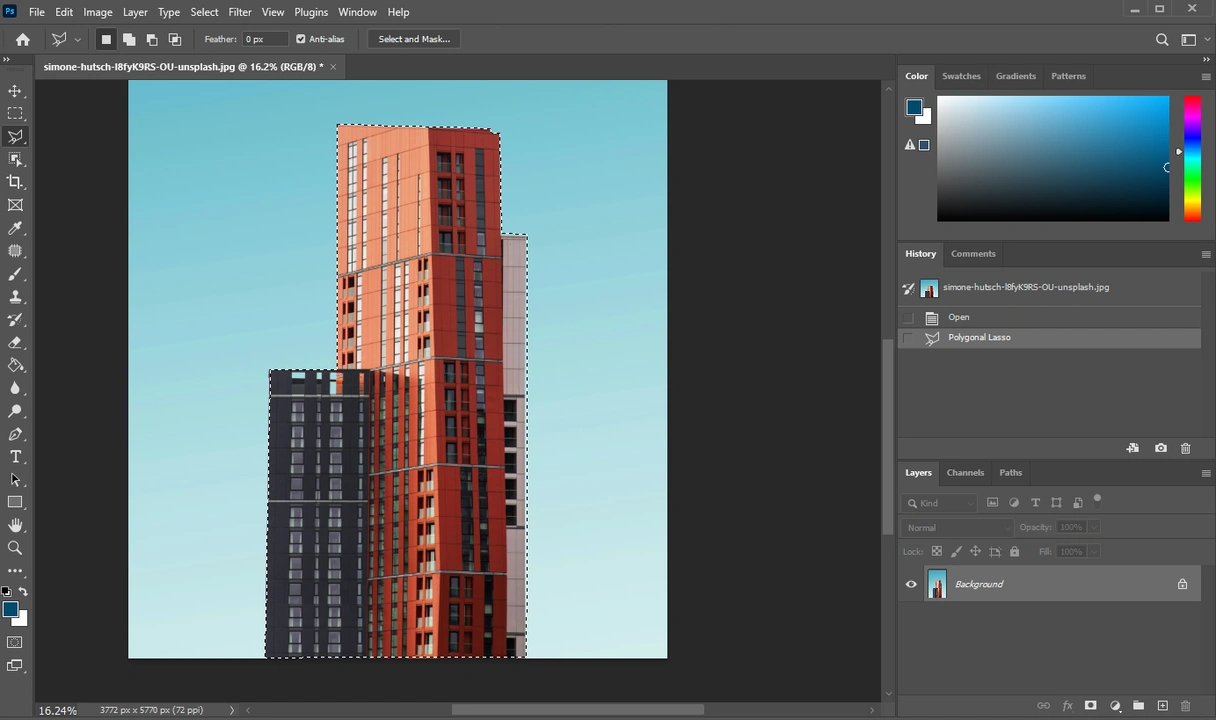
All done! Frankly speaking, the Polygonal Lasso Tool might be more helpful that the regular Lasso Tool, since it’s a bit easier to use.
Why Do You Even Need to Cut Out An Image in Photoshop?
Well, this skill can come in handy if you want to place your cutout on a different background or remove the background completely. The latter will be useful if, say, your logo has a white background, but you want to use it as a watermark. This is how you can remove the background, and your logo will fit in perfectly into any photo.
Also, you can use your cutouts when designing a collage. For instance, you might need to cut out an image in Photoshop to create a YouTube thumbnail.
In fact, you can make a collage in Visual Watermark. It is super simple:
- Open the Add Text to Photo app and import your background image.
- Click on Add Logo, then import your image with the cutout object and transparent background.
- Make the necessary adjustments to the cutout image.
- If you have another cutout image, import it via Add Logo as well.
- You can also add some text by clicking on Add Text button.

And your collage is ready! It’s pretty easy and quick. If you don’t want to switch to another app, you can do the same in Photoshop. The process is pretty similar, though it might require some extra time and effort.
There’s something that you need to know when working with collages. Since you’re basically combining several images into one, your collage might end up being a large-sized file.
Here’s a tip. Save your collage in the highest quality possible. It’s also a good idea to save it as a PSD file if you’re working in Photoshop, so you will be able to make changes in the future, if needed. But don’t post the original large-sized collage to your website! Instead, use Visual Watermark to compress the image – this way, it will look amazing, yet its file size will be much smaller, which is the perfect combination for posting a collage on a website!
Conclusion
Cutting out an image in Photoshop might seem like an intimidating and incredibly complicated task; especially to beginners. Well, the trickiest part is to select the object that you want to cut out. Luckily, Adobe Photoshop offers several different tools that can help you with that. Some of them are simple, while others require more skill, time and accuracy, yet provide more precise results.
This guide has equipped you with all the knowledge and step-by-step instructions on how to cut out something in Adobe Photoshop using different techniques. Hopefully, now you will be able to create a selection around any object regardless of its complexity; even if you are rather new to Photoshop.
 Visual Watermark
 by
by 