 by
by We live in a world where we can snap countless photos and share them in an instant. But there’s still something special about having a tangible photo tucked inside your wallet.
A wallet-size photo is one of those small but meaningful keepsakes that can carry a tremendous emotional impact and serve as a subtle reminder of what matters most. It can be a picture of a loved one, a cherished pet, or a personal milestone. But it’s not just about nostalgia, though. Wallet photos can actually be practical for identification purposes and emergency use.
In this comprehensive guide, we’ll explore everything there is to know about wallet-size photos: what they are, their common sizes and dimensions, how to crop them for printing, and where to get them made. You’ll also learn how exactly you can measure the correct dimensions as well as protect your printed photos.
What Is a Wallet-Size Photo?
A wallet-size photo is a small printed photograph designed to fit snugly inside the card or photo slot of a standard wallet. It’s small enough to be portable, yet large enough to showcase a face or a scene clearly. Its portable size makes it perfect for everyday use.
Types of Photos to Carry in Your Wallet
People carry different types of photos for different reasons. Here are a few common examples:
- Family portraits
- Photos of children or grandchildren
- Photos of a partner
- Couple or wedding photos
- Pet photos
- ID-style headshots
- Memorial photos of loved ones who have passed away
- Photos of a special occasion, e.g. a birthday or a graduation.
Wallet-size prints are also popular for school photo packages or sports team photos.
Reasons to Carry a Photo in Your Wallet
This is a personal choice. Digital photos are, indeed, more convenient. It’ll take you just a few taps to set a photo of your family as your smartphone’s wallpaper. Meanwhile, to put a photo in your wallet, you actually need prep it, then print it somewhere – at home or a print shop.
Nevertheless, there are many reasons to keep a printed photo in your wallet:
- Emotional anchor. A portrait of your child, spouse, or pet can bring some calm or joy as well as provide strength and reassurance during a hectic day.
- Special memories. Photos from significant special events like birthdays, weddings, or graduations can lift your spirits during hard times, as well. Being great memory triggers, they can transport you back to a time, place, or feeling in an instant.
- Emergency ID. If your phone is lost or out of battery, a wallet photo can serve as a backup for identifying a loved one or even yourself. Additionally, you can write some emergency contact information on the back of the printed photo.
- Travel documentation. Some travelers keep photos of important documents or family members in their wallet as a precaution. You can make use of this lifehack, even if you’re not travelling at the moment.
The Dimensions of a Wallet-Size Photo
Let’s talk numbers. Here are the common wallet photo sizes:

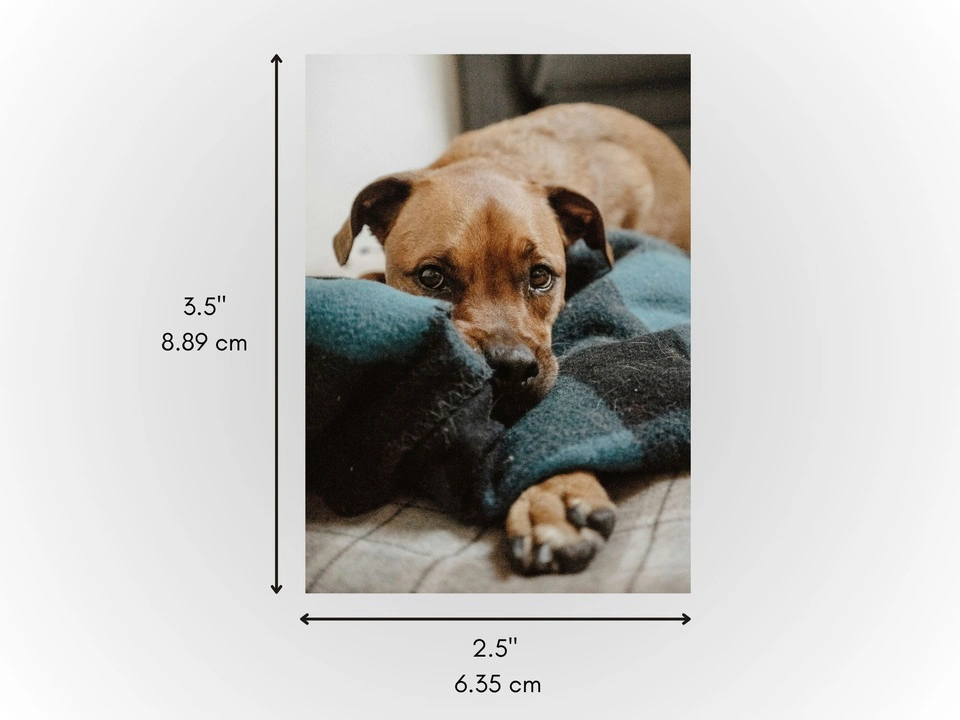
The most popular option is 2.5” x 3.5”, especially in the U.S. It’s suitable for a wallet with a larger compartments. Meanwhile, the 2” x 3” version is slightly smaller and better suited for mini wallets.
But keep in mind that there’s no official standard for a wallet-size photo. In fact, the best dimensions for your wallet photo depend entirely on the type and design of your wallet. Regardless of your wallet being one-of-a-kind or purchased on a popular marketplace, it’s a good idea to measure the photo window or slot where you intend to keep your photo. This way, you will make sure that its size will be correct.
Your printed wallet photo shouldn’t be too big, otherwise you might not be able to fit it into the compartment. You might have to cut or fold it, which isn’t ideal. And if your wallet photo is too small, it might accidentally fall out, and you’ll lose it. So, it’s highly important for your wallet photo to be of the right size to fit in snugly into the allocated space.
Another thing to know is the photo orientation. Which one should you go for? The answer is simple – your wallet-size photo should be portrait-oriented, meaning that its height should be larger than its width.
How to Prepare a Photo for Wallet Size
It doesn’t matter whether you’re printing a photo at home or a print shop, some preparations need to be done.
First, you need to find out the correct dimensions for your wallet photo. Here’s how you can do it:
- Measure the width and height of the wallet slot where you intend to carry your photo. Use a ruler or a measuring tape for this. Write the measurements down.
- Cut out a piece of paper of the same size as the measured width and height.
- Put this piece of paper into the allocated slot. Does it fit in comfortably? Is it too small or too big?
- If the piece of paper is too small, cut out a second piece of paper with slightly adjusted measurements. But if it’s too big, then simply trim the edges, making it smaller.
- Keep making adjustments until you are happy with how the piece of paper fits into the wallet compartment.
- Measure the width and the height of your piece of paper and write the measurements down. These are the correct dimensions for your wallet photo.
Once you know the correct dimensions, you can move on to preparing your digital photo for printing.
You’ll need to:
- Change the aspect ratio. The most common aspect ratios for a wallet-size photo are 2:3 and 5:7. But if the dimensions of your wallet photo are quite different from the common ones, you’ll need to calculate the necessary aspect ratio with the help of an online aspect ratio calculator.
- Make sure your photo has the correct pixel dimensions and resolution. Ideally, your image should be:
 ◦ 600 x 900 pixels for 2" x 3"
 ◦ 750 x 1050 pixels for 2.5" x 3.5"
The resolution must be 300 DPI (dots per inch).
Frankly speaking, if the pixel dimensions of your photo are bigger than the aforementioned ones, you don’t really need to make them smaller. In other words, if your image is 1200x1500px, you don’t need to resize it to 600x900px. When it comes to printing, the more pixels are in your digital photo, the better. Your printed photo will then look clear and sharp.
However, if the pixel dimensions of your photo are smaller than the aforementioned ones, then you’ll need to make them bigger. Otherwise, you might end up with a blurry printed photo.
Here’s a tip
If you found out that the photo you want to print isn’t big enough, you can try to upscale it using Visual Watermark’s image resizer. Just make sure to check the High Quality Resize option.
How to Crop a Photo for Wallet Size with Visual Watermark
Do you have a digital photo that you want to print and put in your wallet? There’s a high chance that you’ll need to crop it to change its aspect ratio before printing. Fortunately, this task is pretty straightforward. You will only need a couple of minutes and an easy-to-use image cropper. For instance, you can use Visual Watermark!
Here’s how it works:
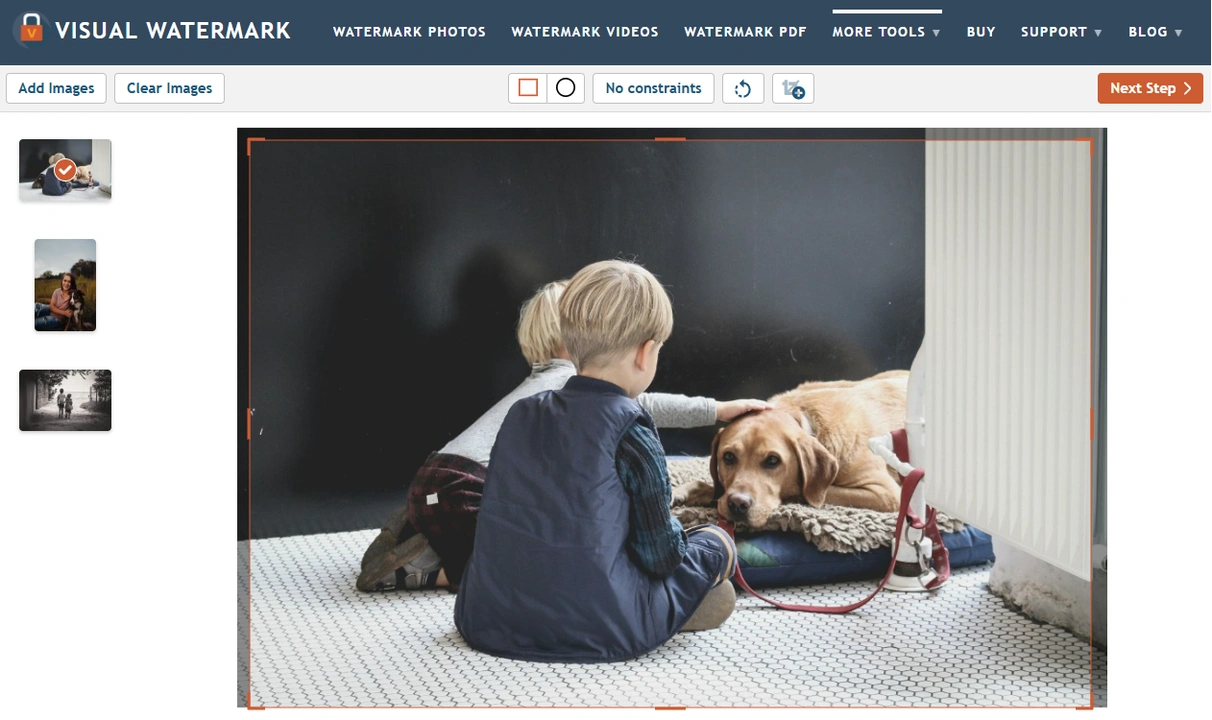
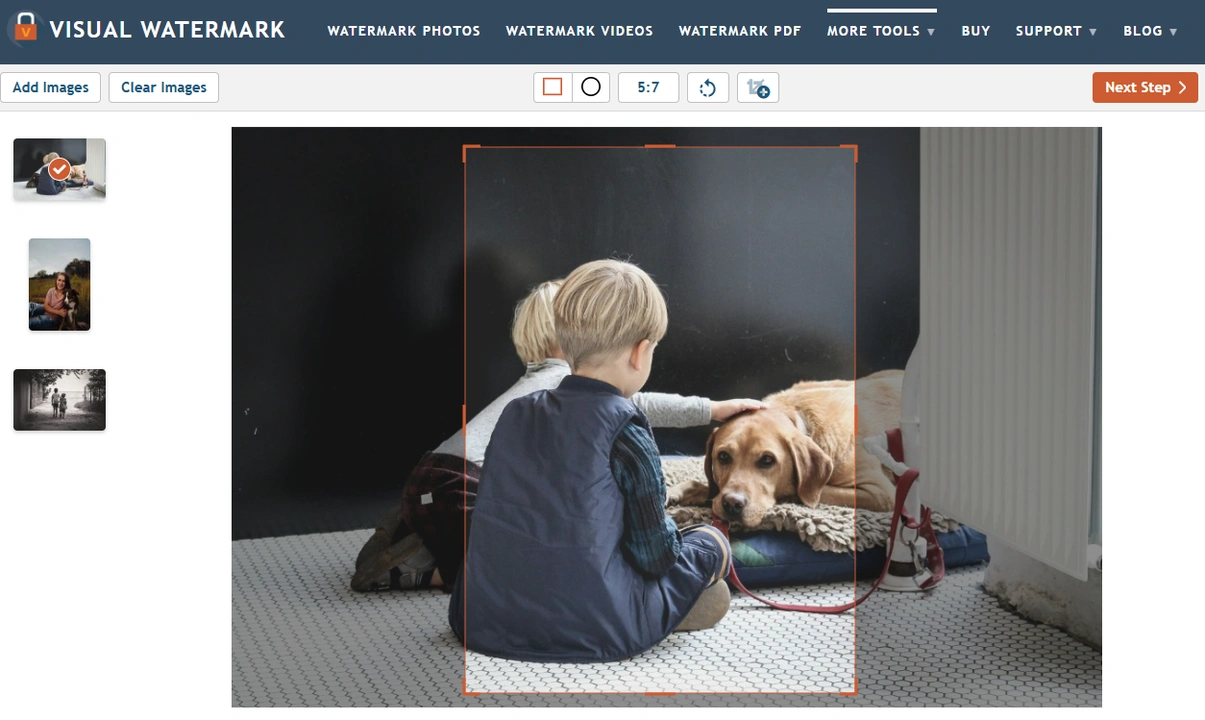
- Open Visual Watermark’s crop tool.
- Drag and drop one or several images that you want to crop. You can also import them by clicking on the Select Images button.
- Click on the No Constraints button and enter your custom dimensions – e.g., the 5:7 aspect ratio.
 Alternatively, you can enter pixel dimensions instead of the aspect ratio. For instance, 750 x 1050px.
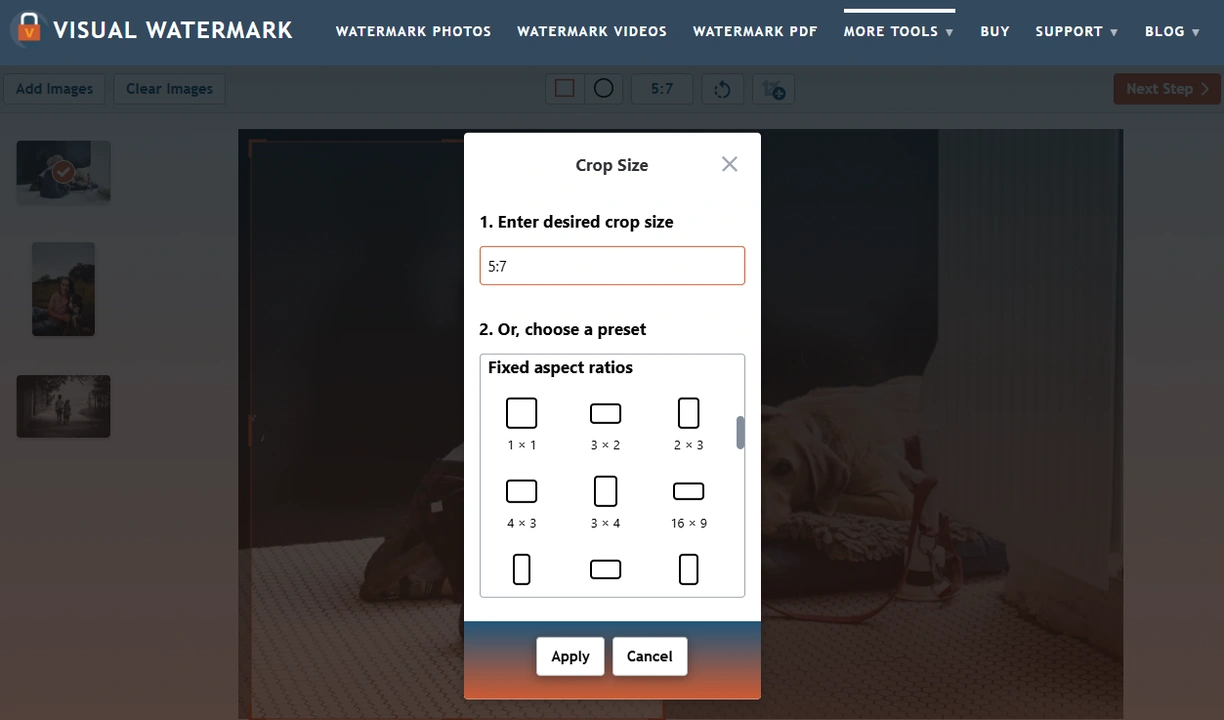
- Click on Apply.
- Position the cropping area as needed. For instance, you can focus on the main subject by placing it right in the center.
- Adjust the size of the cropping area. Since a wallet-size photo is quite small, it’s better to remove as many distractions and redundant elements as possible.
- Make the necessary adjustments to the cropping area on every photo in the batch.
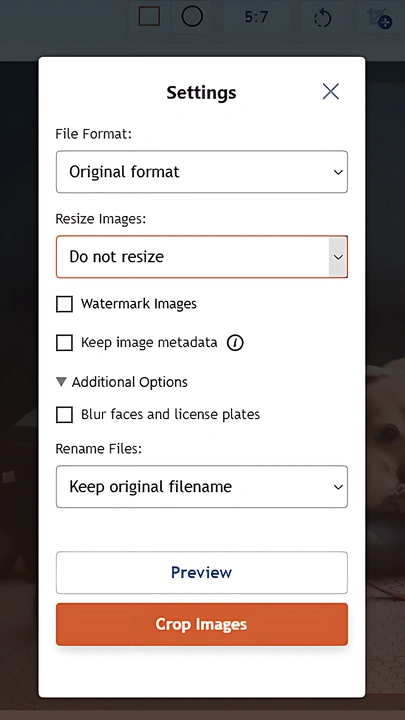
- Click on the Next Step button to get to the export settings.
- Now, there’s something you need to know. If you entered the necessary aspect ratio in the No Constraints menu, then in the export settings you can resize your cropped copies.
But if you entered the pixel dimensions in the No Constraints menu, then in the export settings, the Resize option won’t be available. Instead, the app will tell you that your images will be resized to the pixel dimensions of your choice.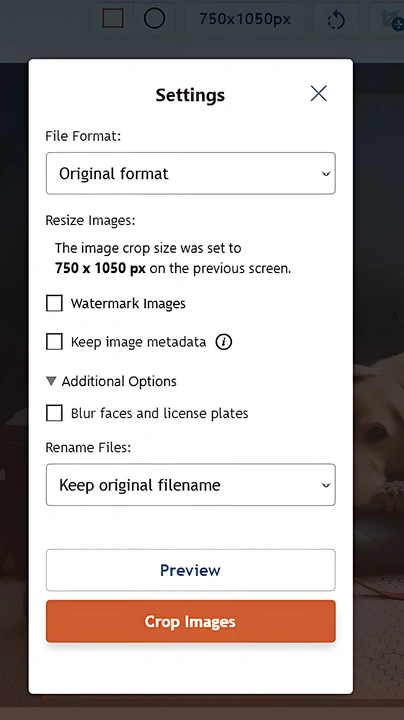
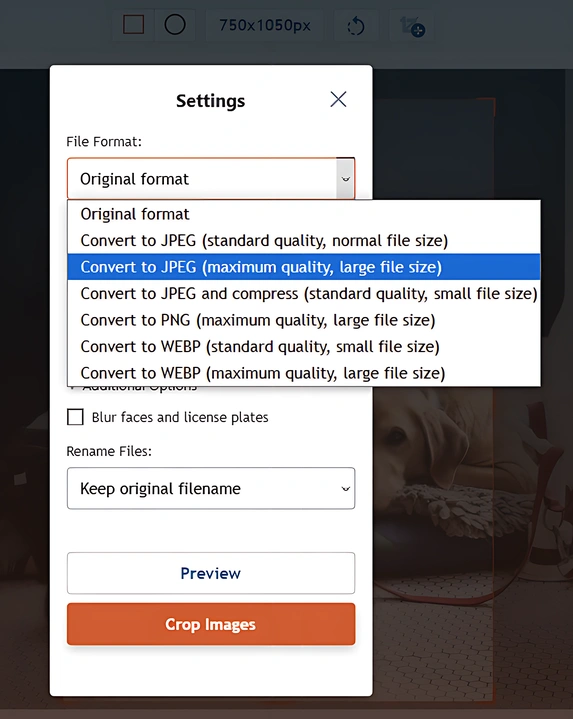
- Make sure to choose the necessary format – JPEG or PNG – and Maximum Quality in the File Format menu. Since you’re going to print out your images, you need their quality to be as high as possible.
- Click on Crop Photos and wait until the app finishes processing. Then download your cropped copies.
Now, you can go ahead and print your beautiful photos!
Are you wondering why you need to crop photos? Well, by changing the aspect ratio to the necessary one, you’ll make sure that all the crucial elements and details will remain within the frame and that the overall photo will look exactly how you want after printing.
Where to Print Wallet-Size Photos
You can print your wallet-size photos at home by yourself or use a professional printing service:
Professional Photo Labs. Do some searching online to find out what print shops and photo labs are near your home or work. Here are some options:
- Mpix. Available in the US. Offers high-quality prints on archival paper.
- Shutterfly. Provides international shipping to over 100 countries. Affordable packages, especially for school or event photos.
- Walgreens, CVS, Walmart, Tesco. Local stores with 1-hour photo services.
Online Printing Services. Services like Printique, Nations Photo Lab, or Amazon Photos allow you to upload, crop, and order prints from your phone or computer.
Home Printing. It might be easier for you to print your photos at home. But there are a couple of things you need to keep in mind:
- Use a color inkjet printer with photo paper.
- Set the “Wallet” size or specify your custom dimensions manually in the printer dialog.
- Use software like Canva or Microsoft Word to arrange multiple photos on one 4x6 sheet.
Protecting Wallet-Size Photos
A printed photo has one notable disadvantage – it’s subject to wear and tear, especially if you carry it every day. Here’s how you can protect your wallet photo:
- Laminate the photo. Laminating protects against scratches, moisture, and fading.
- Use a protective sleeve. If your wallet has no window, keep the photo in a plastic sleeve. There’s no need to keep it in a protective sleeve, if you laminated it, though.
- Print on archival photo paper. Choose acid-free, fade-resistant photo paper for longevity.
- Avoid sun exposure. Keep your photo away from the sun to reduce exposure to UV light. Otherwise, it might fade quickly.
- No humidity or heat. Both humidity and heat can damage your printed photo severely.
- Don’t put multiple photos in one slot. If you put several printed photos together, they might stick to each other or some of the ink might get rubbed off.
- Store backups. Don’t delete the digital copy of your printed photo. If the printed photo gets lost or damaged, you’ll be able to print out the digital copy again.
Final thoughts
Wallet-size photos are portable, personal, and incredibly meaningful. They can lift your spirits or help you out in case of an emergency if your smartphone is out of reach. It’s an easy and practical way to carry treasured memories or important contacts with you.
Now that you know what a wallet-size photo is and how you can measure the correct dimensions, you’ll be able to print it out so that it fits perfectly in your wallet compartment. By choosing the right aspect ratio, pixel dimensions as well as the best place for printing, you’ll end up with crisp, vibrant prints. Then follow our protection tips to make them last for years to come.